Authenticating Users to a Windows NT/2000 Database If you have a Windows NT/2000 domain, your users probably already have a domain username and password. If this is the case, it is probably an easier task on a network administrator to configure ACS to use a remote database. The point here is that having a Windows domain opens up additional features of ACS. Having a Windows domain allows such configurations as Unknown User Policy. If you recall, in Chapter 4, "Enterprise Authentication Servers," you installed the ACS on a server in your network. One of the steps of the install was to enter the IP address of the Windows server. For the time being, this is the server that we are going to use to authenticate users, rather than go the ACS database for a local password. Authenticating to a Windows Domain To configure ACS to perform in this manner, you simply access the user account that you want to authenticate to the Windows NT/2000 domain and select Windows NT/2000 in the Password Authentication drop-down list below the User Setup heading. This causes the user to authenticate with the password on the Windows domain. Authentication and Password Options Authentication and password options greatly depend on the network environment that ACS is deployed in. As seen earlier in this chapter, you can choose to implement local passwords in ACS and allow users to change passwords with the UCP module. Of course, your network security might be at such a high priority that you choose to implement an ACS device in conjunction with a token server. You might also choose strict lock-out policies in the ACS device or on a Windows NT/2000 domain. Either way, at some point, you need to face the task of managing user authentication and password options. The User Setup of ACS enables you as the administrator to choose separate passwords for the Challenge Handshake Authentication Protocol (CHAP), Microsoft-Challenge Handshake Authentication Protocol (MS-CHAP), or AppleTalk Remote Access Protocol (ARAP). These protocols never send the actual username and password over the network but rather a hash that can be re-created and authenticated on either side. Because it would be foolish to use a protocol such as Password Authentication Protocol (PAP), which sends the username and password in clear text across a network and then uses the same password for devices requiring CHAP/MS-CHAP, or ARAP authentication, you can choose to create separate passwords in the ACS database. User Callback and Client IP Assignment ACS also provides for user callback. This sends a string to the access server that allows a user to be called back at a predefined number. This is also a security measure that ensures authentication. The options for callback follow: Use group settings This uses the group settings configured for callback. No callback allowed Select this option if you want to disable the callback feature for this user. Callback using this number This is the option that you select to specify the number to always call this user back at. This is very secure; however, the user cannot roam. Dialup client specifies callback number This can be used if you want users to be able to roam and specify their own callback number. Use Microsoft NT/2000 callback settings This option can be selected if you want to inherit the callback settings in Windows NT/2000.
Another authentication option that can be configured is client IP address assignment. The following list contains the options for client IP assignment: Use group settings This option is selected if you want to use the group configured settings to assign IP addresses to users. No IP address assignment If you have group settings that are assigning addresses to users in that group and you do not want a particular user to be assigned addressing from that group, you select this box. This overrides the group IP addressing assignments. Assigned by dialup client You select this if you want to use the IP address from the dialup client. This again overrides the group IP addressing assignments. Assign static IP address This can be used in situations where administrators are making dial-in connections and you want to assign them a specific IP address. The reason this works well for administrators is because this gives you the ability to filter network access based on IP address. Assigned by AAA client pool You can configure a client address pool on the AAA client. You can then choose this option and enter the name of the AAA client address pool in ACS. When the user authenticates, ACS assigns an address from that client address pool. Assigned from AAA pool This is an alternative to configuring address pools on the AAA client. This creates the pool on the ACS device itself. You can see how this is configured in the step sequence after this list. Select the AAA server IP pool name in the Available Pools list and by clicking the right arrow button, that pool moves into the Selected Pools list. If more than one pool exists in the Selected Pools list, the users in this group are assigned to the first available pool in the list. You can also change the order that the pool is selected by selecting the pool name and clicking the Up or Down button until you are satisfied with the selections in place. This changes the order of the pool. The pool at the top of the list is used first. Once again, keep in mind that the IP assignment in User Setup overrides the IP address assignment in Group Setup.
To set up a local AAA pool, follow these steps: Step 1. | Select Interface Configuration.
| Step 2. | Select Advanced Options.
| Step 3. | Place a check mark in the box marked IP Pools, as shown in Figure 7-11.
Figure 7-11. Enabling IP Pools 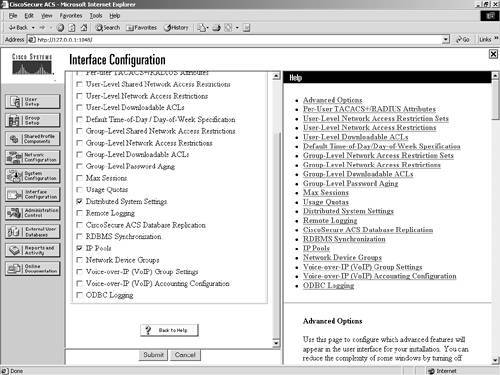
| Step 4. | Select Submit.
This makes the IP Pools portion of the configuration visible in the ACS interface.
| Step 5. | Select System Configuration.
| Step 6. | Select IP Pools Server.
| Step 7. | Select Add Entry.
| Step 8. | Enter a name for your address pool, as shown in Figure 7-12.
Figure 7-12. Naming an IP Pool 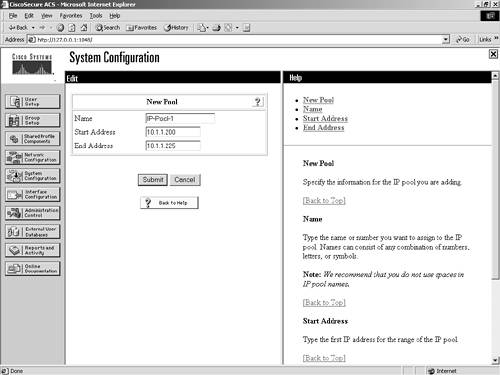
| Step 9. | Enter a Start address.
| Step 10. | Enter an End Address.
| Step 11. | Select Submit.
| Step 12. | You now see an address pool entry in the ACS interface. At this point, you have a few options. You can allow pool addresses to overlap by selecting the button Allow Overlapping Pool Address Ranges, you can Refresh, or you can Cancel. If you note in the chart with your address pool entry, you can determine the percentage of the address pool that is used. Use the Refresh button to monitor this value. In this situation, you select the Cancel button. This is simply to navigate away from this page without saving settings.
| Step 13. | From the Select menu, now choose the link IP Pools Address Recovery. This is yet another management aspect of IP address assignment. Here you can reclaim addresses after a specified amount of time.
| Step 14. | Select Cancel.
|
Now that the IP Pool has been created, you next apply it to one of the users that you have created. To do this, you need to access the user account and edit the IP Pool assignment. By default, no IP Pool is selected. To configure an IP Pool assignment, follow these steps: Step 1. | Select User Setup.
| Step 2. | Select List All Users.
| Step 3. | Select the user aaauser, which you want to add an IP pool to, from the User List in the right frame. Figure 7-13 demonstrates this list.
Figure 7-13. User List 
| Step 4. | Scroll to Client IP Address Assignment.
| Step 5. | Select Assigned from AAA pool.
| Step 6. | Select the IP pool from the list of available pools.
| Step 7. | Select the right arrow to place the available pool into the Selected Pools list. (See Figure 7-14.)
Figure 7-14. Selecting an IP Pool 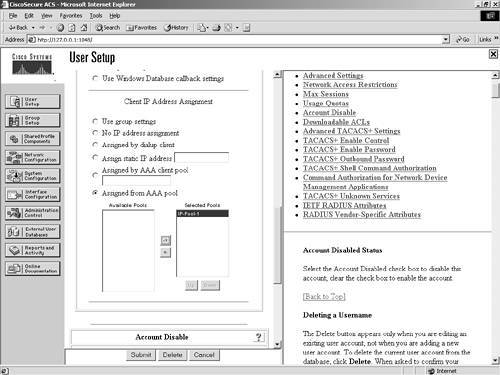
| Step 8. | Select Submit.
|
|