| If this is your first time installing ACS, you want to follow the next set of instructions as well as provide some information during the install. If you are reinstalling ACS, you need to combine the installation steps in this section with the information in the section titled "Reinstalling ACS and Using an Existing ACS Database." For a new install, you want to have some basic information prepared as well as be logged in to the device to run the install program of ACS with Administrator rights. You need to know the IP address and name of at least one device that acts as a client to ACS. We call this a network access server (NAS). You also need to know what protocol the NAS uses to communicate with ACS. The available protocols are Terminal Access Controller Access Control System Plus (TACACS+) or Remote Authentication Dial-In User Service (RADIUS). TACACS+ uses TCP port 49, and RADIUS uses UDP ports 1812 and 1645 for authentication and 1813 and 1646 for accounting. RADIUS ports 1812 and 1813 are the registered RADIUS ports and are specified in newer RADIUS implementations. TACACS+ can encrypt the entire body of the message. RADIUS encrypts only the password portion of the data. TACACS+ was developed by Cisco Systems and is an enhancement of the protocol TACACS, which used UDP. You should also plan on having a shared secret key. This needs to be the same both on the NAS and the ACS. The shared secret key is used when passing messages between the ACS device and the AAA client. This encrypts the entire packet if you choose to use TACACS+ and the password in the packet if using RADIUS. This does not, however, encrypt communication between the user's device and the AAA client. The last piece of information to have prepared is the Windows server address. This allows you to use a Windows database for authentication as well as the ACS database. After you gather the necessary information, you can proceed with the install of the server software, as follows: Step 1. | Begin by inserting the ACS CD into the CD-ROM drive, and as long as you have auto-run enabled, your installation of ACS begins. If you are using the trial download of ACS, you extract the ZIP file to a folder, browse to that folder, and double-click the setup.exe icon. If you have not met the service pack requirements, you receive a message; however, you can still proceed with the install. You can install the required service packs at a later time. ACS might not work properly until you do so.
| Step 2. | The first step of the actual installation process is to read and agree to the software agreement.
| Step 3. | After you have accepted, you see the Welcome screen. By choosing the Next button, you are prompted with the Before You Begin screen. This is where you confirm the minimum requirements to install ACS have been fulfilled. This includes information for the first AAA client that you install. You need information such as the protocol to use for communication, the AAA client name, IP address, and the TACACS+ or RADIUS secret key. This screen does not add this information; rather it verifies that you have the information ready. This is seen in Figure 5-1. Choose the Explain button for detailed requirements.
Figure 5-1. Confirming the Minimum Requirements 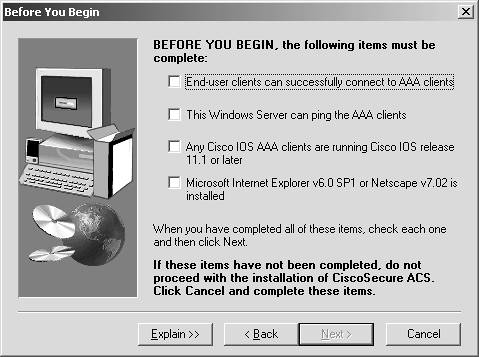
| Step 4. | After choosing Next, you are prompted to choose the destination directory for ACS to install to. Select Browse if you want to change the default location. If you select a location that does not exist, the setup program creates the directory for you. When you are finished, select the Next button.
| Step 5. | You now see the Authentication Database Configuration dialog box. You have the option to check only the ACS database or to check a Windows 2000/NT database. The CiscoSecure Database can handle around 100,000 users and has a higher level of performance than choosing to check a Windows 2000/NT database. The performance increase comes from the amount of time saved by checking a local database to ACS as opposed to authenticating and communicating with an external database for authentication.
If you decide to also authenticate users to a Windows Security Access Manager (SAM) or Active Directory user database and have selected the Also check the Windows 2000/NT database option, you are also able to refer to the Grant dial-in permission to user setting in the Windows Database option. Users are not allowed to authenticate if this is not selected in the Windows 2000/NT database.
| Step 6. | Select the databases to check, and choose the Next button.
| Step 7. | Your next window is for active service monitoring. In this window, you can choose to send e-mail notifications and specify the mail server to use for this. ACS active service monitoring gives you the ability to ensure that the services ACS needs to run are always available, and when an issue occurs, the e-mail function allows you to respond. When you select Next, you are taken to a Cisco Secure ACS Network Access Server Details page, as seen in Figure 5-2.
Figure 5-2. Cisco Secure ACS Network Access Server Details 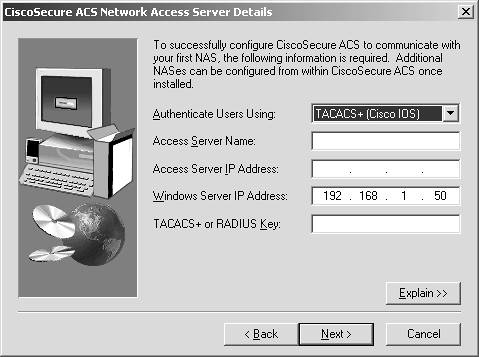
| Step 8. | In the Cisco Secure ACS Network Access Server Details page, input the information that you prepared before beginning the installation. If you choose any protocol other than TACACS+ (Cisco IOS) or RADIUS (Cisco IOS/PIX), your install begins immediately. If you do choose TACACS+ (Cisco IOS) or RADIUS (Cisco IOS/PIX), you are given the opportunity to configure the Cisco IOS Software. The install program gives you a list of the required AAA commands, and a button that Telnets to the NAS for you to enter these commands. You can also select the Print button to print the minimum Cisco IOS configuration to your default printer.
| Step 9. | You're not finished yet! You must now choose which advanced options to make visible in your server. You can enable these at a later time; however, I prefer to enable them all at the time of install. These options affect what is visible in the HTML interface. The ones you should select depend on your network and how you plan to use ACS. Your final window starts the ACS services.
|
ACS runs seven services in total. Those services are CSAdmin This provides the HTML interface to administer ACS. The ACS web server listens on port 2002. To access the ACS server in a web browser, type http://127.0.0.1:2002. You are then redirected to another port. CSAuth This provides authentication and authorization service. Its role is to permit or deny users authentication or authorization requests. It can retrieve this information from the internal database or an external server. It pulls the authentication and authorization information and store it in the internal database of ACS. It is also responsible for processing unknown user requests. CSDBSync This service provides the synchronization between the ACS database and a third-party database. CSLog The CSLog service captures all logging information from the TACACS+ or RADIUS packet and CSAuth and then places it in a comma-separated value (CSV) file. More logging information is covered in Chapter 12, "Reports and Logging for Windows Server." CSMon CSMon performs four separate activities: - Monitoring the ACS. - Recording and reporting of all exceptions to a log file. - Notification to the administrator of all potential issues with the ACS. - Response to these issues by automatically attempting to reconcile these problems. This is an application-specific utility.
CSTacacs This service speaks between CSAuth and TACACS+ NAS devices. It is capable of running simultaneously with the CSRadius service. CSRadius This service speaks between CSAuth and RADIUS NAS devices. It is capable of running simultaneously with the CSTacacs service.
You can now access your ACS: Step 1. | If you selected the checkbox option to launch ACS, you're ready to go. If not, there should be a link on your desktop named ACS admin.
| Step 2. | You can access ACS by selecting the ACS admin link or opening your web browser and opening http://127.0.0.1:2002. At this time you must configure ACS from the device that it is installed on. Later, you configure a local username and password for administrative access.
|
|