Recipe 5.14. Customizing Right-Click Menu Choices in Windows Explorer
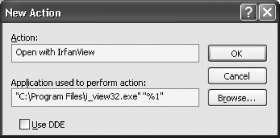
ProblemYou want to customize the pop-up shortcut menu that appears when you right-click on a file in Windows Explorer. The pop-up menu differs according to the program that you right-click on. So if you right-click on a graphics file, for example, one set of programs will appear on the menu, and if you click on a text file, a different set of programs will appear on the menu. You want to be able to change the choices that appear for specific file types. And you want to add new choices to the pop-up menu, so that you can do things such as easily move and copy files between folders. SolutionUsing a graphical user interfaceIt's easy to add choices to the right-click pop-up menu for specific file types. Let's say that you want to add a shortcut menu item that would allow .gif files to be opened with the graphics viewer and editor IrfanView. Here's how to do it:
Figure 5-13. Use the New Action dialog box to add an item to a file's shortcut menu Add and remove destinations for the Send To optionA particularly useful item on the right-click context menu is the Send To option, which allows you to send the file you've selected to anyone of a list of programs or locations, for example to a drive, folder, or program. When you install new programs, some install various options on this menu choice. You can, however, easily delete or add to options on the menu. In Windows Explorer go to C:\Documents and Settings\<User Name>\SendTo, where <User Name> is your user name. The folder will be filled with shortcuts to all the locations that you find on your Send To context menu. To remove an item from the Send To menu, delete the shortcut from the folder. To add an item to the menu, add a shortcut to the folder by highlighting the folder, choosing File Using the RegistryYou can use the graphical user interface to add a menu choice to the Open With dialog box for specific file types. But if you want to add the same shortcut menu item to every type of file, you'll have to use the Registry. Here's how to do it:
Cleaning up Explorer's Open With optionsThe previous parts of the recipe will let you add items to the Open With menu. But what if you find that the Open With menu for a particular file type is filled with too many options, or there are programs that you don't want to be there? Use the Registry to clean it up:
Add Copy To Folder and Move To Folder context menu optionsA substantial amount of the time, when you open Windows Explorer, you're going to want to perform one of two functions: Move a file between folders or copy a file to another folder. But doing these two simple tasks requires a fair amount of dragging files, or manually copying and pasting them. However, you can use the Registry to add Copy To Folder and Move To Folder options to the right-click context menu. Then, when you right-click on a file, you can chose either option from the menu and you'll be able to browse to any place on your hard disk to copy or move the file to, and then send the file there. To do it:
Figure 5-14. When you choose the Copy To Folder option on the right-click context menu, you'll use this dialog box to specify where you want the file copied Open the command prompt from the right-click menuXP may be a GUI, but that doesn't mean that you don't need the command prompt at times. There may be times when you want to open the command prompt from the right-click menu. Frequently, when you use the command prompt, you're going to want to perform an action from your current folder, so it would be nice to be able to open the command prompt to the current folder. For example, if you were to right-click on the C:\Current Work folder, you could then choose to open a command prompt at C:\Current Work. To add an option to the right-click menu:
Using downloadable softwareDownload and install a free copy of Microsoft's Open Command Window Here PowerToy from http://www.microsoft.com/windowsxp/pro/downloads/powertoys.asp. When you get to the page, look for the Open Command Window Here section. Click on the link next to CmdHere.exe. After you download it, run CmdHere.exe, and the option will be added to the right-click context menu. DiscussionWhen you right-click on a file in Explorer, the shortcut menu that appears includes a list of programs with which you can open the file. To open the file with a given program, choose the program, and you'll be able to open the file with it. This pop-up menu differs according to the program that you right-click on. So if you right-click on a graphics file, for example, one set of programs will appear on the menu, and if you click on a text file, a different set of programs will appear on the menu. Some programs, when you install them, automatically put themselves on that pop-up menu. But not all do. So this recipe lets you customize the pop-up menu so that certain programs appear on it for certain file types. It also lets some programs appear on every file type. And it allows you to remove some programs from appearing when you right-click on a file. See AlsoPC Magazine has an excellent utility, ContextMenu Plus, that makes it easy to edit, add, or remove menu commands from any Windows context menu. Get it at http://www.pcmag.com/article2/0,1759,1554248,00.asp. You can only download it if you're a subscriber to the PC Magazine utilities library; if you're a subscriber, it's free. |
EAN: 2147483647
Pages: 408
 Folder Options
 File Types.