Xandros Desktop OS, Version 3.0 Deluxe
| I decided to include Xandros 3.0 here for a couple of reasons. One is that it isn't one of the big-name distributions. The second is that its commercial product comes with CrossOver Office preinstalled, making it easy to run a number of Windows applications (e.g., Microsoft Office, Quicken, Adobe Photoshop), should you have a need to do so. While Xandros offers a free distribution version, their commercial product does provide a number of additional products to simplify the switch from Windows to Linux for those who have more of an investment in their legacy operating system. Let's take a look at the Xandros 3.0 Deluxe install. Start by putting your CD in the drive and rebooting your system. The initial boot screen is kind of nice, with a Xandros logo to the right (Xandros: Making Linux Work for You) and hardware and boot information showing up on the left. Eventually, the logo fades out, very dramatically, to be replaced by the rather classy-looking, graphical Xandros installation screen. There isn't much to do here other than clicking Next. The screen that follows is the license, which explains that part of the programs included with a Xandros distribution are GPL while others are not (the CodeWeavers CrossOver Office product, for instance), thereby making this a single-user distribution. That said, the license permits you to install Xandros on unlimited home computers (for noncommercial use) and one commercial-use system. Once you accept the agreement, you can click Next. There are two installs possible . . . an express install and a custom install. I'll give you details on the custom install. Under Software Selection, you'll find four desktop possibilities. The minimal desktop comes in at 904MB, the standard at 1262, and the complete at 1268; the custom desktop starts at 844MB and goes up from there. Given the small difference between standard and complete, I opted for complete. Below these choices is a software list of the various packages that will be installed. Each has a checkbox to the left so that you can make changes to your selection. Click Next, and the installer moves you to the Disk Configuration screen. Under Disk Configuration, you have the option of using free space, taking over a disk or partition, or managing the partitions manually. There is also an option for resizing a Windows FAT, FAT32, or NTFS partition. Not having a copy of XP loaded, I did not test this. Finally, there is an option for upgrading an existing Xandros installation. Since I wanted to give the automatic install as much leeway as possible, I chose "Take over disk or partition" and clicked next. I was presented with a list of existing partitions to choose from. I selected one, clicked Next, and was taken to the summary screen. The partition I chose would be formatted as ReiserFS. As for swap, the installer noticed my existing swap partition and chose to use it. Perfect! The next screen was for Network configuration, and my card was detected without a hitch. The default is a dynamic setting, which is great for people with a DSL or cable modem connection. Since this machine is to be part of an existing network, I clicked Edit and entered the IP address, default gateway, and DNS info. Under Administration configuration, I was asked to enter the admin password. Rather than using "root" as the admin username, the system defaults to "Administrator" (presumably to make the Windows users feel at home). I entered the password and gave the computer a name (XANDROS). Before clicking Next here, you might want to look at two additional options for installations. These allow you to Enforce strong passwords and Make user home folders private. The next screen had me configure individual nonadmin users (for everyone who will be using the system). Good. I added my own username, chose a password, and moved on. That was it. An installation summary screen gave me a quick recap of my settings and warned me that it would take over all the data on the chosen partition. Fine with me. I clicked Finish and watched the install take place. A status bar along the bottom showed the progress of the installation. A few minutes later, the install was complete. Just before exiting, you have the opportunity to create a rescue/boot diskette. This whole process takes a only a couple more minutes. After it was over, I clicked Exit to restart my system. The boot screen that follows offers three choices: a default boot, a safe mode boot, and an administrator configuration boot. Choose the default option by pressing Enter (or just wait a few seconds), and the system comes up normally. The login screen is relatively plain, with a graphical box requesting your username and password. If you configured only one user, this will be the default, so enter your password and log in. The first time you log in, you will be presented with the First Run Wizard (Figure B-4). The first screen asks you to customize your mouse preferences for right- or left-hand use. I'm a right-handed guy living in a right-handed world, but I thought this was a rather thoughtful touch. Figure B-4. Xandros Desktop OS 3.0 desktop.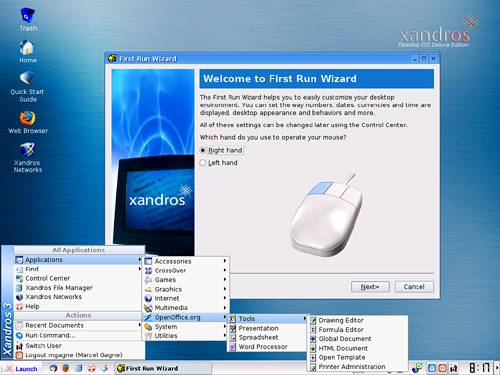 Clicking Next takes you to the Regional Settings. This is basically your language of choice, keyboard layout, and so on. Click Next again and enter the correct date, time, and time zone. When you are done here, click Next, and the Connection Wizard will help you set up your Internet connection. This wizard will take you through the steps to connect using a DSL line, a local LAN, a SLIP connection, or a modem. Once you are done with this, click Next, and another wizard will let you set up your printer. When you have done so, click Next. You are almost there. Next, the System Behavior screen offers a number of settings, including window decoration and style, whether you single-click or double-click to launch a program, and so on. For starters, you might want to just accept the default (which is KDE's Plastik theme), but the button labeled "Keep Current Behavior" lists a number of other system defaults, including a Windows-like style. Click Next when you are through here and you will be at the Registration screen, where you can register your copy of Xandros online. There is only one more screen after this, and it is an important one. Two buttons are available. One is the Xandros/KDE Control Center, from which you can change a number of the settings you have already made. The other button is labeled Xandros Networks. This will allow you to connect to Xandros and download any updates that might apply to your current release. Software updates are installed by double-clicking on the Xandros Networks icon. Several sections are available through this, including the Xandros online shop, new application installs, and application updates. I checked for updates and found the process very simple. Updates are listed as security updates, driver updates, and so on. Each has a description with an "Install now" link. After clicking on the link, you will be asked for the admin password, after which the process begins. |
EAN: 2147483647
Pages: 247