Naming Groups of Data
When you work with large amounts of data, it s easier to identify groups of cells that contain related data. In the following graphic, for example, cells C2 through C6 hold the prices of items from a customer s order.
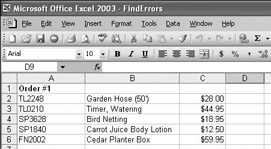
Rather than specify the cells individually every time you want to use the data they contain, you can define those cells as a range (also called a named range ). For instance, you could group the items from the previous graphic into a range named OrderItems1 . Whenever you want to use the contents of that range in a calculation, you can simply use the name of the range instead of specifying each cell individually.
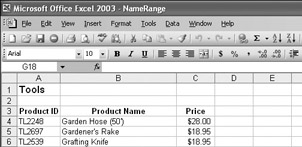
You can create a named range in a number of ways, two of which you can access through the Insert menu. The first method works well if you have a column of data with a label at the head of the column, as in the following graphic.
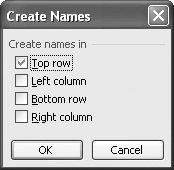
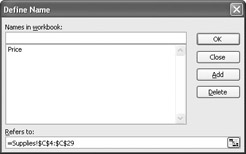
In this case, you access the Create Names dialog box by pointing to Name on the Insert menu and clicking Create. In the Create Names dialog box, you can define a named range by having Excel use the label in the top cell as the range s name. You can also create and delete named ranges through the Define Name dialog box, which you access by pointing to Define on the Insert menu and clicking Name.
A final way to create a named range is to select the cells you want in the range, click in the Name box next to the formula bar, and then type the name for the range. You can display the ranges available in a workbook by clicking the Name box s down arrow.
| Important | Every range in a workbook must have a unique name. Assigning the name of an existing range to a new range removes the original reference, likely affecting how your worksheet behaves. |
In this exercise, you will create named ranges to streamline references to groups of cells.
USE the ![]() NameRange.xls document in the practice file folder for this topic. This practice file is located in the
NameRange.xls document in the practice file folder for this topic. This practice file is located in the ![]() My Documents\Microsoft Press\Office 2003 SBS\PerformingCalculations folder, and can also be accessed by clicking Start/All Programs/Microsoft Press/Microsoft Office System 2003 Step by Step .
My Documents\Microsoft Press\Office 2003 SBS\PerformingCalculations folder, and can also be accessed by clicking Start/All Programs/Microsoft Press/Microsoft Office System 2003 Step by Step .
OPEN the ![]() NameRange.xls document.
NameRange.xls document.
-
If necessary, click the Tools sheet tab.
-
Click cell C3 and drag to cell C18.
The selected cells are highlighted.
-
On the Insert menu, point to Name , and then click Create .
The Create Names dialog box appears.
-
If necessary, select the Top row check box.
-
Click OK .
Excel assigns the name Price to the cell range.
-
In the lower left corner of the workbook window, click the Supplies sheet tab.
The Supplies worksheet appears.
-
Click cell C4 and drag to cell C29.
-
On the Insert menu, point to Name , and then click Define .
The Define Name dialog box appears.
-
In the Names in Workbook box, type SuppliesPrice and then click OK .
Excel assigns the name SuppliesPrice to the cell range, and the Define Namedialog box disappears.
-
In the lower-left corner of the workbook window, click the Furniture sheet tab.
The Furniture worksheet appears.
-
Click cell C4 and drag to cell C18.
-
Click in the Name box.
The contents of the Name box are highlighted.
-
Type FurniturePrice , and press [ENTER].
Excel assigns the name FurniturePrice to the cell range.
-
On the Insert menu, point to Name , and then click Define .
The Define Name dialog box appears.
-
In the Names in workbook list of the Define Name dialog box, click Price .
Price appears in the Names in workbook box.
-
In the Names in workbook box, delete Price , type ToolsPrice , and then click OK .
The Define Name dialog box disappears.
-
On the Standard toolbar, click the Save button.
CLOSE the ![]() NameRange.xls document.
NameRange.xls document.
EAN: 2147483647
Pages: 350