Designing a New Form
If an existing form or sample isn t close to what you need, you can start with a blank form. When designing a new form, InfoPath will define your data source automatically as you work.
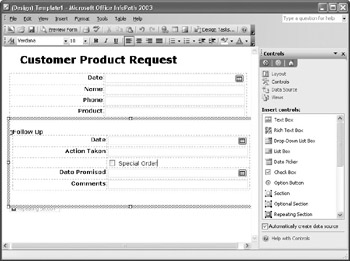
In this exercise, you will create a form for recording customer requests for products that are not immediately available from The Garden Company.
-
In the Fill Out a Form task pane, click Design a Form .
-
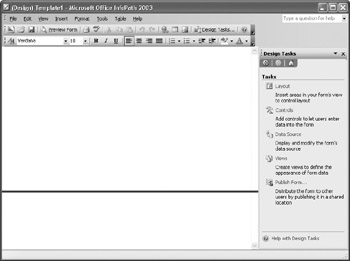
In the Design Form task pane, click New Blank Form .
InfoPath opens a new form and displays the Design Tasks task pane.
-
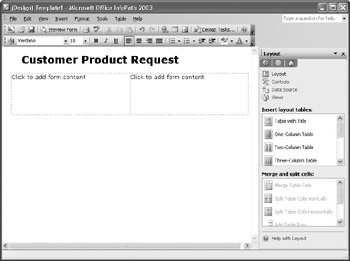
At the top of the form, type Customer Product Request . Then select the text you just typed, and on the Format menu, click Font .
The Font task pane appears.

Tip You can also access the Font task pane by right-clicking selected text and clicking Font on the shortcut menu, or by clicking the title of the task pane and clicking Font in the Other Task Panes list. If you prefer, you can set font formatting directly on the Formatting toolbar.
-
In the task pane, select the Bold check box, and in the Size list, select 18 .
The appearance of the text reflects your formatting choices.
-
Press the [ ’] key, and press [ENTER].
-
On the toolbar at the top of the task pane, click the Back button.
The Design Tasks task pane appears.
-
In the task pane, click Layout . Then in the Insert layout tables list, drag Two Column Table to the blank form, below the title.
The blank table is inserted into your form.
-
Drag the horizontal line at the bottom of the table up to make the row only tall enough to fit a single line of text.
-
Drag the vertical line between the two cells to the left until it is below the d in Product in the title.

-
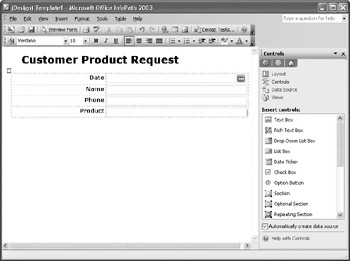
Click in the first cell , type Date , and then select the text you typed.
-
On the Formatting toolbar, click the Bold button, click the Align Right button, and then press [TAB] twice.
Your text is formatted, and a second row is added to the table.
-
Type Name , and press [TAB] twice. Then in the third row, type Phone , press [TAB] twice, and in the fourth row, type Product .
-
In the task pane, click Controls .
The Control task pane appears.
-
In the Insert controls list, drag the Date Picker control to the cell to the right of Date .
The new field is inserted into the cell.
Tip By default, InfoPath automatically creates your data source when you design from a blank form. However, the field names are not meaningful ”for example, field1 or field2 rather than RequestDate or CustName . To change a field name, right-click the control, and click Properties on the shortcut menu.
-
In the Insert controls list, drag the Text Box control to the cell to the right of Name .
-
Drag a Text Box control to the cell to the right of Phone , and then drag another Text Box control to the cell to the right of Product .
-
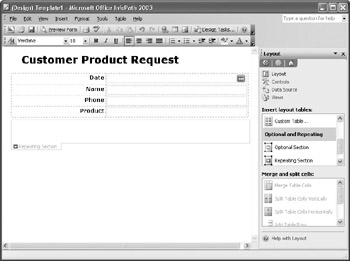
Press the [ “], and in the task pane, click Layout . Then in the Insert layout tables list, under Optional and Repeating , click Repeating Section .
A blank repeating section is inserted at the end of the form.
-
Click in the repeating section, and type Follow Up . Then select the text, on the Formatting toolbar, click the Bold button, press the [ ’] key, and press [ENTER].
-
Select the table at the top of the form (the one you created earlier in this exercise), and on the Edit menu, click Copy .
-
Click in the repeating section, and on the Edit menu, click Paste .
The table is inserted into the repeating section.
Tip A blue and white information icon appears in fields that store duplicate data ”as do all the fields in your form at this time. Point to one of the fields to see how it is labelled.
-
In the repeating section, click the Date Picker box in the first row, and press [DEL].
-
In the task pane, click Controls . Then in the Insert controls list, click Date Picker .
A new date control that uses a different field name than the date field in the first table is inserted into the cell.
-
Press [TAB], and in the first cell of the second row, type Action Taken .
-
Press [TAB], press [DEL], and in the Insert controls list, click Text Box . Then press [TAB], and in the first cell of the third row, type Date Promised .
-
Press [TAB], press [DEL], and in the Insert controls list, click Date Picker . Then press [TAB], and in the first cell of the fourth row, type Comments .
-
Press [TAB], press [DEL], and in the Insert controls list, click Text Box . Then click in front of Date Promised in the first cell of the third row of the table, and on the Table menu, point to Insert , then click Rows Above .
A blank row is inserted between Action Taken and Date Promised .
-
Click in the second cell of the new row, and in the Insert controls list, click Check Box .
A check box is inserted into the row, with a label of Field 9 .
-
Select the label, and type Special Order .
-
On the File menu, click Close . When prompted to save the form, click Yes .
The Save as dialog box appears.
-
Browse to the
 My Documents\Microsoft Press\Office 2003 SBS\Design folder. Then in the File name box, type CustomerRequest , and click Save.
 InfoPath saves and closes your form.
Tip To fill out a form based on this template, click On My Computer in the Fill Out a Form task pane. Then browse to the location where the template is saved, click the template you want, and click Open .
EAN: 2147483647
Pages: 350