Using Input Masks to Restrict Data
When you use masks in tables or forms, people entering information can see at a glance the format in which they should make entries and how long they should be. You can use the InputMask property to control how data is entered in text, number, date/time, and currency fields. This property has three sections, separated by semicolons, like the mask for a telephone number, shown here:
!\(000") "000\-0000;1;#
The first section contains characters that are used as placeholders for the information to be typed, as well as characters such as parentheses and hyphens. Together, all these characters control the appearance of the entry. The following list explains the purpose of the most common input mask characters :
| Character | Description |
|---|---|
|
| Required digit (0 through 9). |
| 9 | Optional digit or space. |
| # | Optional digit or space; blank positions are converted to spaces;plus and minus signs are allowed. |
| L | Required letter (A through Z). |
| ? | Optional letter (A through Z). |
| A | Required letter or digit. |
| a | Optional letter or digit. |
| & | Required character (any kind) or a space. |
| C | Optional character (any kind) or a space. |
| < | All characters that follow are converted to lowercase. |
| > | All characters that follow are converted to uppercase. |
| ! | Characters typed into the mask fill it from left to right. You can include the exclamation point anywhere in the input mask. |
| \ | Character that follows is displayed as a literal character. |
| Password | Creates a password entry box. Any character typed in the box is stored as the character but displayed as an asterisk (*). |
Any characters not included in this list are displayed as literal characters. If you want to use one of the special characters in this list as a literal character, precede it with the \ (backslash) character.
The second and third sections of the input mask are optional. Including a 1 or leaving nothing in the second section tells Access to store only the characters entered; including a 0 tells it to store both the characters entered and the mask characters. The character in the third section is displayed in a new record as the placeholder for the characters to be typed. This placeholder defaults to an underscore if the section is omitted.
The input mask !\(000") "000\-0000;1;# creates this display in a field in both a table and a form:
(###) ###-####
In this example, you are restricting the entry to ten digits ”no more and no less. Access stores just the digits entered, not the parentheses, space, and dash (though those characters could be displayed in your table, form, or report if you set the correct format property).
In this exercise, you will use the Input Mask Wizard to apply a predefined telephone input mask to a text field, forcing entered numbers into the (206) 555-0001 format. You will then create a custom mask to force the first letter of an entry to be uppercase(a capital letter).
USE the FieldTest database in the practice file folder for this topic. This practice file is located in the ![]() My Documents\Microsoft Press\Office 2003 SBS\Accurate\InputMask folder and can also be accessed by clicking Start/All Programs/Microsoft Press/Microsoft Office System 2003 Step by Step .
My Documents\Microsoft Press\Office 2003 SBS\Accurate\InputMask folder and can also be accessed by clicking Start/All Programs/Microsoft Press/Microsoft Office System 2003 Step by Step .
OPEN the FieldTest database.
-
Open the Field Property Test table in Design view.
-
In the first blank Field Name cell , type PhoneField , and leave the data type setto Text .
-
Click the row selector to select the row, and then drag the new field to the topof the field list so that it will appear at the left end of the table.
-
Save the table design, and with PhoneField still selected, click Input Mask in the Field Properties area.
-
Click the button to the right of the cell to start the Input Mask Wizard and display the first page of the wizard. (Click Yes if you are prompted to install this feature.)
Tip You can create an input mask by hand for text, number, date, or currency fields, or you can use this wizard to apply one of several standard masks for text and date fields.
-
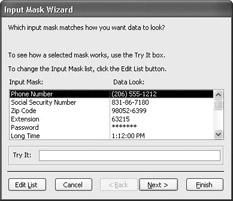
With Phone Number selected in the Input Mask list, click Next .
The second page of the wizard displays the input mask and gives you the opportunity to change the placeholder character that will indicate what to type. The exclamation point causes Access to fill the mask from left to right with whatever is typed. The parentheses and hyphen are characters that Access will insert in the specified places. The 9s represent optional digits, and the 0s represent required digits,so you can enter a telephone number with or without an area code.
Tip Because Access fills the mask from left to right, you would have to press the Right Arrow key to move the insertion point past the first three placeholders to enter a telephone number without an area code.
-
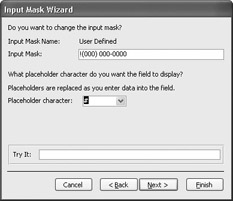
Change 999 to 000 to require an area code, and then change the placeholder character to # .
-
Click Next .
On the third page of the wizard, you specify whether you want to store the symbols with the data. If you store the symbols, the data will always be displayed in tables, forms, and reports in this format. However, the symbols take up space, meaning that your database will be larger.
-
Accept the default selection ”to store data without the symbols ”by clicking Finish .
Access closes the wizard and displays the edited mask as the Input Mask property.
-
Press [ENTER] to accept the mask.
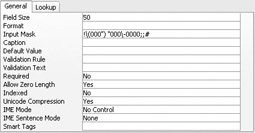
Access changes the format of the mask to !\(000") "000\-0000;;# . Notice the two semicolons that separate the mask into its three sections. Because you told Access to store data without the symbols, nothing is displayed in the second sectionof the mask.
Tip New in Office 2003 ”Property Update Options When you press [ENTER], a button is added in front of the Input Mask. This is the Property Update Options button, and if you click it, a list of options is displayed. In this case, the only option is to apply the input mask everywhere PhoneFieldis used. This button disappears when you edit any other property or change to a different field.
-
Save your changes, and click the View button to return to Datasheet view.
-
Press the [ “] key to move to the new record, and type a series of at least ten digits and then some letters to see how the mask works.
Any letters you type are ignored. The first ten digits are formatted as a telephone number. If you type more than ten digits, they are also ignored. If you type fewer than ten digits and press Tab or Enter, Access warns you that your entry doesn t match the input mask.
Tip An input mask can contain more than just the placeholders for the data to be entered. If, for example, you type The number is in front of the telephone number in the Input Mask property, the default entry for the field is The numberis (###) ###-#### . Then if you place the insertion point to the left of The and start typing numbers, the numbers replace the # placeholders, not the text. The Field Size setting is not applied to the characters in the mask, so if this setting is 15 ,the entry is not truncated even though the number of displayed characters (including spaces) is 28.
-
Return to Design view, and add a new field below BooleanField . Name it LastName . Leave the Data Type setting as the default Text .
-
Select the new field, click Input Mask , type > L < ?????????????????? (18 question marks), and press [ENTER].
The > forces all following text to be uppercase. The L requires a letter. The < forces all following text to be lowercase. Each ? allows any letter or no letter, and there is one fewer question mark than the maximum number of letters you want to allow in the field (19, including the leading capital letter). The Field Size setting must be greater than this maximum.
-
Save your changes, return to Datasheet view, type smith in the LastName field of one of the records, and press [TAB]. Try entering SMITH , and then McDonald .
As you can see, only the first letter is capitalized, no matter how you try to type the name, so this type of mask has its limitations. But it can be useful in many situations.
-
Close the table.
CLOSE the FieldTest database.
EAN: 2147483647
Pages: 350
- Article 285 Transient Voltage Surge Suppressors (TVSSs)
- Article 330 Metal-Clad Cable Type MC
- Article 426: Fixed Outdoor Electric De-Icing and Snow-Melting Equipment
- Example No. D2(b) Optional Calculation for One-Family Dwelling, Air Conditioning Larger than Heating [See 220.82(A) and 220.82(C)]
- Example No. D10 Feeder Ampacity Determination for Adjustable-Speed Drive Control [See 215.2, 430.24, 620.13, 620.14, 620.61, Tables 430.22(E), and 620.14]