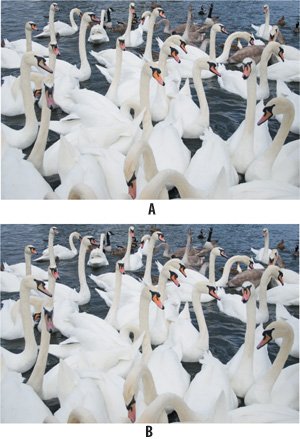
| Channels let you customize settings for selected parts of your image. Here I'll show you techniques to selectively compress an image for the Web using an alpha channel, how to dramatically improve grayscale images, and how to selectively focus an image. Weighted Optimization Using Alpha Channels Weighted optimization or regional compression allows you to compress some parts of an image more than others and so get the best of both worldsgood quality in the most important parts of the image as well as a fast download time. Using an alpha channel and the Modify Quality Setting command in the Save for Web dialog box, you choose a compression range between the selected and masked areas of your image. This allows you to preserve detail in the subject while at the same time keeping the your file as lean as possible by reducing detail in the less important areas of the image. However, the practicality of weighted optimization with alpha channels is somewhat diminished by the fact that you have to use high JPEG settings in order to see any benefit. When working with lower quality settingsthat is, more compressionweighted optimization can actually make the file size bigger! Figure 2.29. The original image (example A) and the Channels palette showing the saved selection (example B). 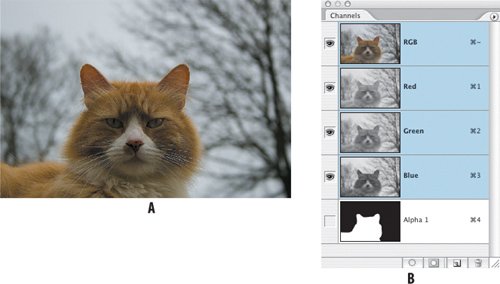
Note When using Save for Web to save as a GIF file, you have the option of using an alpha channel to modify the Lossy setting as well as the Dither setting.
1. | Select the part of the image that you want to selectively compress. In the case of the image shown, a general selection with the Lasso tool was sufficient. Save this selection as an alpha channel by clicking the Save Selection as Channel button at the bottom of the Channels palette.
| 2. | Choose File > Save for Web (Command/Ctrl-Option/Alt-Shift-S) and click the 4-Up tab to compare the results of different amounts of compression applied to the image. What you lose in terms of quality you gain in download time.
| 3. | To use an alpha channel to apply varying amounts of compression to the image, click the Modify Quality setting.
Figure 2.30. Using my saved alpha channel I varied the amount for compression between 30% (the black or masked areas) and 60% (the white or selected areas). 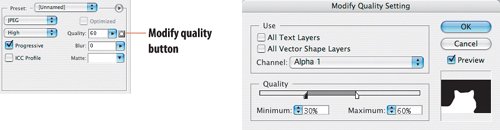
Figure 2.31. In the Save for Web dialog box, this 2-Up arrangement shows the difference in file size/download time and quality. The image on the left is compressed without using Modify Quality. The version on the right uses the saved alpha channel to vary the amount of compression applied. 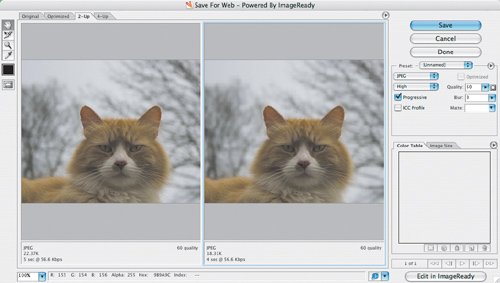
| | | 4. | In the Modify Quality dialog box, choose the alpha channel you created in step 1 from the Channel pull-down menu. Adjust the range of maximum and minimum settings used between the masked area and the selected area. The image sections shown in white will contain the maximum quality areas, and the black sections will contain the minimum. In my case I used a range from 30% to 60%. The resulting file size is smaller and the download time quicker; the trade-off is some degradation of image quality in the background areas.
|
Note You can also apply weighted optimization using a text layer or a shape layer.
Converting to Grayscale If your aim is a black-and-white image, either for aesthetic purposes or because you want to print with only a single ink, start with a color image. It may sound contradictory, but for the best quality grayscale image, start with an RGB image. An RGB image contains more data and offers the widest range of options for converting to grayscale. A straight mode conversion (Image > Mode > Grayscale) gets OK results, but rarely better. Like all off-the-rack solutions, sometimes it fits, but often it's a little tight around the collar or a little loose around the shoulder. Add a few simple steps and you can have a dramatically better custom grayscale image. Here are two approaches that use channels. Note that when working with your own files you may want to retain a copy of the file in color. Note Note that the alpha channel is not saved with the JPG or GIF file, so make sure you keep copies of your source files.
The Channel Mixer method The first technique to customize a grayscale image starting with an RGB image is to use the Channel Mixer. The Channel Mixer command lets you choose the percentage of each color channel that makes up the resulting grayscale. This is essentially what Photoshop mode conversion does. The problem is that the Photoshop conversion uses the same percentages for every image: 60% red, 30% green, and 10% blue. The Channel Mixer lets you choose exact percentages of red, green, and blue to make up your monochrome image. This feature does not work with Lab Color images. | | 1. | Open the Greyhound Rock image.
Figure 2.32. The original RGB image that we want to convert to grayscale.

| 2. | Before you start mixing channels, evaluate your raw materials. Press Command/Ctrl-1, 2, 3 to look at your Red, Green, and Blue channels. Generally speakingand it's a very broad generalizationthe Red channel will have the most contrast, the Green the most detail, and the Blue the most noise.
| | | 3. | Return to your composite channel (Command/Ctrl-~) and choose Channel Mixer from the Adjustment Layers pull-down menu at the bottom of the Layers palette. If you've never used adjustment layers, consider this a trailer for Chapter 5, "Adjustment Layers," where they are discussed in detail. In a nutshell, applying the Channel Mixer as an adjustment layer allows you to retain your original layer intact and gives you the flexibility to change your mind about exactly what percentages of Red, Green, and Blue channels go to make up the grayscale.
Figure 2.33. The Channel Mixer, where you can experiment with what percentages of Red, Green, and Blue channels will make up your monochrome image. 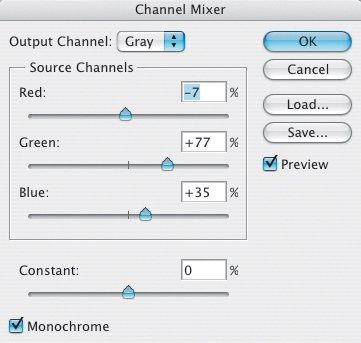
| 4. | In the Channel Mixer dialog, check the Monochrome checkbox. The Output Channel becomes Gray. Experiment with combining different percentages of your Red, Green, and Blue channels. Typically, the total should add up to 100%a higher number results in a brighter image and vice versa. Moving the Constant slider will result in an overall brightening or darkening of the image. Usually this is best left alone. Click OK to exit the Channel Mixer.
| 5. | As a last optional step, choose Image > Mode > Grayscale to convert the image to a single channel image. In the dialog that appears, choose Flatten and then click OK. Photoshop will use your channel percentages to make a single-channel document. I'd caution against this unless absolutely necessaryfor example, if you are printing in only one of two colors. Once the color information is discarded, it's gone for good, and you never know when you might need it. If you just want your image to look black and white, without officially being black and white, then leave it in RGB.
|
Figure 2.34. The color channels in Lab Color mode. 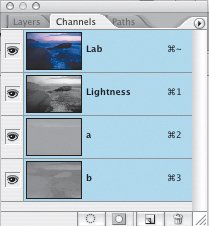
The Lab Color Method An alternative approach to customizing a grayscale image from an RGB image is to convert it to Lab Color mode and use the Lightness channel. This channel contains all the image detail but very little image noise. Unlike other mode conversions, converting to Lab does not result in loss of image data. 1. | Choose Image > Mode > Lab Color, then press Command/Ctrl-1 to view the Lightness channel. When viewing just the Lightness channel, the image will appear grayscale.
| | | 2. | Next, choose Image > Mode > Grayscale and click OK to convert to Grayscale mode using the gray values of the Lightness channel.
|
COMPARING THE GRAYSCALE CONVERSIONS: Figure 2.35. Generic grayscale conversion. 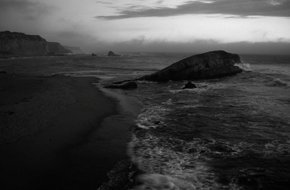
Figure 2.36. The Channel Mixer method. 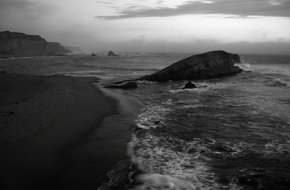
Figure 2.37. The Lab Color method. 
Selectively Focusing an Image You can add a lens blur to your image to give selective focus and the effect of a narrower depth of field. Blurring certain areas of your image will accentuate the areas that remain in focus. The Lens Blur filter uses a depth map to determine what parts of the image are blurred and by how much. This depth map can be based on an alpha channel. 1. | Open the Swans image.
Figure 2.38. The original image (example A) and the result of applying a lens blur based on an alpha channel (example B).
| | | 2. | Using the Pen tool, start by making a path selection around the neck and head of the central swan. (Alternately, you can make your selection with the Lasso tool.) I've included a saved path with the file. To use the saved path, click on Path 1 in the Paths palette to activate the path.
| 3. | To convert the path (vectors) into a selection (pixels), choose Make Selection from the Paths palette menu. I added a feather radius of 1 pixel.
| 4. | Once you have an active selection, save this selection as an alpha channel by clicking the Save Selection as Channel icon at the bottom of the Channels palette. Press Command/Ctrl-4 to view the resulting channel by itself.
| | | 5. | With your Gradient tool and your foreground color set to black, use a Foreground to Transparent gradient to blend the bottom of the swan neck into the masked background.
Figure 2.39. Draw a Pen path around the area you want to remain in focus. 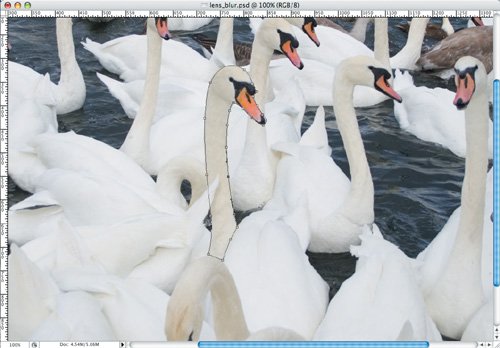
Figure 2.40. Convert the path to a selection. Save the selection and use a gradient on the channel to blend the bottom portion of the mask. 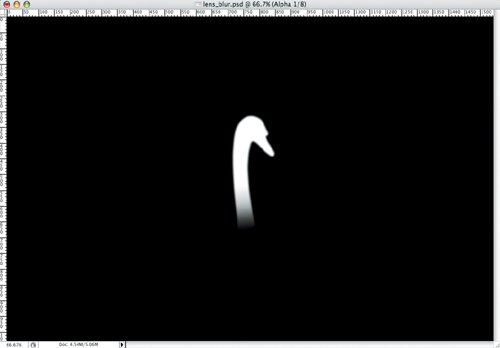
| 6. | Return to your composite channel and make a copy of the Background layer as insurance.
| | | 7. | With the Background Copy layer active, choose Filter > Lens Blur.
Figure 2.41. Lens Blur filter. 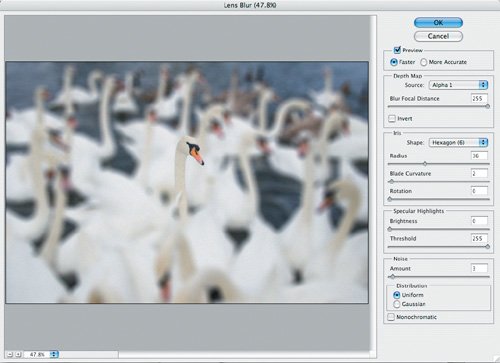
Note The Faster and More Accurate options affect only how the preview is rendered and not the quality of the result. You might want to switch to More Accurate before committing to the filter, but since Lens Blur is a memory hog, I'd recommend leaving this on Faster. | 8. | In the Lens Blur dialog, for Depth Map, choose your saved alpha channel. Check the Invert check box to blur the background rather than the selected swan and drag the Blur Focal Distance slider to the right to determine the amount of blurring. Leave the dialog open.
| 9. | Click the selected swan in the image to identify this as that area you want to remain in focus. This causes the Blur Focal Distance slider to move from 0 to 255 (white).
Make the following adjustments in the Lens Blur dialog:
Increase the value of Radius slider and watch the background (black area) go out of focus. There's no right or wrong amountwhatever works for you. To see the effect of choosing different iris shapes, zoom in close to your preview. The iris shape affects how the image is blurred. Iris shapes are determined by the number of blades they contain. You can change blades of an iris by curving them (making them more circular) or rotating them. To make the blurring look more realistic and match any film grain to the focus area, add a small amount of noise. I used the default amount of 3 pixels.
| 10. | Click OK to return to your image.
|
|