Planning and Strategy
| An efficient workflow requires planning. Photoshop CS, Bridge, and Camera Raw 2.x offered a limited amount of workflow flexibility. Photoshop CS2, Bridge, and Camera Raw 3.x offer many more options. You can flail around and try everythingit's actually not a bad way to get your feet wet, though I hope you'll use the information in this chapter to make your flailing somewhat methodicalbut at some point, you have to decide what works, and stick with it. Among the things you need to decide, and stick with, are the following:
You'll need to make plenty of decisions when you're working on your images. It's a Bad Idea to start making decisions about any of the above when you're working on a deadline, because doing so introduces complexity (of which you already have enough) and increases the chance of unintended consequences (which you want to avoid). Who Has the Cache?Bridge's cache performs the important task of storing image thumbnails, previews, and sort order. (For file types that can't support sidecar .xmp files, it also stores keywords and metadata, but that doesn't apply to raw formats.) Bridge's Advanced Preferences let you choose whether to use a central cache or distributed caches (see the Advanced Preferences section under "Preferences and the Bridge Menu (Mac)" in Chapter 6, Adobe Bridge). The only downside to using distributed cache files is that you wind up with two cache files in every folder that Bridge ever sees. If that drives you crazy, by all means use a central cache instead, but do so with the clear knowledge that you run the risk of losing thumbnails, previews, and custom sort orders when you do any of the following:
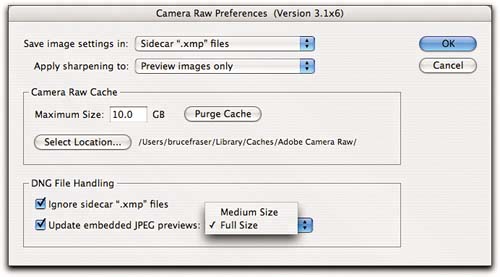
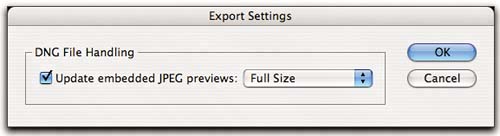
You can work around these limitations of the central cache by making sure that you use the Export Cache command from Bridge's Tools>Cache submenu, but you're introducing complexity that is unnecessary with distributed caches, and hence creating more opportunities for operator error. If you're downloading images to a laptop computer in the field, with the eventual goal of transferring them to a desktop machine back in the studio for further processing, I'll come straight out and say that it's just crazy to use a central cache on the laptop. (Using a central cache on the desktop I deem merely eccentric.) A second argument against a central cache is that when you use it, you're putting all your eggs in one basket. You can control where the central cache gets stored, so you don't have to store it in the default location on your startup drive where it's vulnerable to permissions issues and other ills, but like pets, all hard drives die, eventually, and storing all your caches in one folder incurs the risk that you'll lose them all. With distributed caches, every folder contains a cache automatically, you can copy and rename your folders without having to think about it, and when the inevitable does happen, you've only lost what was on that drive (which was of course backed up). Strategies for SettingsYou can save Camera Raw settings either in the Camera Raw Database or in sidecar .xmp files. Superficially, it may seem that the same arguments apply to the Camera Raw Database as apply to the centralized Bridge cache, but in fact it's not that simple. The Camera Raw Database indexes images by their content, not by their filenames, so you can copy, move, or rename them willy-nilly without losing track of your raw settingsbut only as long as the images remain on the same computer as the Camera Raw Database. Move them to another machine, and the settings are gone (or, rather, they're still on the originating computer where they'll do absolutely no good). You can work around this limitation by always remembering to use Camera Raw's Export Settings command to write out a sidecar .xmp file for the image, and always remembering to include the sidecar file with the image. But that's a lot of "always remembering." If you use sidecar .xmp files instead, Bridge does its best to keep track of them. As long as you use Bridge to copy, move, and rename your raw files, the sidecar files travel with them automatically. But if you copy, move, or rename your raw files outside of Bridge, it's up to you to keep track of your sidecar files and move them with the images manually. Again, it's not an ideal solution. There's a third alternative, which is to use the DNG format instead. This is a topic that's sufficiently nuanced to deserve its own discussion, so see the sidebar "Working with DNG" on the following page. Those of you with sharp eyes will doubtless have noticed that all the screen shots in this book use DNG images. My personal opinion is that unless you like to bounce back and forth between Camera Raw and your camera vendor's proprietary raw converter, a DNG workflow makes more sense than one based on proprietary raws. The convenience of having all the metadata, including Camera Raw settings, stored right in the file itself outweighs the one-time speed bump entailed in converting the raws to DNG. But if you want to use your camera vendor's converter, and your camera doesn't write DNG, you should stick with proprietary raws for your working files, at least for now. You may, however, want to consider using DNG with the original raw embedded as an archival format. See "Archiving Images," later in this chapter.
What's in a Name?I don't, personally, make a practice of renaming my raw files, simply because I haven't found a compelling reason to do so. That said, I know a good many photographers whose sophisticated naming schemes are a core part of their workflow, so I'm not in any way against the practice. If you do want to make a practice of renaming your raw files, I suggest the following two simple rules:
Aside from these two simple rules, file naming conventions are limited only by your ingenuity. Don't overlook metadata as a source for naming elements, and expect to see ingestion scripts that offer more metadata-related naming features than Bridge's Batch Rename (see Figure 6-32 in Chapter 6, Adobe Bridge) both from Adobe and from third-party scripters. Ratings and LabelsBridge and Camera Raw offer two independent mechanisms, labels and ratings, for flagging images. Each mechanism offers six possible values: if you use them in combination, you can have 36 possible combinations of ratings and labels, which is almost certainly more than most people need! If you think you can use a system with 36 values productively, knock yourself out. Otherwise, I suggest keeping things simple. I prefer to avoid using labels because they introduce large blobs of color into an environment where the only color I want to see is the color in my images, so I use ratings instead. The ratings system was designed to mimic the time-honored practice of making selects on a light table by marking the keepers from the first round with a single dot, adding a second dot to the keepers from the second round, and so on. That's how I use itit's simple and effective. I do make limited use of labels for various esoteric purposes. For example, I've applied the purple label (which I've renamed "weird") to the ever-growing collection of high-ISO sodium-vapor-lit nighttime cityscapes that I use for testing noise reduction techniques, and hide most of the rest of the time. Labels are handy for this kind of use because they can operate completely independently of the star-based rating system. If you can think of uses for them, go ahead and use them, but don't feel that just because a feature exists, you have to use it. Remember that if you want to use labels to communicate something about images to someone else, you and they need use the same definitions of the labels. If they're different, the recipient will get a bunch of images with white labels, indicating that a label has been applied, but with different label text than is currently specified in their Labels preferences. (See Figure 6-14 in Chapter 6, Adobe Bridge.) They can search the metadata for your label text, but since labels are meant to be an easy visual way to identify something about the images, you'd likely be better off using keywords instead. Simplicity Is Its Own StrategyCamera Raw, Bridge, and Photoshop offer an amazing number of options. Only a genius or a fool would try to use them all. If, like me, you're neither, I recommend keeping things as simple as possible without making any overly painful compromises. The four issues that I've called out in this sectionBridge cache, Camera Raw settings, naming conventions, and rating/labeling strategiesare things that can't be changed without going through considerable pain. You can certainly spend some time trying out the options before setting your strategies in stone, but once you've found the approach that works best for you, don't change it arbitrarily. If you do, it's entirely likely that you'll lose work, whether it's Camera Raw edits, Bridge thumbnails, ratings, or simply winding up with a bunch of incomprehensibly named files. Any of these violates the first workflow principledo things once, efficientlyand you pay for it with that most precious commodity, your time. |
EAN: N/A
Pages: 112