Bridge Menu Commands
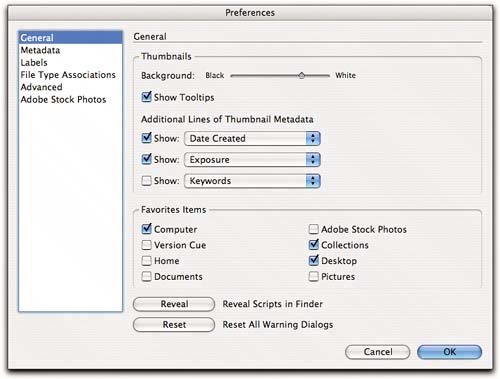
| Bridge serves not only Photoshop but the entire Creative Suite, so a good many of its menu commands aren't relevant to a digital raw workflow. Moreover, many of the menu commands offer relatively inefficient ways to accomplish tasks that can be performed more easily by other means. So rather than giving a blow-by-blow description of every single menu command, I'll give you an overview of the menus, along with details about the commands I find particularly useful and/or interesting. Preferences and the Bridge Menu (Mac)The Bridge menu, which is found only in the Mac version of Bridge, really contains only one important command, Preferences (press Command-K). The Camera Raw Preferences command that also appears on the Bridge menu simply replicates the one on Camera Raw's own menu (see "The Camera Raw Menu" in Chapter 4, Camera Raw Controls). On Windows, these commands are on the Edit menu.) Bridge's Preferences dialog box contains six different panels, each governing a different aspect of Bridge's behaviorsee Figure 6-12. Figure 6-12. Bridge Preferences, General
General PreferencesThe controls in this panel let you set the shade of gray for the background on which thumbnails are displayed, hide or show tooltips, and specify up to three additional lines of metadata that are displayed under the thumbnail along with the filename. It also lets you specify items that always appear in the Favorites panel, and offers two control buttons, one of which reveals scripts in the Finder (Mac) or Explorer (Windows). Metadata PreferencesThese options let you specify which metadata fields are displayed on the Metadata palette. If you don't have a GPS-enabled camera, for example, you may as well hide all the GPS fields. This panel also offers the option to hide fields that are empty for the selected image or images automaticallysee Figure 6-13. Figure 6-13. Bridge Preferences, Metadata
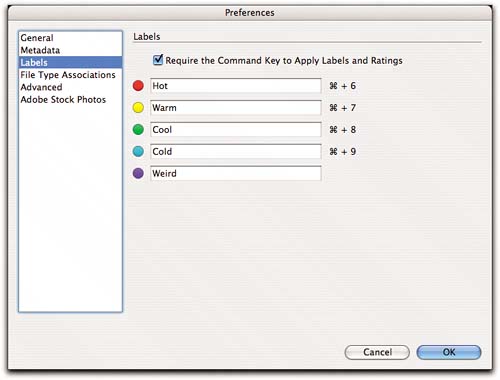
Labels PreferencesThese options let you associate text labels with the label colors (you can't change the colors) to something more useful than the color names. The label text is searchable in Bridge, and can be displayed both in the Metadata palette and as an additional line of metadata accompanying the thumbnails if you choose that option in the General Preferences tab. If you change the label text in Preferences, images that have previously had labels applied lose the label colorit turns whitebut the label text remains part of the image's metadata. See Figure 6-14. Figure 6-14. Bridge Preferences, Labels
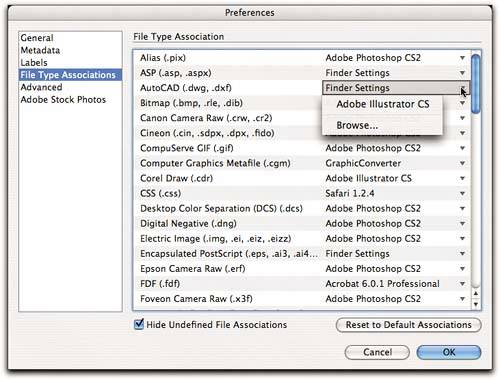
File Type Association PreferencesThese options let you specify the default application for opening files from Bridge. It applies only to the behavior you get when opening files from Bridge, and has no effect on how files open from the Macintosh Finder or Windows Explorersee Figure 6-15. Figure 6-15. Bridge Preferences, File Type Associations
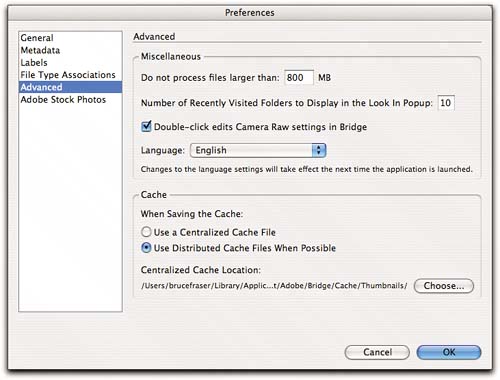
Advanced PreferencesThis panel contains several unrelated but nevertheless important items. The Miscellaneous preferences are largely self-explanatory, with the exception of "Double-click edits Camera Raw settings in Bridge." When this preference is unchecked, which it is by default, double-clicking a raw's thumbnail opens it in Camera Raw hosted by Photoshop. When it's checked, doing the same thing opens the raw image in Camera Raw hosted by Bridge. This preference works as advertised, but has a non-obvious impact on some other file-opening keyboard shortcutssee "Opening Images," later in this chapter. The other important setting in this panel is the choice of whether to use centralized or distributed cache filessee Figure 6-16. Figure 6-16. Bridge Preferences, Advanced
Bridge's cache holds the image thumbnails and previews, custom sort order, and, for file types that can't store metadata either in the file itself or in a sidecar .xmp file, label and rating information. For raw files, only the thumbnails, previews, and custom sort order are stored uniquely in the Bridge cache, but since the thumbnails and previews take some time to generate, they're pretty important. The only advantage offered by using a centralized cache is simplicityyou know where all your cache files are. The significant disadvantages of the centralized cache are:
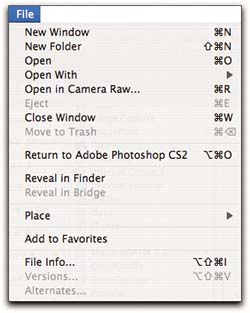
Using a distributed cache avoids both problems. The cache files are written directly into the folder to which they pertain, and travel with the folder even when it's renamed or moved. Note, however, that if Bridge for some reason can't write a distributed cache (the volume may be read-only, or mounted on a server) it writes to the central cache instead. The only real downside to using distributed caches is that every folder that Bridge has opened winds up containing two files named Adobe Bridge Cache.bc and Adobe Bridge Cache.bct. By default, Bridge hides these files, but the Macintosh Finder and Windows Explorer do not. I find that it's well worth suffering this small inconvenience to obtain the benefits of distributed caching, and besides, it's often useful to be able to see the cache files so that you can check that they're present and up-to-date. File Info and the File MenuThe bulk of the commands on the File menu let you do things that are better accomplished via keyboard shortcutsopening images, creating new windows, and so on. See Figure 6-17. Figure 6-17. Bridge File menu
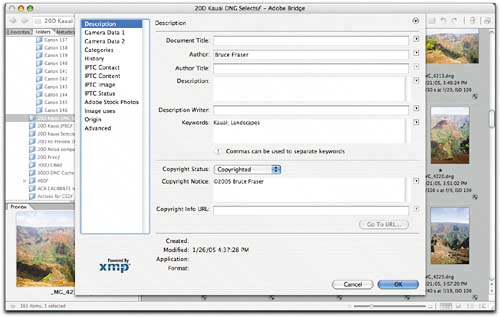
In the case of raw images, the subtle difference between "Open" (Command-O) and "Open in Camera Raw" (Command-R) is that the former opens the raw image or images in Camera Raw hosted by Photoshop, while the latter opens the raw image or images in Camera Raw hosted by Bridge. There are several easier ways to open images than choosing the menu commands, including the aforementioned keyboard shortcuts. I'll discuss these in "Opening Images," later in this chapter. I'll discuss the workflow implications of which application hosts Camera Raw in Chapter 7, It's All About the Workflow. Most of the other commands are self-explanatory. However, the File Info command, which opens the File Info panel, deserves a closer looksee Figure 6-18. Figure 6-18. Bridge File Info
The first thing you'll notice when you open File Info in Bridge is that it's a modal panel (not a movable modal dialog box) that helpfully covers all the images. I find that this behavior makes File Info less useful than it could be! While Bridge allows you to open File Info when multiple images are selected (the old File Browser did not), it's a relatively inefficient way to apply keywords and other metadata when compared to the Metadata and Keywords palettes. I use it to do three things:
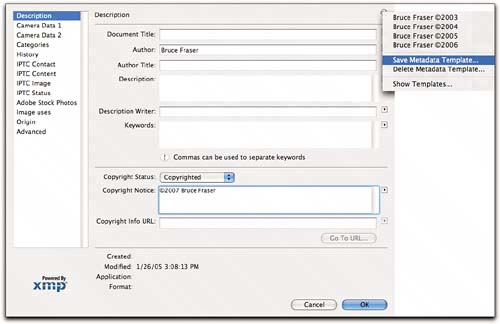
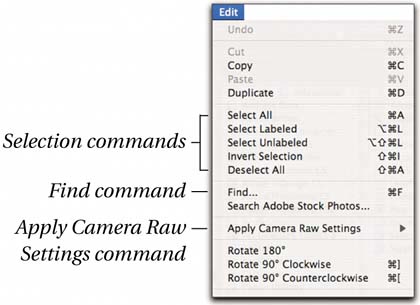
I'll discuss metadata, the File Info panel, and Metadata templates in much more detail in Chapter 8, Mastering Metadata. Select, Find, and Edit with the Edit MenuThe Edit menu hosts Bridge's Preferences command on Windows, and offers the same functionality as the Mac version does on the Bridge menu. It also hosts the usual Copy, Paste, Cut, and Duplicate commands, as well as the Rotate commands whose functionality is replicated by Bridge's Rotate buttons. The important commands for the raw workflow are the various Select commands, the Find command, and the Apply Camera Raw Settings commandssee Figure 6-20. Figure 6-20. The Edit menu
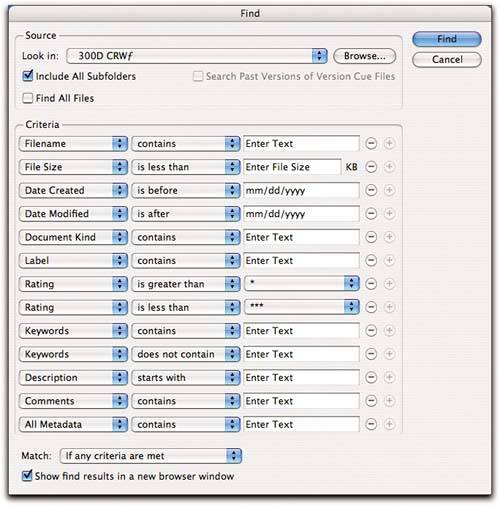
Let's look at these in turn. The Select CommandsThe Select commands offer quick ways to manipulate selections. Select All (press Command-A), Deselect All (press Command-Shift-A) and Invert Selection (press Command-Shift-I) do exactly what they sayInvert Selection deselects the files that were selected and selects those that weren't. The two remaining commands, Select Labeled and Select Unlabeled (press Command-Option-L and Command-Option-Shift-L, respectively), work in conjunction with Bridge's Label feature, which lets you apply one of five labels, or no label, to images. See "Labeling, Rating, and the Label Menu," later in this chapter. The Find CommandThe Find command lets you perform searches using up to 13 different search criteriasee Figure 6-21. Figure 6-21. The Find dialog box
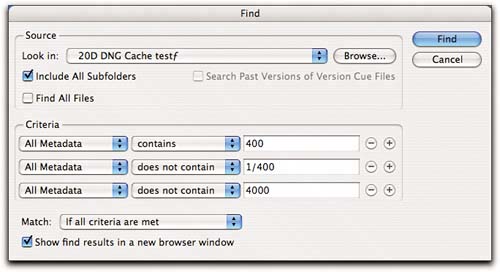
The Find command is undeniably powerful, but some of the things it lacks serve to remind us that Bridge is a version 1.0 application. For example, the "All Metadata" criterion does let you search on EXIF metadata or Camera Raw settings, but only up to a point. You can only search for values; you can't specify the metadata field to which they belong. That means you have to be very aware of exactly how the metadata is expressed. For example, searching for "300 mm" finds all my images shot at 300 mm focal length, but excludes images shot with my 28-300mm lens because the lens is expressed as "28.0300.0 mm." Likewise, searching for "f/8" will find all images shot at f8. But there's no easy way to find all images shot at ISO 400if you search on All Metadata contains "400" you'll find all your ISO 400 images, but also all images shot at 1/400 second, and all images with a white balance of 4000K. Of course, there are workarounds. Figure 6-22 shows search criteria that will find ISO 400 images while excluding those shot at 1/400 second and those with a 4000K white balance. (Of course, this will also find all images whose keywords contain the string "400.") Figure 6-22. Finding ISO 400 imagesThese search criteria find all images whose metadata contains the string "400", while excluding those whose metadata contains "1/400" or "4000."
Even this search isn't perfect. It finds all ISO 400 images, but in my case it also finds an ISO 100 image shot at 1/250 second at f13, because my Canon EOS 20D recorded the aperture value in the EXIF data as "7400879/1000000." The bottom line is that if you plan to use metadata searches, you'll need to become quite familiar with the exact contents of the metadatasee Chapter 8, Mastering Metadata, for a much deeper discussion of working with metadata. (Unless it got fixed at the last minute, the online help indicates that you can use * as a wildcard character in search criteria. It's wishful thinkingyou can't!) In addition to the criteria, the Find dialog box has the following important features.
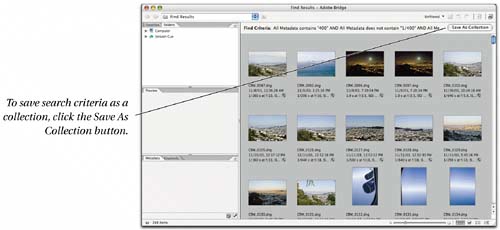
Save As CollectionWhen you perform a search, you have the option to save the search criteria as a collection. The slightly confusing element is that the option doesn't appear in the Find dialog, but rather in the results windowsee Figure 6-23. Figure 6-23. Save As Collection
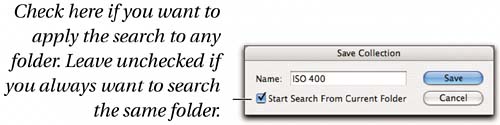
When you save a collection, you can save it as an "absolute" search or a "relative" search. Absolute searches always search the folder you specified in the Find dialog box's Look In menu when you did the initial search that created the collection, while relative searches can be applied to any folder. Checking "Start Search From Current Folder" in the Save Collection dialog box creates a relative search; leaving it unchecked creates an absolute one. Collections are saved in User/Library/Application Support/Adobe/Bridge/Collections (Mac) or Documents and Settings\Username\Application Data\Adobe\Bridge\Collections (Windows). If you enabled the Preference that displays Collections in the Favorites panel, you can navigate quickly to the Collections folder by clicking Collections in the Favorites panel. You'll see all your saved collections in the foldersee Figure 6-24. Figure 6-24. Saved Collections
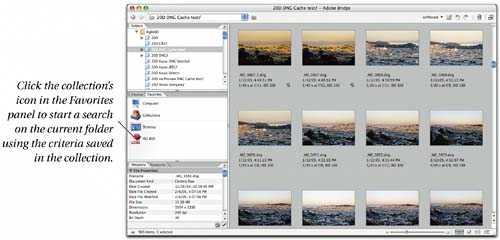
You can start absolute searches (ones that start from the folder used to create the collection) by double-clicking a collection in the folder. (If you start a search this way, it doesn't matter whether the "Start Search From Current Folder" checkbox was checked or unchecked when you saved the collectionthe search always applies to the folder that was specified when you created the collection.) Applying the search to a different folder is a little trickier, and is only possible if you saved the collection with the "Start Search From Current Folder" checkbox checked. First, drag the collection you want to use to the Favorites panel, then navigate to the folder to which you want the search to apply. Then, to start the search, single-click on the collection icon in the Favorites panelsee Figure 6-25. Figure 6-25. Searching a different folder
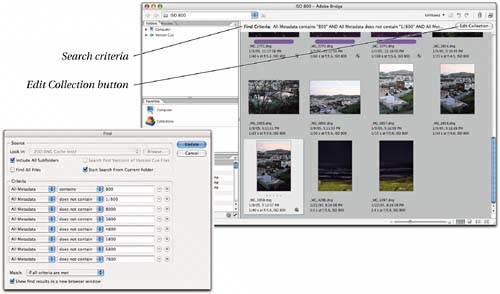
The search is performed on the folder you selected in the Folders panel, including subfolders if you chose that option for the initial search that created the collection, and using the search criteria you specified when you created the collection. The results appear in the same window or in a new Bridge window depending on whether "Show find results in a new browser window" was checked or unchecked when you created the collection. When the search results are displayed, a line of text showing the search criteria and the folder searched appears at the top of the window, but since it doesn't wrap, you often can't see most of it. The Edit Collection button lets you edit the search criteriabear in mind that you're actually editing the collection itself, so any changes you make will be permanentsee Figure 6-26. Figure 6-26. Search resultsClicking Edit Collection opens the dialog box shown at the left. Note that the main button is Update rather than Find, and the dialog box includes the "Start Search From Current Folder" checkbox.
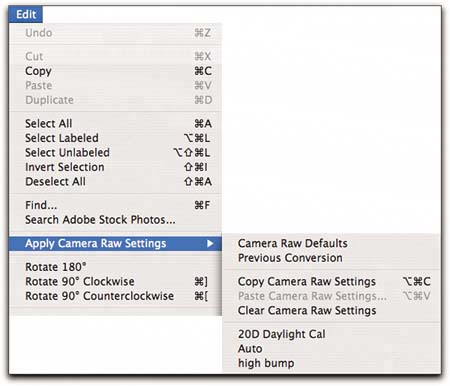
Apply Camera Raw SettingsThe Apply Camera Raw Settings submenu lets you apply Camera Raw Defaults or Previous Conversion (the last-used Camera Raw settings) to selected images. It also lets you copy settings from an image and apply them to others by pasting, or clear existing settings from an image. Finally, it lets you apply any saved settings that you've saved in Camera Raw's Settings folder (see "Loading and Saving Settings" in Chapter 4, Camera Raw Controls). Figure 6-27 shows the Apply Camera Raw Settings submenu. Figure 6-27. Apply Camera Raw SettingsSaved custom settings appear at the foot of the Apply Camera Raw Settings submenu.
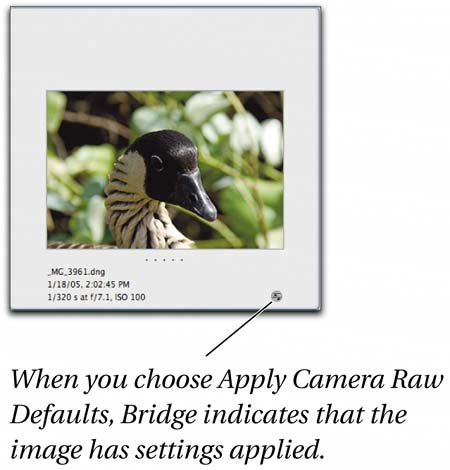
You may wonder what the difference is between applying Camera Raw defaults and clearing Camera Raw settings. The effect on the image is identical in both cases, but Bridge offers a useful piece of feedback that shows whether or not an image has settings applied to itsee Figure 6-28. When you apply Camera Raw defaults, Bridge treats the image as having had settings applied; when you clear the settings, Bridge treats the image as having no settings applied. Figure 6-28. Apply Camera Raw Defaults and Clear Camera Raw SettingsWhen you choose Clear Camera Raw Settings, Bridge indicates that the image has no settings applied.
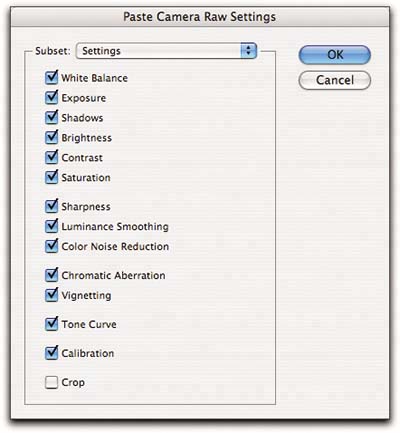
The Copy Camera Raw Settings command (Command-Option-C) copies all the Camera Raw settings from the selected image. When you choose Paste Camera Raw Settings (Command-Option-V), the dialog box shown in Figure 6-29 appears, giving you the opportunity to choose all the settings, any individual parameter, or everything in between, to apply to the image or images to which you're pasting the settings. Figure 6-29. Paste Camera Raw SettingsPaste Camera Raw Settings
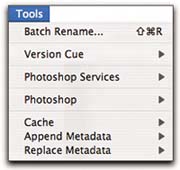
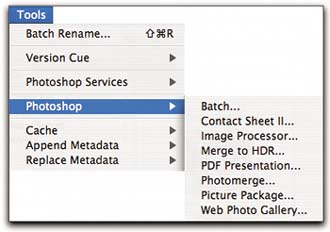
The ability to apply Camera Raw settings by pasting to multiple images offers an alternative to working directly in Camera Raw in filmstrip mode. I'll discuss the workflow implications of each approach in detail in Chapter 7, It's All About the Workflow. Automation, the Cache, and the Tools MenuThe Tools menu provides access to several useful Photoshop-hosted automation features as well as Bridge's own Batch Rename, allows you to work with Bridge's cache files, and provides an alternative means of applying metadata templates if you don't want to use the Metadata palette menusee Figure 6-30. Figure 6-30. The Tools menu
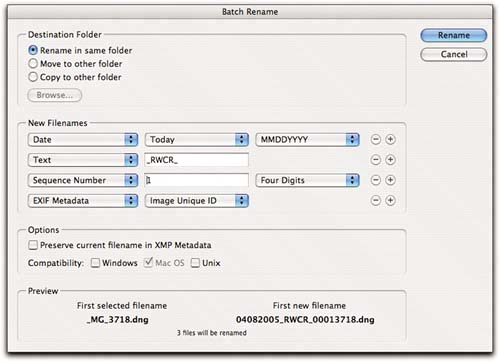
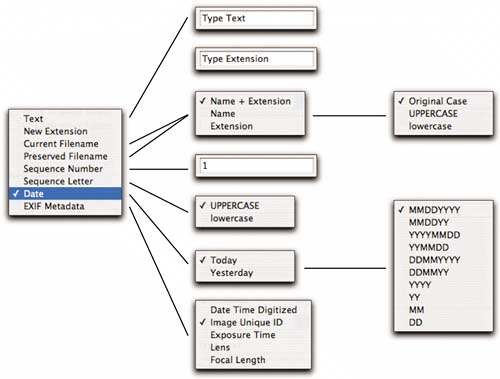
Batch RenameBridge's Batch Rename feature looks nothing like Photoshop's, though it offers essentially the same functionalitysee Figure 6-31. The inclusion of EXIF Metadata as a naming component is intriguing, but the potentially most-useful piece of metadata, Date Time Digitized, should be treated with some caution. The option looks in the metadata for DateTimeOriginal. If it's not present, it looks for DateTimeDigitized. If that too is not present, the feature uses the IPTC DateCreated property. It's possible for these three dates and times to be different, so test this option carefully and make sure you understand its behavior with your raw files before using it on live jobssee Chapter 8, Mastering Metadata, for further discussion. Figure 6-31. Batch RenameBatch Rename offers options to rename images in place, rename and move to a different folder, or make renamed copies in a different folder.
The option to preserve the current filename in XMP metadata actually adds a custom metadata tag containing the filename. If you've already applied Camera Raw settings before renaming, you can skip this option because the Camera Raw settings metadata already contains the original filename, but if you're renaming otherwise-untouched raw files, and you want the original filename to be retrievable, it's a good idea to check this option. Tip Undoing Renaming. One of the useful things that the aforementioned "Preserve current filename in XMP Metadata" option allows is easy undoing of batch renaming. Simply choose Batch Rename, and specify Preserved Filename. Your files will get renamed to their original filenames. You can add up to 10 different sets of data for inclusion in the filename. Figure 6-32 shows an "exploded" view of the menus with all the possible choices. Figure 6-32. Renaming optionsThis figure shows all the renaming options from the expanded menus. You can combine up to ten of these.
Since Bridge is eminently javascriptable, you can expect to see a variety of useful image-ingestion scripts, possibly including some from Adobe, that will likely include more flexible metadata-based renaming features, but Bridge's Batch Rename at least provides baseline functionality out of the box. PhotoshopThe Photoshop submenu (see Figure 6-33) provides access to several useful Photoshop automation features. If you want to run any of these automations using images selected in Bridge as the source, you must launch them from Bridge's Tools menuif you try to launch them from Photoshop's File>Automate menu instead, you'll find that Bridge is either grayed out or simply unavailable as the source. Figure 6-33. The Photoshop submenu
I'll discuss these features in much more detail in Chapter 9, Exploiting Automation, but here's an overview.
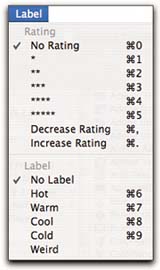
For all these automation features, the procedure for invoking them from Bridge is the same. You select the images you want processed through the automation, then choose that automation from the Tools>Photoshop submenu. Photoshop then goes to work, opening the images using the Camera Raw settings you've applied, or the camera-specific default settings if you haven't applied settings to the image, then processing them using the settings you've specified for the automation. You can continue to work in Bridge while Photoshop is processing the images. Labeling, Rating, and the Label MenuThe Label menu offers a not-particularly-efficient alternative to the keyboard shortcuts for applying labels or ratings to your images (see Figure 6-34. The only things you can do from this menu that you can't do with keyboard shortcuts are to remove a label, or to apply the fifth label, which by default is called Purple, (though you can change the text but not the color in Bridge's Preferences). See "Labels Preferences," earlier in this chapter. Figure 6-34. The Label menu
Labels and ratings are entirely separate. Labels apply the selected label color to the image thumbnail's label area, and write the label text into the image's metadata (in the Label field under File Properties). Ratings apply zero to five stars to the image thumbnail's rating area, and write the rating (from one to five) into the image's metadata (in the Rating field under File Properties). See Figure 6-35. Figure 6-35. Labels and ratingsLabels appear as colored swatches beneath the thumbnails. Ratings appear as stars in the label area. Both the label text and the rating appear in the File Properties metadata.
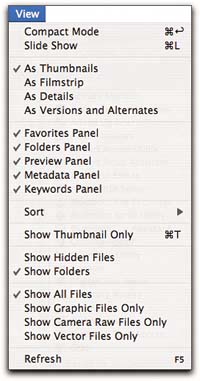
You can search images by label and by rating, and sort images by label or by rating. Last but not least, you can use the Unfiltered/Filtered menu (on Bridge's tool bar, not on the menu bar) to filter which images are displayed in the Bridge window based on label, on rating, or by doing first one, then the other, on both. Labels and ratings are simply arbitrary flags that you can apply to images. It's entirely up to you to decide what they mean. For my own work, I avoid using labels entirely because I dislike the extraneous color they introduce, and I find that six levels of rating (0 to 5 stars) is more than enough for my needs, but that's just my personal biaswhat's important is that you come up with a system that works for you! But for some suggestions on how to use these features, see "Selecting and Sorting," later in this chapter. Applying labels and ratingsBy far the easiest way to apply labels or ratings is to use the keyboard shortcuts (most of which also work in Camera Raw). To apply red, yellow, green, and blue labels, press Command-6 through Command-9, respectively. To apply the purple label, or to remove labels, you must use the menu commands. (Inside Camera Raw, the purple label can be toggled using Command-Shift-0.) To apply ratings, press Command-1 through Command-5 to apply that number of stars, and press Command-0 to remove ratings. (Inside Camera Raw, the shortcut is command-~ (tilde)Command-0 fits the image in the preview. You can also press Command-. (period) to increase the rating by one star or Command-, (comma) to reduce it by one star. A slower alternative that is nevertheless occasionally convenient is to click and drag in the rating area of the thumbnaildragging to the right increases the rating, and dragging to the left reduces it. Last but not least, for those who have grown to love the simplicity of the old File Browser's flagging mechanism, the old keyboard shortcut. Command-' (apostrophe), toggles one star on and off. Bridge Display and the View MenuThe commands on the View menu offer a variety of controls over the way Bridge displays both its windows and the contents of its windows. In the former category, several of the commands replicate the functionality of the control buttons in Bridge's windowsCompact Mode, As Thumbnails, As Filmstrip, As Details, and As Versions and Alternates (the last is relevant for VersionCue users only). Others let you toggle the visibility of the individual panelsFavorites, Folders, Preview, Metadata, and Keywords. See Figure 6-36. Figure 6-36. The View menu
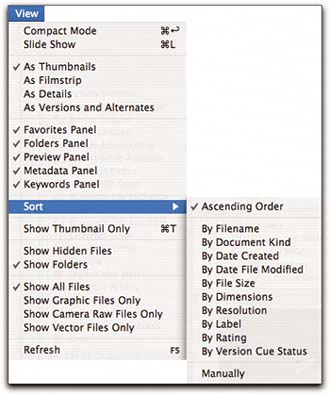
SortThe Sort command (see Figure 6-37) lets you sort the contents of the Bridge window based on the file properties listed in the Sort menu. The Manually item becomes checked when you sort images into a custom order by dragging their thumbnailschoosing it from the menu has no effect unless you've previously sorted your images manually, in which case it switches to the last manual sort order you used. Figure 6-37. The Sort submenu
Show Thumbnail OnlyThe Show Thumbnail Only command (colloquially known as the "Hide the crap" command thanks to the good offices of my friend and colleague Jeff Schewe) suppresses the display of the filenames and any other optional metadata displayed under the thumbnails. Press Command-T to toggle the metadata display on and offsee Figure 6-38. Figure 6-38. Show Thumbnail OnlyThe Show Thumbnail Only command toggles the display of filenames and optional metadata under the image thumbnails. It doesn't hide the other panels.
Note that despite its name, Show Thumbnail Only doesn't hide the other palettes. The easiest ways to do so are to click the Show/Hide panels button at the lower left of the window, or choose a Workspace that hides them from the Window>Workspace menu (see "The Window Menu and Bridge Configuration," later in this chapter). Content filtering commandsSix commands on the View menu let you control the types of content Bridge displays in its windows.
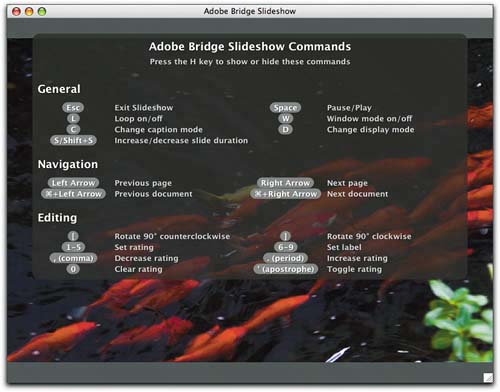
Of all these commands, the only one I truly find useful in a raw workflow is Show Camera Raw Files Only, but as the EPA is wont to say, your mileage may vary. Slide ShowSlide Show (press Command-L) offers an alternative to Bridge's light table metaphor by presenting selected images as a slide show that also allows you to apply ratings and rotations while enjoying the benefits of a large image preview. If you prefer to review your selects as before-and-afters rather than (or as well as) side-by-sides, you'll find the new Slide Show feature extremely useful. Press H (with no modifier) to display all the keyboard shortcuts that apply in Slide Show mode. See Figure 6-39. Figure 6-39. Slide Show Options
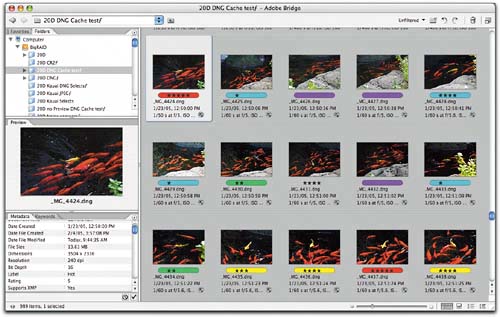
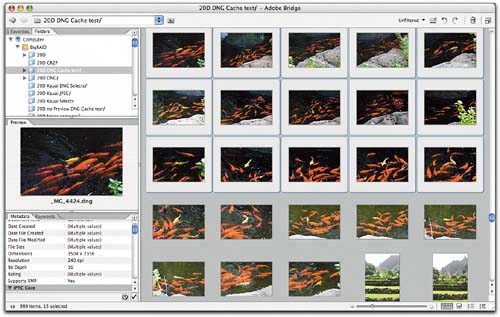
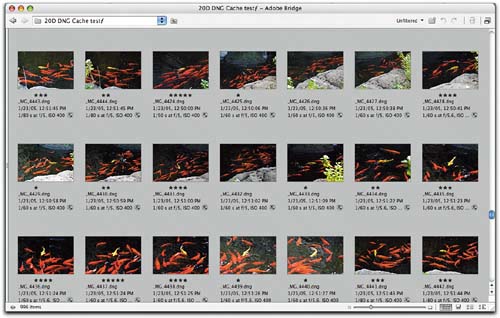
You can run the slide show in a window, or in full-screen mode with the image either scaled to fit the screen (the entire image is displayed at the maximum size that will fit your screen) or scaled to fill your screen (the image is cropped to the aspect ratio of your screen and displayed at maximum size). Slide Show Options Slide Show offers by far the easiest way to review and rank your raw images at full-screen resolution, and is a valuable addition to the workflow. The Window Menu and Bridge ConfigurationThe Window menu is short and sweet (so short and sweet that it doesn't actually list the windows that are open in Bridgemaybe next time), and the one item you're likely to use again and again is the Workspace menu, which lets you save and recall custom Bridge configurations. Bridge ships with four preconfigured WorkspacesLightbox, File Navigator, Metadata Focus, and Filmstrip Focus, shown in Figure 6-40but if you're at all like me you'll probably find that none of them is exactly what you want. Figure 6-40. Preset WorkspacesBridge's preconfigured Lightbox Workspace
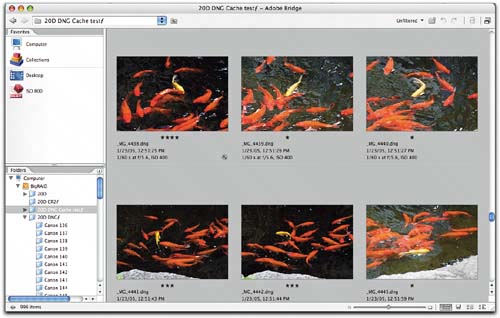
Bridge's preconfigured File Navigator Workspace
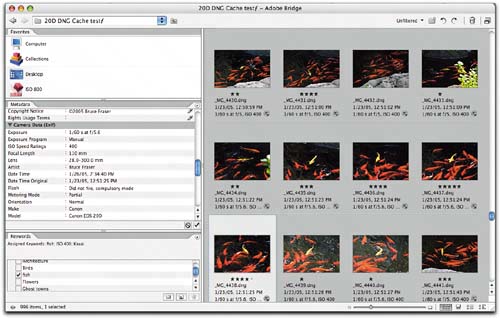
Bridge's preconfigured Metadata Focus Workspace
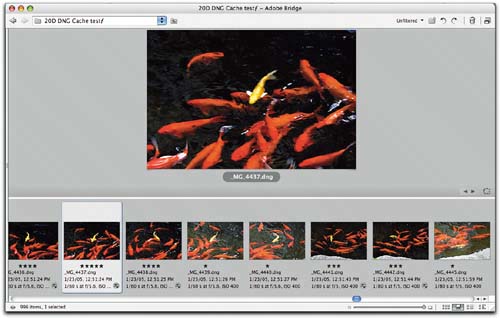
Bridge's preconfigured Filmstrip Focus Workspace
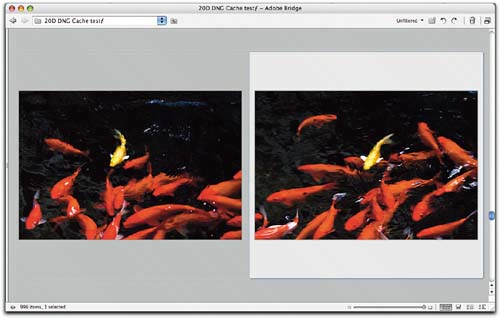
Fortunately, Bridge windows are eminently configurable, and you can save your custom configurations as Workspaces too. You can dock the panels as you wish, resize them by dragging their borders, remove panels you don't need using the View menu commands, or hide all the panels using the Show/Hide panels toggle. See Figure 6-4, earlier in this chapter, for the locations of the various window components. Saving Workspaces in Bridge is easy. Configure the window the way you want the Workspace to appear, then choose Save Workspace from the Window>Workspace menu. Enter a name (and, optionally, a keyboard shortcut), then click Save, checking Save Window Location as Part of Workspace if you always want the window to appear in the same place (very useful on dual-monitor setups). Your saved Workspace is then added to the Workspace menusee Figure 6-41. Figure 6-41. Saving a WorkspaceConfigure the window the way you want the Workspace to behave. In this case, I'm displaying two maximum-size thumbnails side by side with filename and metadata hidden.
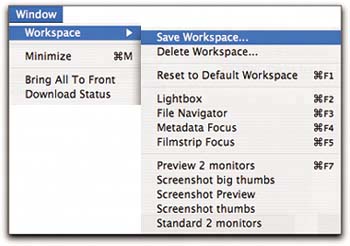
Choose Save Workspace from the Workspace submenu on the Window menu.
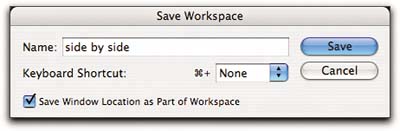
Name and save your Workspace.
For those of you have to know where things get saved, Workspaces as saved as workspacename.workspace, and are stored in Users/username/Library/Application Support/Adobe/Bridge/Workspaces on Mac OS and in Documents and Settings\Username\Application Data\Adobe\Bridge\Workspaces on Windows. |


EAN: N/A
Pages: 112