Bridge Windows
| Where the File Browser was limited to a single window, in Bridge, you can open as many windows as you like. Each window shows the contents of a folder or volume (subfolders appear as folder icons). Curiously enough (remember that this is a 1.0 application), the windows don't show up on Bridge's Window menu. This makes managing Bridge windows a little complicated. Arranging WindowsA few tricks can help you manage your Bridge windows.
In Compact and Ultra-Compact modes, Bridge windows by default "float" above full-mode windows, so they're easily availablesee Figure 6-2. Figure 6-2. Bridge window modes
Full to Compact
Compact to Ultra-Compact
Ultra-Compact to Compact
Compact to Full
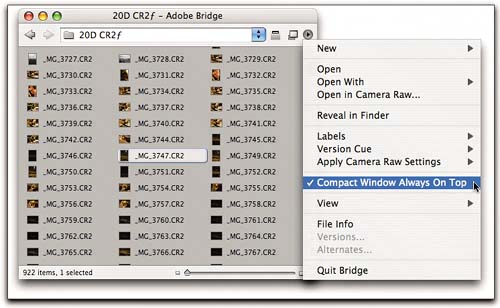
You can cycle through all the open Full-mode windows by pressing Command-~ (tilde) on the Mac and Alt-Tab on Windows, but the shortcut doesn't apply to Compact or Ultra-Compact windows, so it's just as well that they float by default. If the floating behavior annoys you, you can turn it off for individual Compact or Ultra-Compact windows from the flyout menu sported by those window modes, but be warned that doing so can make your Compact and Ultra-Compact-mode windows hard to findsee Figure 6-3. Figure 6-3. Compact and Ultra-Compact window menu
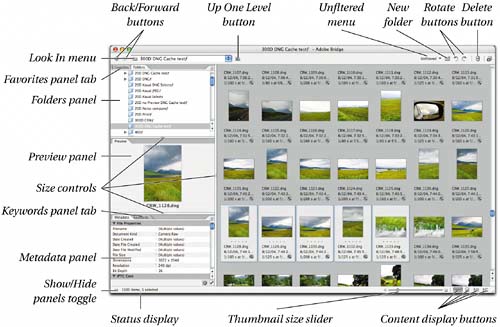
You can toggle between Full and Compact modes by pressing Command-Return (Mac) or Ctrl-Enter (Windows). The shortcut toggles between Full and either Compact or Ultra-Compact modes, depending on which of the compact modes you'd last applied to the window. Tip Select to Ensure the Right Window. One curious side effect of the floating compact windows is that Bridge can have multiple windows as the foreground window, and sometimes simply clicking on the one you want to switch from compact to full or vice versa doesn't work. If you select one or more thumbnails in that window, though, the shortcut will apply to that window. Bridge Window ComponentsIn Full mode, Bridge windows contains seven different areas, two of which, the tools and buttons, and the main window containing the thumbnails, are always visible. The five remaining componentsthe Folders, Favorites, Preview, Metadata, and Keywords palettesare resizable and rearrangeable within the palette area at the left of the windowsee Figure 6-4. Figure 6-4. Full window components
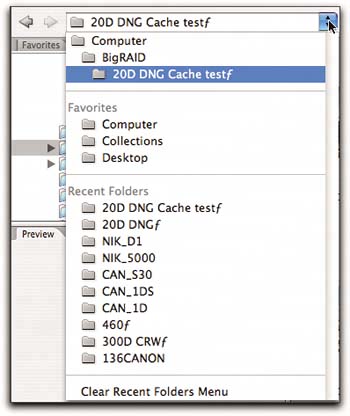
The main window holds thumbnails, which you can display at different sizes. The Folders palette lets you quickly browse through folders and also lets you move or copy files by dragging or Option-dragging their thumbnails to a Folder icon in the Folders palette. The Preview palette shows a preview of the selected image. The Metadata palette shows the metadata associated with the selected imageyou can control which fields are displayed. The Keywords palette lets you create keywords and sets of keywords, assign them to images, and perform searches. Bridge Tools and ButtonsBridge's tools and buttons are arranged in three logical groups. The navigation controls are at the upper left of the window, the content controls are at the upper right, and the display controls are at the lower right. Navigation controlsThe Back/Forward buttons work like those in Web browsers, letting you move backward and forward through recently visited folders. The Look In menu shows the current folder and its path, the number of recently visited folders specified in Bridge's Preferences, and folders or volumes added to the Favorites list using the File>Add Folder to Favorites command or by dragging into the Favorites panelsee Figure 6-5. The Up One Level button lets you navigate upward through the folder hierarchy. Figure 6-5. Bridge Look In menu
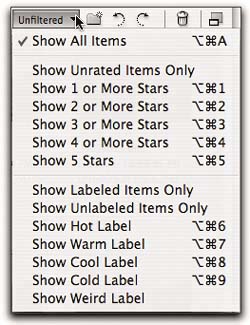
Content controlsThe content controls are a somewhat loose logical grouping, but they all affect the main window content in some way. The Unfiltered/Filtered menu lets you choose which thumbnails are displayed based on their rank or label (but not both)see Figure 6-6. I'll discuss using ranks and labels later in this chapter. Figure 6-6. Bridge Unfiltered menu
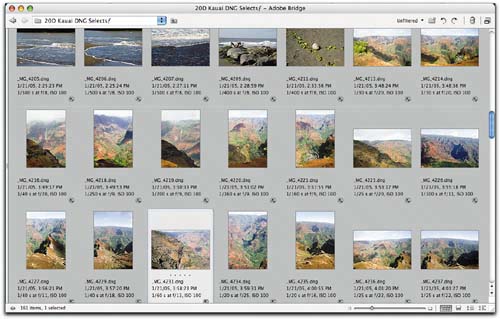
The New Folder icon lets you create a new folder inside the folder you're currently browsing (you can do the same by pressing Command-Shift-N). The rotate left and rotate right tools (keyboard shortcuts are Command-[ and Command-], respectively) rotate the selected thumbnails and previews, and instruct Camera Raw to apply the rotation to the raw file on open. The Trash icon (keyboard shortcut is Delete key) moves selected items to the Trash/Recycle Bin, but doesn't actually empty it. Display controlsThe thumbnail size slider lets you control the size at which Bridge's thumbnails are displayed, with the long side at a minimum of 16 pixels to a maximum of 512 pixels. The remaining buttons let you switch quickly between Thumbnails view, Filmstrip view, Details view, and for VersionCue users, Versions and Alternates view. VersionCue is outside the scope of this book and isn't readily applicable to a raw digital workflow. Note that the view buttons apply only to the main window that shows the image thumbnails. They have no effect on the palettesif the palettes are visible, switching views keeps the palettes visible, and if they're hidden, switching views keeps them hidden. Figure 6-7 shows the Thumbnails, Filmstrip, and Details views with the palettes hidden. Figure 6-7. Bridge viewsThumbnails view shows the image thumbnails with up to three lines of additional metadata.
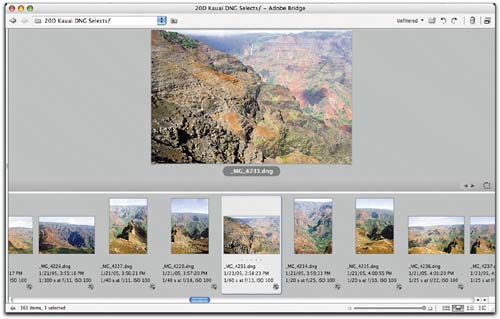
Filmstrip view shows the image thumbnails arranged along the bottom of the window with a large preview of the selected image displayed above.
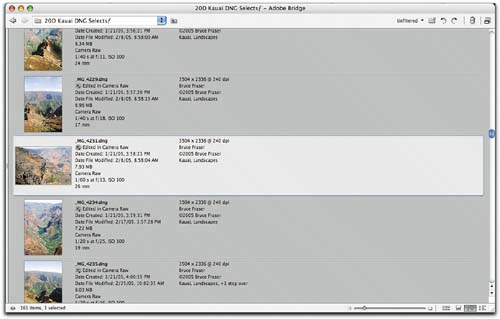
Details view shows the thumbnails as a list, along with additional metadata.
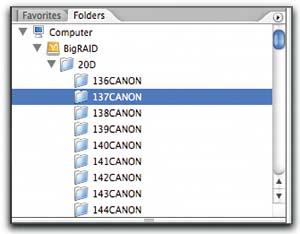
If you're like me, you'll find that none of these views is quite what you need at any given moment. Rest assured that Bridge is very tweakablesee "The Window Menu and Bridge Configuration," later in this chapter. Bridge PalettesThe Bridge Main window that holds the thumbnails lets you do a great deal of your work, but the other palettes are useful for specialized tasks. The Folders and Favorites palettes are primarily navigation aids, the Metadata and Keywords palettes let you apply and edit metadata, and the Preview palette offers a larger preview than the thumbnails at maximum size. Let's look at them individually. The Folders paletteThe Folders palette displays the volume and folder hierarchy, allowing you to navigate to different folderssee Figure 6-8. You can navigate up and down the folders list using the up and down arrow keys, and you can collapse and expand volumes or folders that contain subfolders using the left and right arrow keys. Command-up arrow moves you up to the next level in the folder hierarchy. The palette menu contains but one command, Refresh. Figure 6-8. The Folders palette
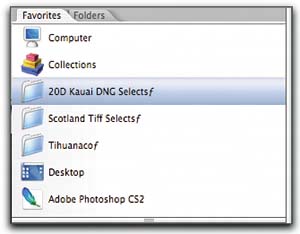
The Favorites paletteAs its name suggests, the Favorites palette is a handy place for storing things that you often want to return to in a Bridge window. In addition to actual volumes and folders, the Favorites palette can hold Collections, which are saved search criteria that act as "virtual" folders. It also contains an icon for Photoshop CS2. Clicking it transfers you to Photoshop CS2, launching it if it isn't already running. You can configure the preset items from Bridge's Preferences (see "Bridge Menu Commands," later in this chapter), and you can add items to it by dragging or by menu command. The Favorites palette has no menu of its ownsee Figure 6-9. Figure 6-9. The Favorites palette
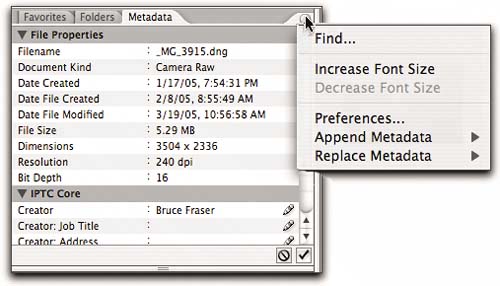
The Preview paletteThe Preview palette displays a preview for the selected image. Like the other palettes, you can collapse it by double-clicking on its tab and resize it by dragging its size controls, but it has no menu and no secrets. The Metadata paletteThe Metadata palette (see Figure 6-10) displays the metadata associated with the currently selected image or images (see the sidebar "All About Metadata, later in this chapter). When you have more than one image selected, many of the fields read "Multiple Values Exist." Figure 6-10. The Metadata palette
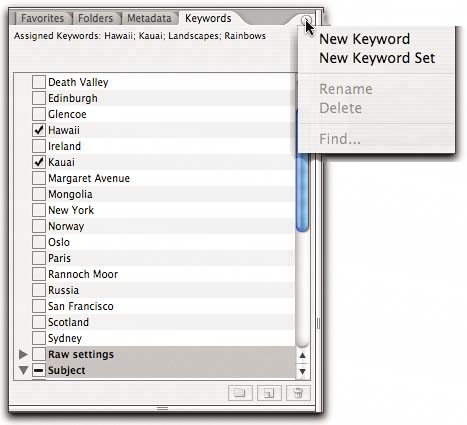
Metadata fields that are editable appear in the palette with a pencil icon next to the title. To edit these fields, select the images or images whose metadata you wish to edit, and then either click the pencil icon or click directly in the text area to enter the new metadata. To confirm entries, click the Apply checkbox at the palette's lower-right corner, or press Enter (Mac) or Alt-Enter (Windows). The only IPTC field that isn't editable here is the Keywords fieldto edit keywords, you need to use the Keywords palette. The Metadata palette menu lets you launch a search using the Find command (press Command-F), which is replicated in Bridge's Edit menu; increase or decrease the font size used in the palette; and append or replace metadata from saved templates, which appear in the menu (see "File Info and the File Menu," later in this chapter). The Preferences command takes you directly to the Metadata panel of Bridge's Preferences (see "Bridge Menu Commands," later in this chapter). It's definitely worth taking the few minutes needed to decide which fields you want to displayvery few Photoshop users need to see them all! The Metadata palette contains two separate sets of IPTC (International Press Telecommunications Council) metadata. The older IIM (Information Interchange Model) set is there for compatibility with legacy imagesit has been superseded by the new IPTC Core schema for XMP metadata. You can find out more about the IPTC standards at www.iptc.org. I'll discuss advanced handling of metadata in Chapter 8, Mastering Metadata. The Keywords paletteThe Keywords palette lets you create keywords (which you can group into categories called keyword sets), and apply them to a selected image or images. The keywords get written into the Keywords field of the IPTC metadata, so they're visible in the Metadata paletteyou just can't edit or apply them there. Keyword sets appear as foldersthe triangle to the left lets you expand and collapse them. When they're expanded, you can see the list of keywords in the set (see Figure 6-11). To apply a keyword to selected images, click in the column at the left of the palettea checkmark appears, indicating that the selected images contain this keyword. To apply all the keywords in a set, click beside the set name rather than beside the individual keyword. Icons at the bottom of the palette let you create a new keyword set or keyword, or delete an existing keyword set or keyword. Deleting keywords removes them only from the list, not from any files that contain them. You can also move keywords to a different set by dragging. Figure 6-11. The Keywords palette
The Keywords palette menu commands mostly replicate the functions of the control buttons, but the Rename command provides the sole path for renaming keywords or categories, and the Find command, which is only enabled when a keyword is selected, takes you to Bridge's Find dialog box with the selected keyword already loaded in the search criteria. |

EAN: N/A
Pages: 112
- Chapter I e-Search: A Conceptual Framework of Online Consumer Behavior
- Chapter III Two Models of Online Patronage: Why Do Consumers Shop on the Internet?
- Chapter VIII Personalization Systems and Their Deployment as Web Site Interface Design Decisions
- Chapter XIV Product Catalog and Shopping Cart Effective Design
- Chapter XVI Turning Web Surfers into Loyal Customers: Cognitive Lock-In Through Interface Design and Web Site Usability