Saving Your Images
| It's likely that the majority of images displayed on Web pages today were produced or edited with Photoshop. However, making images for the Web is a study in compromise: You can have either great-looking images or pictures that download quickly. You choose. The problem is that you need to see all the options to make an informed decision about how much to degrade your image in the name of small file sizes. The solution is the Save For Web feature. Save For Web (select it from the File menu or press Command-Option-Shift-S) lets you see exactly what will happen to your images when you convert them to GIF or JPEG. Better yet, it can display two or four versions at a time and let you tweak each of them until you get just the effect you want (see Figure 14-3). Figure 14-3. Save For Web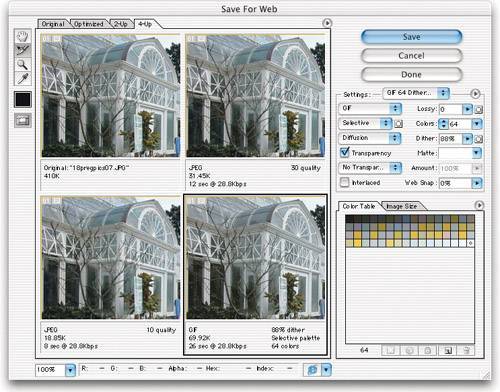 On-Screen File FormatsWe discussed graphic file formats back in Chapter 13, Image Storage and Output, but we need to explore two formatsGIF and JPEGin more depth here, because they're key to the way images appear on the Internet. If your images are destined for a multimedia program such as Microsoft PowerPoint or Macromedia Director, you can probably save them in the PICT or TIFF file format. But for Web use, you almost certainly need to save your images in either GIF or JPEG format. Tip: Checking File Size The file size that Photoshop provides in the lower-left corner of the document window is far from accurate, mostly because it doesn't take into account any form of compression you will achieve with either JPEG or GIF images. The file size you see in the Save For Web dialog box is more accurate, but it's still not perfect. The only way to find an image's true (post-compression) file size is to save it to disk and switch out of Photoshop. If you have a Macintosh, use Get Info in the Finder (select the file and choose Get Info from the File menu); if you're working on a Windows machine, use Properties on the Desktop (click on the file with the right mouse button and choose Properties from the list of options; see Figure 14-4). Figure 14-4. Finding file size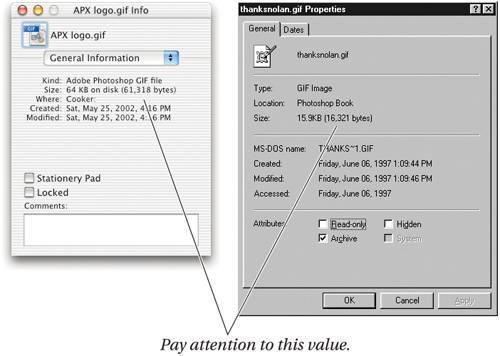 If the file size is displayed as "27 K on disk (22,045 bytes used)," only pay attention to the second number. The first value is the amount of space the image takes up on your hard disk: this depends on the block size your hard disk uses. If your disk uses 32 K blocks, a 2 K file will occupy 32 K on disk, and a 33 K file will use 64 K of disk space. The second number shows the actual amount of data someone would have to download to see the image, and it's usually smaller than the disk space number. Save For WebThe trick to the Save For Web feature is to be methodical. Here are the basic steps you should follow once you have the dialog box open.
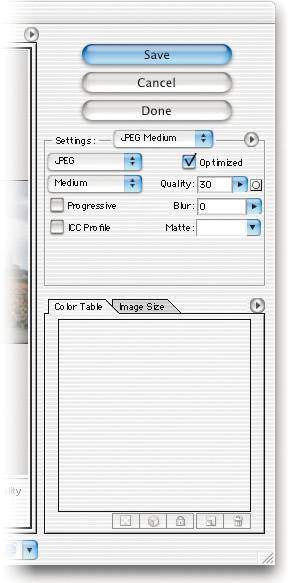
The problem is that there are so many settings in the dialog box to tweak, many of them obscure. The Settings and Format popup menus are relevant for any file format you use, so we'll cover them first. Then we'll get into the settings that are specific to GIF, JPEG, WBMP, and PNG. SettingsThe Settings popup menu lets you recall saved sets of settings. There's nothing magic about the settings that are already built-in; they're only there to get you started. If you don't like Adobe's settings, you can delete them by choosing Delete Settings from the popout menu to the right of the Settings popup menu. If you want to add your own group of settings to the list, choose Save Settings instead; make sure the settings are saved in the Optimized Settings folder (inside your Photoshop Presets folder), with an .irs file name extension. FormatIf you prefer to arrange the settings manually, you should start by choosing GIF, JPEG, PNG, or WBMP from the Format popup menu. We discuss these formats in some detail in the last chapter and below. JPEGFor best reproduction on the Web, scanned photographic images should almost always be saved in the JPEG file format. This way, people viewing the image on a 24-bit color monitor will see all the colors in the image, and those on 8-bit monitors will see a dithered version. Fortunately, the dithered version is usually pretty goodalmost as good as if you had converted the image to 8-bit in Photoshop yourself. JPEG compresses RGB natural images really well, even if the image does suffer some degradation in the process. On the other hand, JPEG is not suitable for images that have a lot of solid colors, especially computer-generated images, type, and line art. It's also not appropriate for images in which you've used Web-safe colorsbecause colors often shift in JPEG imagesor images that require transparency. You can save images in the JPEG format from the Save As dialog box (see Chapter 13, Image Storage and Output), but you get much more control in the Save For Web dialog box (see Figure 14-5). Figure 14-5. Save For Web: JPEG images OptimizedThe only time you want to turn off the Optimized checkbox is if you're sure your image will be displayed on a very old Web browser that may not support the Optimized JPEG format. Almost every browser in use these days supports this format, however. Compression qualityThe more compression you apply in Photoshop, the worse the resulting image quality. Where you only have 12 levels of JPEG compression in the Save as JPEG dialog box, the Save For Web dialog box offers you 100 levels. The four settings in the Quality popup menu (Low, Medium, High, and Maximum) are simply presets for values in the Quality field to the right. (The four settings correspond to numerical values of 10, 30, 60, and 80, in case you care.) You can change the value to any number between 1 and 100 (100 being the highest quality and least amount of compression). If you're a prima donna about your images, and you don't want any degradation, you're probably in the wrong business here. Remember that you can usually get away with a lot of degradation. David rarely uses a Quality value over 50 for Web images, though he probably wouldn't use less than 90 (a 9 or 10 setting in the Save As dialog box) for prepress images. Ultimately, it's all trial and error. Note that if there are particular areas in your image that you don't want as degraded as others by the JPEG compression, you can select those areas, and save the selection as a channel. Then, click the little button next to the Quality field (the one that has a little dotted circle in it), and choose your channel from the Channel popup menu. Here, Photoshop lets you choose compression values for the black and white areas of the channel. Similarly, you can just specify a text or vector layer rather than building a channel. However, watch out: files that have this sort of compression-prioritizing area may look slightly better, but are almost always larger than those in which you have a single compression value throughout. ProgressiveLike Optimized, we almost always leave the Progressive feature turned on. When it's on, Web browsers will display a low-resolution version of the image first, then replace it with a high-resolution version. Strangely, progressive JPEG images are even slightly smaller than non-progressive JPEGs, so the only reason not to leave this turned on is for displaying on very old browsers. BlurThe problem with JPEG images is that the more you compress them, the more blocky they appear. These blocky artifacts are distracting to the eye, and primarily appear around high-contrast edges in your image. One option to combat these artifacts is to blur your image slightly so the edges aren't so pronounced. You can either apply the Gaussian Blur filter to your image before opening the Save For Web dialog box, or you can type a blur value into the Blur field here. Both do exactly the same thing, so if you're going to use it (we rarely doperhaps only for thumbnails) we recommend just applying it in the dialog box. ICC ProfileThe ICC Profile checkbox lets you tell Photoshop whether to embed your RGB workspace profile in your JPEG image. Currently, the only Web browsers that care about color management assume that images are in sRGB unless an embedded profile tells them otherwise. We generally recommend converting Web images to sRGB before opening Save For Web, which makes profile embedding moot. But if for one reason or another you don't want to convert the image to sRGB, and you think your target audience will have color management configured correctly, by all means embed your working space profileit usually adds less than 1 K of data to the file. For more information about ICC profiles and color management, check out Chapter 5, Color Settings. MatteJPEG images are always opaque and they're always rectangular. That's just the way it is; if you want real transparency, use the GIF or PNG format. So what happens if your image is on a layer that includes transparency? Photoshop fills in all your transparent pixels with whatever color you've chosen in the Matte field. In general, you want the Matte color to be the same color as either the background of the image or the background of your Web page. Note that the color you choose may shift slightly in the conversion to JPEG, especially if you're applying a lot of compression; check the RGB and Hex settings at the bottom of the Save For Web dialog box. Tip: Keep Your Originals Remember that if you open a JPEG image in Photoshop and then save it out again as a JPEG, the compression damages the image even more. So remember to always keep the original non-JPEG version of your image. That way, you can go back and make edits on the original and save out the JPEG version fresh again. GIFWhile JPEG is the preferred format for natural ("photographic") scanned images, GIF (don't even get us started on the "how should this be pronounced" argument) is currently the format for everything else.
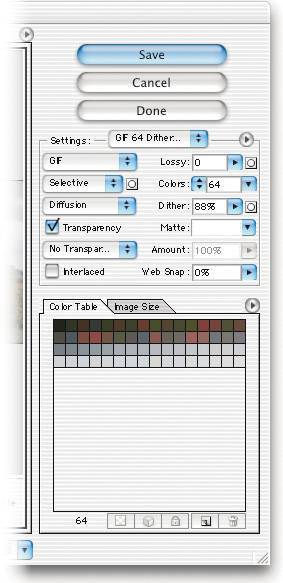
Theoretically, the GIF specification allows for a full 24-bit color image; however, nobody really supports this, so GIF images are always saved in 8-bit indexed color. (For more on this mode, see "Indexed Color" in Chapter 3, Image Essentials, and "Indexed Colors," later in this chapter.) That means you can't have more than 256 colors in your image. Fortunately, you can usually specify which 256 colors you want to use. Tip: Stay in RGB Some folks convert their RGB images to Indexed Color mode (on the Mode submenu) before saving them as a GIF. There's nothing wrong with doing this, but the Save For Web dialog box makes this workflow obsolete. Just leave the image in RGB and let Photoshop convert to Indexed Color mode on the fly when you save the file. The RGB mode is much more efficient in the long run because it affords the most flexibility in editing the image. Here are the various options you have when saving a GIF image in the Save For Web dialog box (see Figure 14-6). Figure 14-6. Save For Web: GIF images LossyNo, Adobe isn't breaking the rules of GIF images: the GIF file format is still a lossless format (it doesn't degrade your image like JPEG does). Instead, the Lossy feature in the Save For Web dialog box lets you degrade the image before it's saved as a GIF. Photoshop is taking advantage of several characteristics of the compression algorithm that GIF uses; by degrading the image in certain intelligent ways, it can compress the file further. This is most helpful when you have to save a scanned photographic image as a GIF instead of a JPEG (for instance, if you want portions of the image to be transparent). You can often get a significant increase in compression with hardly any visual noise by increasing the Lossy value to 10 or 20. Color reduction methodGIF images are saved in the Indexed Color mode, which means a maximum of 256 colors. If you're converting an RGB image, or reducing the number of colors in an indexed color image, you need to tell Photoshop what method of color reduction to use (these are the same as the reduction methods listed in the Indexed Color dialog box): Adaptive, Selective, or Perceptual. Where Adaptive picks colors from your image based on how often they appear in the image, Perceptual picks a color palette based on how the colors look to the eye; in particular, Perceptual creates much nicer transitions between colors, so it's best for scanned photographic images. The Selective method is slightly better for images that have sharp high-contrast edges, such as synthetic images (like those from Illustrator or FreeHand). We hardly ever use Adaptive anymore. If you insist on using a Web-safe palette, go ahead and select "Restrictive (Web)" from the popup menu. Or, if you've already built a custom color palette, you can choose it by selecting Load Color Palette from the popout menu next to the Color Table and Image Size tabs (if they labeled these popout menus, it would sure make it easier to describe this stuff to you). Tip: Giving Preferential Treatment Do you care about the color in one part of your image more than in other areas? No problem. Make a rough selection of the pixels you care about using the Marquee or Lasso tool, and save the selection in the Channels palette (see Chapter 8, Making Selections). Then, in the Save For Web dialog box, click the little button next to the Color popup menu (the one where you select Adaptive, Perceptive, and so on). Photoshop lets you pick the saved channel, and re-creates the color palette, giving a weighted preference for colors in that area. ColorsThe fewer colors in an image, the more solid or patterned areas in the image, so the better compression you can get. Very few GIF images need a full 256 colors; in fact, it's rare to find an image that won't look reasonable on screen with only 64. Note that the colors are shown in the Color Table at the bottom right of the dialog box (see "Color Table," later in this chapter). DitherReducing the number of colors in an image is an imperfect science, and the results are often better if you dither the final colors a little bit. Photoshop has always included the Diffusion and Pattern dithers in the Indexed Color dialog boxes (the first is good, the second is bad). New to the lineup is the Noise option. The results are similar tothough a little "noisier" thanthe Diffusion dither; however, you should use the Noise option if you're also slicing the image into smaller pieces (see "Slices," later in this chapter). The reason has to do with the way that diffusion dithers are created (Photoshop looks at each pixel and the pixels around it; if you later slice an image, the pixel values might change and the dither would no longer look right). If you choose the Diffusion method, you can also pick a Dither amount in the Dither field. Personally, we feel that if you're going to be dithering an image at all, you might as well pick a value in the 70 or 80 percent area. However, the choice is up to you and really is image-specific. TransparencyIf your image contains transparent pixels (that is, it has no opaque Background layer), you can choose whether or not those pixels should be transparent in the final image by turning on or off the Transparency checkbox. When the checkbox is turned off, all transparent pixels are set to the color in the Matte field. If Matte is set to None, then Photoshop sets the colors to white. On the other hand, if you turn on the Transparency checkbox, Photoshop leaves fully transparent pixels transparent, and blends partially transparent pixels with the color in the Matte setting. This is very useful when you're trying to blend your GIF image into your Web page's background color (see Figure 14-7). If Matte is set to None, then Photoshop simply clips off all partially transparent pixels, and you get a hard, aliased-edged image. Figure 14-7. Transparency in GIF images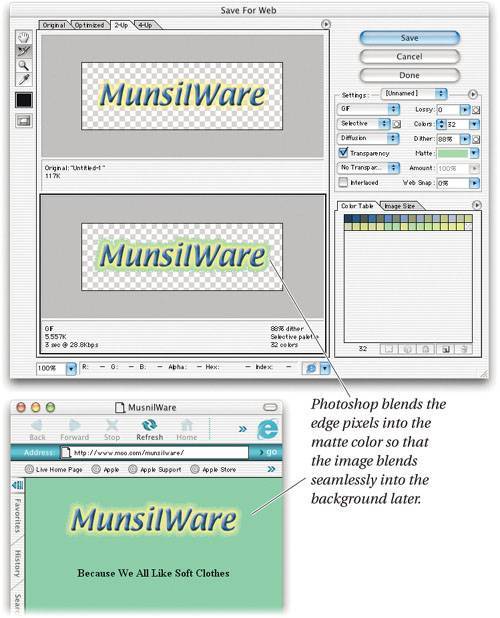 If your image doesn't contain any transparent pixels, you can force particular colors to be transparent in the Save For Web dialog box by selecting them in the Color Table (you can choose more than one by Command-clicking on each color) and clicking the Transparency button. But unless you have very few colors in your image, it's usually just much faster to exit the Save For Web dialog box and create transparency in the image itself. You can also create "dithered transparency" by selecting from the popup menu directly beneath the Transparency checkbox. This only has an effect when there are pixels that are partially transparent in your image (like a drop shadow might be). Unfortunately, the result is typically so extraordinarily ugly that we find it hardly worth the time. Tip: Finding a Good Matte Color When choosing a matte color to which Photoshop can blend your semitransparent pixels, you generally want to pick a color dominant in whatever background you're placing the image over. If you can't remember what that color is, but it appears somewhere on screen (the Photoshop Color Picker, the Swatches palette, or in some image window), you can choose it by clicking once on the Matte color swatch, then clicking on the desired color with the automatically provided eyedropper tool. If the Swatches palette isn't visible (and you want it to be), choose Show Swatches from the Window menu first. InterlacedWhereas turning on the Progressive checkbox for JPEGs generally makes the image slightly smaller (a fact which truly confounds us, as the image doesn't appear to change any), turning on the Interlaced checkbox for GIF images actually makes the image very slightly larger. Because of this, we only turn this on when having an image appear slowly (like a venetian blind opening) actually benefits the viewer. For instance, we rarely use this for buttons, but we typically do use it for image maps, because the audience might be able to click on an area of the image map before the final image is complete. Web SnapMaybe we just don't get it, but the Web Snap feature seems really useless to us. The concept is that as you increase the Web Snap percentage, some number of colors in your image will snap to a Web-safe color palette. Unfortunately, you have no control over what colors are changed. We never use this; if we want to snap colors to a Web-safe palette, we do it manually in the Color Table area. Color TableThe Color Table not only displays which colors appear in your final image, but also lets you change them or keep them from being changed. While it's rare that you'd need to do so, if you double-click on any color swatch, Photoshop lets you change its color (using the standard Color Picker). More common is tweaking the color to match the nearest Web-safe color. Fortunately, Photoshop makes this really easy: just select the color (or more than one color by holding down the Command key when you click) and click the Snap to Web-safe Color button (that's the one that looks like a little cube). Web-safe swatches appear with a white dot in their centers. The popout menu next to the Color Table lets you add and delete colors, select specific colors, andbest of allcontrol how Photoshop displays the color swatches. We generally choose to display the swatches by Hue or Luminance, as we find these easiest to comprehend. Tip: Save That Color! Let's say you've got an image of a banana with a small bit of red text over it. Because the image is composed of mostly yellow colors, the red text might change to a dark yellow color if you lower the number of colors in the image. To save the red pixels, increase the number of colors in the Save For Web dialog box to 128 or so (enough so that the red pixels appear in the Color Table), then select the red swatch and click the Lock button (the one that looks like a little padlock). Now, as you lower the number of colors in the image, that swatch will always remain red. You can unlock it again by selecting it and clicking the button again. Note that locked colors always show a small white square in the bottom-right corner. Tip: Optimize to File Size Computers are supposed to figure stuff out for us, right? So if you know that you need an image to be smaller than 10 K, why not let Photoshop figure out the proper settings for you? Click on one of the images in the Save For Web dialog box and select Optimize to File Size from the unlabeled popout menu next to the Settings popup menu. The Optimize To File Size dialog box lets you choose a file format (JPEG or GIF), but we tend simply to choose the Automatic feature and let Photoshop figure out the best solution for us (see Figure 14-8). Whatever you do, though, don't just accept whatever Photoshop gives you: the best images still require some tweaking. Figure 14-8. Optimize To File Size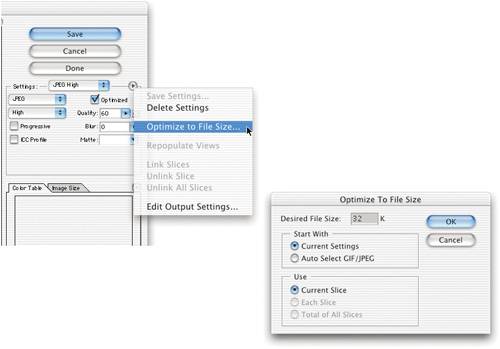 Tip: Eking Out the Bytes A great many images on the Internet (or "information superhighway," or "Infobahn," or whatever you want to call it) are saved in GIF format, especially those that appear on World Wide Web sites. The reason is simple: they're very compact. But sometimes they're just not compact enough. For instance, on slower modem lines, there's a big difference between watching a 30 K image slowly appear on your screen and a 15 K image appear without trouble. If you're trying to eke out every little bit of compression in a GIF file, keep in mind how LZW compression works: it looks for repeating patterns of colors. For instance, it can tokenize "red, blue, red, blue, red, blue" into one piece of information. Therefore, the images that get compressed the most contain lots of these repeating patterns. Here are several ways you can make Photoshop use more repeating patterns when you're converting images from RGB to Indexed Color.
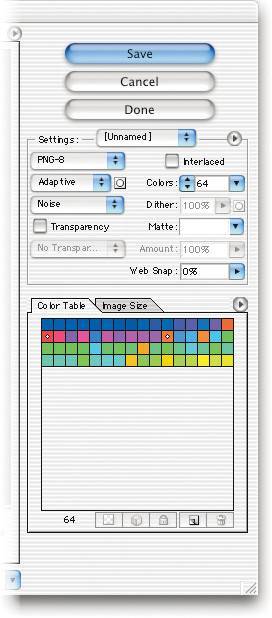
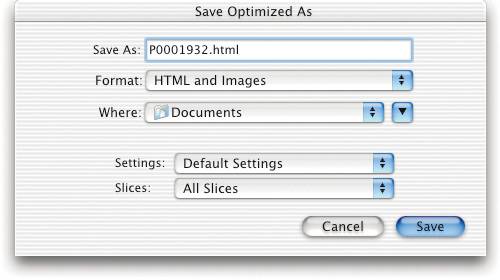
With any of these techniques, the image's dither is almost always slightly more obvious, but you can make the image transfer over phone lines faster. PNG ImagesThere are very few settings you can change when saving files in the PNG-24 format (the primary choice is whether or not they should include transparent areas), and the settings for the PNG-8 file format are almost identical to those of the GIF format (see Figure 14-9). As we explained back in Chapter 13, Image Storage and Output, we think the PNG format is cool, but it is still isn't widely used or supported fully by Web browsers. Also, note that PNG images are generally larger than their GIF or JPEG counterparts, so there has to be a really good reason to use them (which there isn't yet). Figure 14-9. Save For Web: PNG-8 and PNG-24 WBMP ImagesWeb pages are beginning to appear on every sort of device, from cell phones to PDAs to kitchen blenders (well, not yet, but probably soon). However, most of these devices only display black and white pixelsit's like a return to 1984! Standards are shifting, but one file format for displaying these Bitmap images has gained popularity: WBMP (which isn't the same thing as Windows BMP). Photoshop lets you save WBMP files in two ways. If your file is already converted to Bitmap mode from the Mode submenu (in the Image menu), you can simply save as WBMP from the Save As dialog box. Otherwise, the Save For Web dialog box lets you save any kind of image in the WBMP format. The only control you have for WBMP files is the type of dither: None, Diffusion, Pattern, or Noise. Note that Diffusion and None look the same until you increase the dither percentage for the Dither setting. Curiously, the WBMP format doesn't appear to include any compression algorithms, so whatever dither you use creates the same-sized file. Other Save For Web ControlsBefore we move on to other aspects of Photoshop's Web capabilities, we should note just a few other nifty features in the Save For Web dialog box. NavigatingYou can navigate around your graphic to check for image degradation in different areas. First, you can use the Grabber Hand tool (press H) by clicking-and-dragging on any one of the images. As you drag one image, all the other images move, too. Next, you can zoom in and out on the image by changing the view percentage in the lower-left corner of the Save For Web dialog box (though it's usually faster to Control-click or right-mouse-click on an image and change the scale from the context-sensitive menu). Zooming out rarely helps, but we sometimes zoom in to see the effects of the JPEG or GIF conversion more clearly. Note that you can also resize the Save For Web dialog box by dragging in the lower-right corner of the window. Image SizeNeed your final Web graphic to be smaller than the high-resolution version you've got? You can use the Image Size dialog box to downsample the image before using Save For Web, or you can use the Image Size tab in the Save For Web dialog box. Both do exactly the same thing. The one difference is that the Save For Web dialog box only offers you pixel dimensions, and the result will always be at 72 ppi. This is okay because inches, millimeters, and picas don't mean anything in a Web world where everyone's monitors display at different resolutions. Browser DitherSure, you have a 24-bit color monitor, but your audience might not. A few people still have old 8-bit color monitors, and your glorious color images will get dithered using the 256 colors in their Web browser's color palette. If you care about what those people see, you can turn on the Browser Dither option in the unlabeled popout menu at the top right of the Save For Web dialog box's image area (or, better yet, just select it from the context-sensitive menu). Download speedEach image in the Save For Web dialog box lists the approximate time it would take to download this image at 28.8 Kbps. However, if you're pretty sure that most of your audience will be connected with a 256 Kbps cable modem, you can change the setting in the popout menu at the top of the dialog box (or in the context-sensitive menu). To be honest, though, we rarely pay attention to this readout, as there are many variables that affect download times (server load, processor speed, cosmic rays...). GammaAs we pointed out earlier, Windows boxes typically display images darker than Macintosh boxes. You can simulate this by turning on Standard Windows Color, which simulates a display gamma of 2.2; or Standard Macintosh Color, which simulates a display gamma of 1.8 (either from the popout menu at the top of the dialog box or from the context-sensitive menu). But ultimately, when it comes to color and tone correction for the Web, it's still really hit or miss. Let Photoshop Write Your HTMLWho wants to write HTML code anymore? Certainly not us. We paid our dues already, and now we just want to let the computer do what it's good at. Fortunately, the Save For Web dialog box will write HTML code that describes our images. There's two ways to get HTML out of this dialog box. First, you can click on the preview button to open the currently selected image in your Web browser. Not only does the image appear, but so does information about the image and the source code that the Web browser can read. You can then copy the pieces of the HTML that you require (generally the IMG tag). There's a better way, though: After you select which image you want to save and click OK, Photoshop displays the Save Optimized As dialog box, where you can actually name your file and tell Photoshop where to save it (see Figure 14-10). What's more, you can choose HTML and Images from the Format popup menu. (If you're saving Slices, this is really important; see "Slices," in the next section.) You can then open the HTML file in a text editor and copy and paste the relevant information. Figure 14-10. Save Optimized As |
EAN: N/A
Pages: 220