Imaging from Photoshop
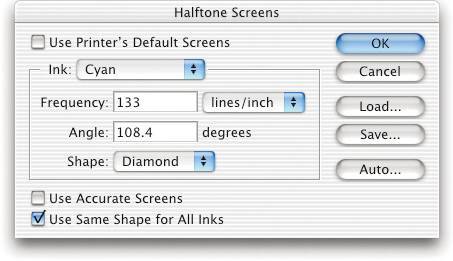
| When we started writing the Real World Photoshop series back in the days of version 3, it was almost a given that most people who used Photoshop didn't print directly from it; instead, they saved their images in some other format and then imported them into some other program to print later. But the revolution in inkjet printing has changed all that, as legions of photographers discover that the digital darkroom is infinitely more controllable and predictable than the wet one. So we're going to tackle the topic of imaging directly from Photoshop before we move out of Photoshop and into QuarkXPress, InDesign, or other programs. As in almost every other Macintosh or Windows program, there are two menu items (and accompanying dialog boxes) tied to imaging: Page Setup and Print, both found under the File menu. But Photoshop also offers a third item, Print with Preview, that serves as command central for the two more common ones and adds Photoshop-specific options. Because Mac OS X and Windows XP currently don't allow applications to add features to the Print and Page Setup dialog boxes, Adobe added the Print with Preview command. Most of the options you need to change when you're printing from Photoshop can be accessed easily in Print with Preview, so when we print from Photoshop, this dialog box is always our first stop (see Figure 13-21). Figure 13-21. Print with Preview dialog box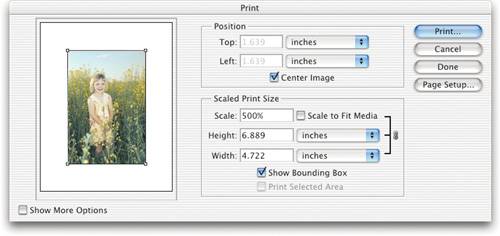 Print with PreviewIn its basic formwhat you get when you click the Fewer Options button in the dialog boxthe Print with Preview dialog box (which is confusingly labeled "Print") lets you control the position and scaling of your image on the page. You can do so either visually, by dragging the image proxy to position it and dragging the bounding box handles to scale it, or numerically, by entering values in the appropriate fields. To scale or position the image by dragging, you must turn on "Show Bounding Box," and if "Center Image" is turned on, you can only scale the image, not position it. Note that the proxy image is For Position Onlyspecifically, it isn't color-managed, so don't try to draw any conclusions from its appearance! PositionThe Position fields let you enter the position of the image's top-left corner on the page, in inches, centimeters, points, or picas. If the Center Image checkbox is turned on, the position fields are dimmed. Scaled Print SizeThe Scaled Print Size fields let you enter a scaling percentage, or a height or width in inches, centimeters, points, or picas. The Scale to Fit Media checkbox, when turned on, scales the image to cover as much of the printer's printable area as the image's aspect ratio allows. All three fields are locked togetheryou can't change the aspect ratio of the image. The base size that's first reported when you open Print with Preview is based on the settings in the Image Size dialog box. When you change the scaling, be aware that you aren't creating any new pixelsthe scaling options are just like changing the size or resolution in Image Size with the Resample Image checkbox turned off. Tip: Don't Scale in Page Setup Photoshop lets you apply scaling to the printed image in Print with Preview or in Page Setup, but Print with Preview doesn't "know" about scaling applied in Page Setup; so if you apply scaling there, the preview and dimensions in Print with Preview will be incorrect. We recommend you always apply scaling in Print with Preview, and leave the scaling in Page Setup at 100 percent. Print Selected AreaYou'd be surprised how many people wonder how to print just a small portion of their enormous image. They go through all sorts of duplicating and cropping convolutions instead of simply drawing a marquee around the area they want printed, then turning on the Print Selected Area checkbox in the Print with Preview dialog box. If no pixels are selected, or if the selected area isn't a rectangle (like if it's feathered), this checkbox is grayed out. Show More OptionsWhen you click on the Show More Options checkbox, Print with Preview gives access to even more controls (we never turn this off). The Photoshop-specific items appear when you choose Output from the popup menu, and (surprise!) the various color management output options appear when you choose Color Management from the popup menu. Let's cover the Output options first (see Figure 13-22). Figure 13-22. Show More Options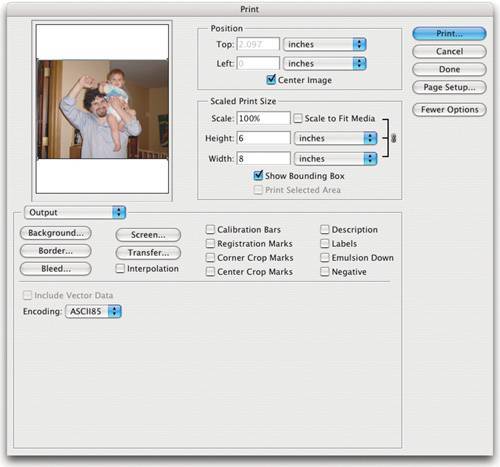 Output OptionsThe Output Options tell Photoshop how to print the document. A couple of these items (screens and transfer curves) also apply when you save files in various file formats. Some features in the dialog box are determined by which printer driver you currently have selected. Because these are standard system-level features, we're going to skip them and get right to the good stuff: the Photoshop-specific items. Note that some of these options apply only to PostScript printing. If you're printing to a non-PostScript printer, they have no effect, and Photoshop will alert you to the fact by popping up the dialog box shown in Figure 13-23. Figure 13-23. The non-PostScript printer alert ScreenThis is a PostScript-only option. When you click the Screen button, Photoshop brings up the Halftone Screens dialog box, where you can specify the halftone screen angle, frequency, and spot shape for your image (see Figure 13-24). When the Use Printer's Default Screens checkbox is turned on (it is unless you go and change it), Photoshop won't tell the printer anything about how the image should be screened. Figure 13-24. Halftone Screens dialog box Leave this checkbox on unless you want to take responsibility for setting your own halftone screens. Photoshop gives you a wide array of possibilities for setting the halftone screen. However, most platesetters and imagesetters override the screen values (see "Overriding Screen Settings," earlier in this chapter).
Note that you can include these screen settings in EPS files (see "Encapsulated PostScript (EPS)" earlier in this chapter). Tip: Use Diamond Spot Peter Fink's PostScript prowess perfected the diamond spot (say that ten times fast). The diamond spot is better in almost every instance than the standard round spot because it greatly reduces the optical tonal jump that is sometimes visible in the mid-to-three-quarter tonesthe 50-to-75-percent gray areas. We've also been told that the diamond spot is much better for silkscreening. TransferWe discussed the idea of input/output contrast curves back in Chapter 6, Image Adjustment Fundamentals, and in Chapter 10, Spot Colors and Duotones. Well, here they are once again, in Print with Preview. A transfer curve is like taking a curve that you made in the Curves dialog box and downloading it to your printer. It won't change the image data on your hard drive, but when you print with the transfer curve, it modifies the printed gray levels. This option works on non-PostScript printers. It's a rare occasion that you'd need to use a transfer curve these days. But if you do, click the Transfer button (see Figure 13-25). Note that while you can save a transfer curve with an image in any format that Photoshop supports, the curve is only recognized when you print directly from Photoshop. To print images with transfer curves from a page-layout application, you need to use EPS files. But there's a danger in using transfer curves with EPS images, because there's no obvious signal to tell anyone working with the image that it contains a transfer curve, except that the values in the file aren't the same as those that print. The only way to tell is to open the image in Photoshop and check to see if there's a transfer curve specified. If you do use a transfer curve, make sure that whoever is responsible for printing the file knows it's lurking there! Figure 13-25. Transfer Functions dialog box Tip: Interchangeable Curves While Bruce can think about transfer curves in terms of numbers, David needs a more touchy-feely approach. So he tries out his transfer curves in the Curves dialog box first. When he gets a curve just the way he wants it, he saves the curve to disk (using the Save button in the Curves dialog box), then he goes to the Transfer Functions dialog box and loads it in. Note that Photoshop provides you with a checkbox at the bottom of the Transfer Functions dialog box: Override Printer's Default Functions. Don't turn this on unless you really know what you're doing with transfer functions. If you're printing through a linearized RIP, turning this checkbox on will override the linearization, and could give you nasty results. While it's nice that Adobe gives us this control, it's one we tend to ignore. BackgroundBackgroundand the next 11 featuresare only relevant when you're printing from Photoshop; you cannot save them in an EPS format (or any other, for that matter) and expect them to carry over to other programs, like you can with Screen and Transfer. When you print your image from Photoshop to a color printer, the area surrounding the image is typically left white (or clear if you're printing on film). The Background feature lets you change the color that surrounds the image, using the standard Photoshop Color Picker. The background color that you pick acts like a matte frame around the image to the edges of the printable area. Tip: Make Your Highlights Pop If you typically make prints with a white border, you can make your highlights appear much snappier if you lay down a small amount of ink in the border. Our eyes adapt to the paper-white border: when you print a very light gray or yellow tone in the border, the eye still accepts this as paper white; so, any specular highlights that use the actual paper white appear brighter than they really are, because the viewer's eye is adapted to the white of the surround. BorderIf you specify a border around an image (the border can be up to 0.15 inches, 10 points, or 3.5 millimeters), Photoshop centers the frame on the edge of the image when you print; that is, half the frame overlaps the image, and half the frame overlaps the background. You cannot, unfortunately, change the color of the frame; it's always black. Unless we're printing directly from Photoshop and we want a print with a black border, we can't think of any reason to use this feature, except perhaps to print an image with a pretrapped frame directly from Photoshop, then strip it in with the rest of the film manually. Yuck. We'd rather import the file into QuarkXPress or InDesign and keyline it there. BleedSetting a Bleed value adjusts where Photoshop places the corner crop marks. You can choose a bleed up to 9.01 points, 3.18 millimeters, or 0.125 inches (who knows who came up with these values). Again, this is most useful if you're planning on doing manual stripping later. Note that if you specify a 0.125-inch bleed, Photoshop sets the crop marks in by that amount from the image boundary, not out: it effectively says, "cut off the edges of this image." InterpolationThis PostScript-only item usually does absolutely nothing. In theory, this feature tells your printer to upsample low-resolution images at print time. We've heard various claims that some PostScript Level 2 or greater printers are actually capable of doing this, but we've yet to see evidence of it. But thanks, Adobe, for giving us the choice! DescriptionDavid loves Photoshop's ability to save a description with a file because of the File Info metadata tie-in to InDesign, but it's also helpful when printing a whole mess of images that you need to peruse, file, or send to someone. When you turn on the Description checkbox in Print with Preview, the program prints whatever caption you have saved in File Info (under the File menu) beneath the image. If you haven't saved a description, this feature doesn't do anything. You might even include your name or copyright information in the Description field of the File Info dialog box, even though there are other fields for this. At least your name prints out with your images. Newspapers and stock photo agencies can make much more elaborate use of the File Info feature, including credit lines, handling instructions, and keywords for database searches. Calibration BarsThis is a PostScript-only option. When you turn on the Calibration Bars checkbox in Print with Preview, Photoshop prints one (for grayscale images) or several (for color images) series of rectangles around the image (see Figure 13-26). Beneath the image is a ten-step gray wedge; to the left is the same gray wedge, but on each color plate; to the right is a series of colors, listed below. Each color is 100 percent (solid). Figure 13-26. Printer marks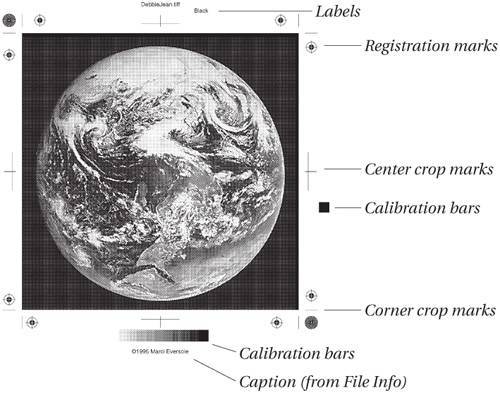
Registration MarksIf you're outputting separations, you need to add registration marks so that the printer can align the four colors properly. Turning on the Registration Marks checkbox adds ten registration marks (eight bull's-eyes and two pinpoint types). Corner Crop MarksEven if your printer is going to strip your image into another layout, it's helpful to print with corner crop marks, which specify clearly where the edges of the image are. This can help the stripper align the image with a straight edge. In fact, it's essential if the image has a clear white background (like a silhouette); without crop marks, it's impossible to tell where the image boundaries are. Center Crop MarksIf you need to specify the center point of your image, turn on the Center Crop Marks checkbox. We always turn this on along with Corner Crop Marks as an added bonus, although we aren't always sure why we do so. Note that when you turn this feature on, Photoshop adds two pinpoint registration marks, even on grayscale images, which in theory don't need them. LabelsWhen you're printing color separations, turning on the Labels checkbox is a must. This feature adds the file name above the image on each separation, and also adds the color plate name (cyan, magenta, yellow, black, or whatever other channel you're printing). If you're printing a spot color in addition to process colors, it's even more vital that you label the spot separation. Negative and Emulsion DownWhen it comes to the Negative and Emulsion Down options, our best advice is to ignore them unless you're a service bureau printing to an imagesetter, and even then, these options are usually better set in the imagesetter RIP itself. For the record, Emulsion Down is a PostScript-only option, while Negative applies to non-PostScript printers too. EncodingAs we mentioned earlier, image data can be stored and sent to a PostScript printer as ASCII or binary data. ASCII takes much more space to describe the data than does binary, but it's universally understandable no matter how your PostScript device is connected to the world; so it's often preferable on networks that are administered using DOS or UNIX machines. We recommend saving time and using binary; if it doesn't work, try ASCII85, which is somewhat more compact than ASCII and almost always works. There's one more option: JPEG. While JPEG is much more compact than either binary or ASCII, and therefore is sent down the wires to the printer faster, the compression is lossy, so image quality degrades slightly. However, when printing with JPEG encoding, Photoshop only compresses the image slightly, so degradation is kept to a minimum. (We'd be surprised if you could see the difference on a scanned image of decent resolution.) JPEG encoding only works when printing to PostScript Level 2 or 3 printers, because they know how to decompress JPEG. Color Management OptionsThe Color Management options inside the Print with Preview dialog box let you tell Photoshop to do one of three things: perform a color conversion on the data that gets sent to the printer, pass the image data and the profile that describes it to the printer driver for printer driver color management, or simply send the pixels to the printer (see Figure 13-27). Figure 13-27. Color Management options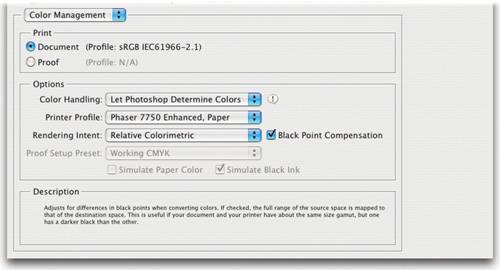 Whether we're making final prints from Photoshop or generating proofs, we find these options invaluable. However, if you make Photoshop convert the color, you must make sure that the printer driver doesn't also make a conversion, because then you'll get hideous results. Document versus ProofBy default, the Print option is always set to Document, which is either the space represented by the profile embedded in the image or, in the case of untagged images, by the current working space you've set for the document's color mode in the Color Settings dialog box (see Chapter 5, Color Settings). The other option, Proof, tells Photoshop to convert the image from the document space to the profile specified in Proof Setup, using the rendering intent set in Proof Setup, before handing off the data to the printer. We use this feature when we're trying to make a desktop printer simulate final printed output when we haven't yet converted the file to the final output space. If, for example, we have a ProPhoto RGB image destined for press output, and we want to simulate the press on an inkjet printer, we set Proof Setup to simulate the press by choosing the press profile there, then we click the Proof button in Print with Preview. When we do so, the Proof Setup Preset menu and the Simulate Paper Color and Simulate Black Ink checkboxes become enabled, and the Rendering Intent menu becomes disabled. See "Proof Setup Preset," slightly later in this chapter. Color HandlingThe Color Handling popup menu allows you to specify whether or not Photoshop will apply a color conversion before sending the data to the printer. There are four options:
Tip: Printing Single Colors in Separations Photoshop doesn't give you an obvious way to print fewer than all four process colors when printing color separations; you only have the option to choose Separations, not "only the cyan and magenta, please." Nonetheless, you can do just this in one of two ways.
Be aware that printing different plates for a separation at different times or from different devices can cause problems with registration and tint (hence color) consistency. If you have to rerun a single plate, it's typically better to rerun all four. Tip: Don't Downsample High-Bit Files for Printing If you're printing a high-bit file directly from Photoshop, it's both unnecessary and unwise to downsample it to 8 bits per channel prior to printing. It's unnecessary because Photoshop is smart enough to downsample the data before handing it off to the printer. It's unwise because if you request color space conversions, you'll get better results allowing Photoshop to do the conversion on the high-bit data before it does its automatic downsampling than you will forcing Photoshop to make the conversion on an image that's already been downsampled to 8 bits per channel. Proof Setup PresetWhen you choose Proof as the source space, the Proof Setup Preset menu becomes enabled, and the Rendering Intent menu becomes disabled. You can choose any saved Proof Setup preset from this menuif you've applied a Proof Setup to the document, it defaults to that setup. When you print, Photoshop first converts the documents colors from the source space to the Proof Setup space, using the rendering intent specified in Proof Setup. It then converts the Proof Setup colors to the printer space specified by Printer Profile. The rendering intent is controlled by the two Simulate checkboxesSimulate Paper Color and Simulate Black Inkas follows:
If you're used to earlier versions of Photoshop, you'll have noticed that all the color management options in Print with Preview have been changed. But no functionality has been added or taken away, and if the new options aren't any more intuitive than the old ones, they aren't any less so, either. It may take you a little while to translate the old settings to the new ones, but the functionality remains the same. Using an Online ServiceDon't own a printer? Prefer photographic prints to inkjet output? Want a poster-sized print? No problem! You can use an online service to print your photographs. When you choose Print Online from the File menu, Photoshop launches Adobe Bridge, selects current image, and automatically chooses Photo Prints from the Photoshop Services submenu (under the Tools menu). The Photo Print service lets you upload one or more images to Kodak EasyShare Gallery. (This service is also known as Ofoto.com; back in Photoshop CS, Adobe worked with Shutterfly.com.) Of course, if you don't already have a free Kodak EasyShare Gallery account, you can create one here. Then Bridge will send the file(s) to the servicejust as you might do manually via the Ofoto.com Web siteand (Kodak hopes) buy lots of prints. Note that Kodak automatically applies brightness and contrast adjustments to your images unless you turn off the proprietary Kodak Perfect Touch feature. If you have carefully tweaked your image in Photoshop, the last thing you want is for those settings to be overridden by a computer that thinks it knows better. Ofoto's system assumes that your JPEG images (it only works with JPEG images) are in the sRGB color space. We don't believe for a moment that its system is truly sRGB, but using that is better than shooting blind. |
EAN: N/A
Pages: 220