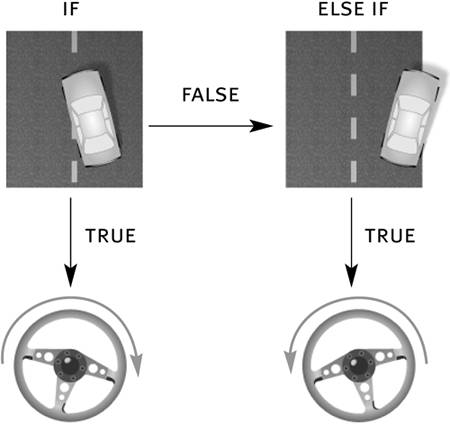
| We contend with boundaries every day. Although boundaries can take many forms physical, financial, mental in the end they're nothing more than an indication of a limit. To make a boundary work, you define its limits and take appropriate action when (or just before) those limits are exceeded. Think of driving a car: lines on the road define the boundaries within which the car is supposed to remain. If you're approaching the line on the left (the left boundary), you move the steering wheel to adjust; if you're approaching the line on the right, you adjust in the opposite direction conditional logic in action! Written in ActionScript, those actions might look like this: if (car_mc._x < leftOfRoad) { turnWheel ("right"); } else if (car_mc._x > rightOfRoad) { turnWheel ("left"); }
To make a boundary work in Flash, you must define its limits and use an if statement to check the affected element each time an event occurs that might cause the element to exceed its defined boundaries. This concept will become clearer as we progress through the following exercise. For example, boundaries in Flash might be used to do the following: Prevent the properties of movie clip instances (including x, y, alpha, xscale, yscale, and so on) from being changed beyond specified amounts Invoke an action (property change or method) when an element is within or exceeds a specified boundary Prevent data values from exceeding defined limits (useful when validating data)
In the following exercise, we'll dynamically animate the red bars at the top of the project to represent a moving "launch window" through which the rocket must pass to complete a successful launch. Open rocketLaunch2.fla. We'll continue building on the file you worked with in the preceding exercise.
With the Actions panel open, select Frame 1 of the Actions layer and add this script at the end of the current script: var direction:String; function launchWinMove(){ if (launchWindow_mc._x < 0) { direction = "right"; } else if (launchWindow_mc._x > 550) { direction = "left"; } if (direction == "right") { launchWindow_mc._x = launchWindow_mc._x + 3; } else { launchWindow_mc._x = launchWindow_mc._x - 3; } } _root.onEnterFrame = launchWinMove;
Three changes occur with this added script: you create the direction variable, define the launchWinMove() function (which uses the direction variable), and set the launchWinMove() function to be triggered with an onEnterFrame event. Let's look at how the function works. The two red bars at the top of the stage are part of the composite movie clip instance named launchWindow_mc. The function in this step uses two if statements to move this movie clip instance back and forth from left to right. Triggering this function using the onEnterFrame event causes these statements to be evaluated 24 times per second (the frame rate of the movie). The first statement analyzes the position of the launchWindow_mc instance as it moves within a specified boundary. The statement says that if the horizontal (x) position of this instance is less than 0 that is, its center point exceeds the left boundary of the stage set the value of direction to "right". If the horizontal position is greater than 550 its center point exceeds the right boundary of the stage set the value of direction to "left". The value of direction changes only if one of the limits of the boundary is exceeded. This will occur as a result of the movie clip instance being put into motion in the next if statement. This statement says that if direction has a value of "right", move the instance to its current horizontal position plus 3. This action moves the instance to the right. Otherwise (else), if direction has a value of "left", move the instance to its current horizontal position minus 3. This action moves the instance to the left. When these two if statements are analyzed and their actions executed 24 times a second, the red bars are set into motion, but the movement of the bars is restricted to a specified area. NOTE When creating boundaries in your scripts, note which event handler might cause an element to exceed a boundary, and use that event to analyze the boundary conditional statement. For example, if you want to take a specific action whenever a movie clip instance's vertical position exceeds an established boundary while being dragged around the stage, the mouseMove event handler would be an ideal choice because it can easily cause a dragged movie clip instance to exceed its boundary. These two if statements in our script work in harmony. The direction of the movement in launchWindow_mc is determined by the boundary it last exceeded (which sets the value of direction to either "left" or "right") that is, movement is in the opposite direction of the boundary exceeded. Eventually a boundary will be exceeded again, and the process will be repeated in the opposite direction. In other words, if direction has a value of "right", the instance will move right, eventually exceeding the right part of the boundary at which point the value of direction is set to "left" and the process is reversed. 
The instance's initial position on the stage is one pixel past the left boundary. When this script is first executed, direction is set to "right" and the instance moves to the right.
Choose Control > Test Movie to test the project's functionality so far. When the movie plays, the red bars are set into motion. When either boundary defined in Step 2 is exceeded, the bar moves in the opposite direction.
Close the test environment to return to the authoring environment, and save your work as rocketLaunch3.fla. We'll build on this file in the next exercise.
|