| Want to trigger a set of actions to execute when a sound has finished playing? Want to know a sound's duration (play length) or current position (playback position)? Flash provides you with precisely this type of dynamic control when using loaded MP3s (or even internally attached sounds). NOTE Lesson 17, "Scripting for Sound," discussed many of the ways that you can control sounds dynamically.
It's often useful to know when a sound will finish playing. Consider a presentation in which the next screen of info should be displayed only after the voiceover has finished explaining the current screen. Or a music jukebox that automatically loads the next song when the current one has finished playing. You can easily achieve this type of functionality by using the onSoundComplete event handler: mySoundObject.onSoundComplete = function(){ //actions go here... }
Using this syntax, you would define a series of actions to be triggered when the sound in the Sound object finishes playing. The Sound class also provides two other events, onLoad and onID3, which we'll discuss in the next exercise. NOTE A Sound object must exist in your movie before you can define an onSoundComplete event handler to it. If you delete or re-create the Sound object, you must redefine the onSoundComplete event. In other words, you can't attach an event to an object that doesn't exist, and after an object has been deleted or re-created, the attached event ceases to exist as well.
Every Sound object has a duration property, representing the sound's length (in milli seconds). Accessing this property's value is accomplished in the following manner: var soundDuration:Number = mySoundObject.duration;
This script sets the value of soundDuration to the duration of the sound currently in the referenced Sound object. If the sound is 5.5 seconds long, the value of soundDuration is set to 5500 (1,000 x 5.5). This property exists for loaded sounds as well as sounds attached to the Sound object by using attachSound(). You can determine how far a sound has progressed in its playback by using the following syntax: var soundPosition:Number = mySoundObject.position;
If the sound in the referenced Sound object has been playing for three seconds, soundPosition is set to a value of 3000 (1,000 x 3). 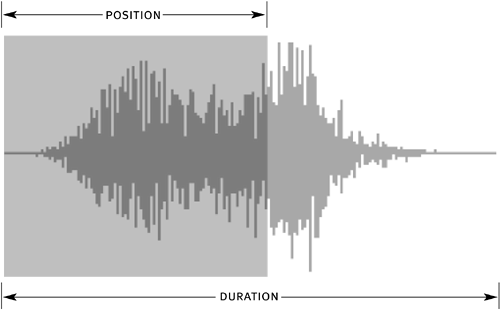
In the following exercise, we'll use the onSoundComplete event to trigger a function. We'll also employ the duration and position properties of the Sound object to create a playback progress bar. Open virtualaquarium7.fla. We'll add some script to Frame 1 of this file from the preceding exercise, as well as add a simple script to the progress_mc movie clip instance (which is below the panel graphic).
With the Actions panel open, select Frame 1 of the Actions layer and add the following lines of script at the end of (but within) the if statement of the changeSlide() function definition: slideSound.onSoundComplete = function(){ changeSlide(currentSlide + 1); }
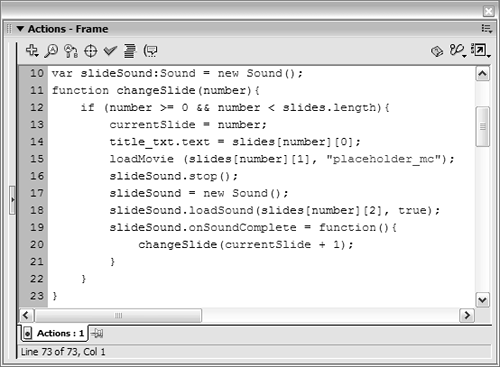
This script defines what should occur when the sound loaded into the slideSound Sound object has finished playing. A call is made to the changeSlide() function. This call acts as an automatic advancing mechanism for the slideshow: As soon as a sound has finished playing, the next image and sound are loaded as a result of the function call to the changeSlide() function. In the preceding exercise, we discussed how our slideSound Sound object is re-created/reinitialized each time before a new sound is loaded into it. Every time this occurs, the event handler is removed from the Sound object instance as well. By placing this script just a few lines after the Sound object's reinitialization, we reattach this onSoundComplete event handler to the Sound object. Let's look at the structure of the playback progress bar before we script it.
Double-click the progress_mc movie clip instance to edit it in place. This movie clip is made up of three layers. We're most interested in the bottom layer, named bar, which contains a 100-frame tween. If you drag the playhead, you'll see that this tween is set up to emulate a progress bar with a range of 0 to 100 percent. In a moment, we'll add a script to move this timeline to the appropriate frame based on the percentage of the sound file that has played. In other words, if 47 percent of the sound file has played, this clip will be at Frame 47, showing the appropriate progress.
Return to the main timeline. With the Actions panel open, select Frame 1 of the Actions layer and add the following script at the end of the current script: progress_mc.onEnterFrame = function(){ var progressAmount = Math.round(((slideSound.position / slideSound.duration) * 100)); this.gotoAndStop(progressAmount); if (progressAmount == 100){ this._visible = false; }else{ this._visible = true; } }
This script attaches an event handler to the progress_mc instance. For each onEnterFrame event, the value of progressAmount is updated to a percentage value between 0 and 100. This percentage value is determined by evaluating the current position and duration values of the slideSound Sound object and then rounding the result. This value is next used to move the instance's timeline to the appropriate frame. Together, these actions emulate the functionality of a progress bar. The if/else statement makes the progress bar invisible when progressAmount has a value of 100, as when the last image/sound has been shown/played. The progress bar will be visible anytime this value is less than 100 (whenever a sound is still playing).
Choose Control > Test Movie. If you let the project play by itself, after the first loaded sound finishes playing, the project automatically advances to the next image/sound and then repeats this process. Notice that the progress bar tracks the playback of the sound as well. 
After the third image/sound has loaded and finished playing, the presentation stops and the progress bar disappears because there is no more content to load, as defined in the slides array. Only by pressing the left-arrow button can you bring the presentation to life again.
Close the test movie and save the file as virtualaquarium8.fla. This step completes the exercise, and we're finally done with this application! You've created a fairly sophisticated project that loads external assets and can be scaled easily to include an almost limitless amount of external content. By loading content into a movie as it plays, you need never worry about huge files or stale content again.
|