| Different projects require varying solutions for handling the errors that the validation process brings to light. In some cases, you may want to provide a graphical indicator such as a red X next to the field containing the error; in others, a text message may suffice. The conditional statement within the validation routine usually determines how to handle any error that it detects. Take, for example, the following: if (dataValid) { // perform these actions } else { // Execute action to denote an error }
Because error handling plays a major role in the validation process, you should think about how you want to handle errors in a particular project or situation before you script anything else. In this exercise, we'll lay the foundation for the error-handling process in our project. Open validate1.fla in the Lesson13/Assets folder. This project contains two frame labels: Registration and Confirm. We'll work on the Confirm label in a later exercise; for now, we'll concentrate on the Registration label, which includes a form that the user must fill out, and thus data that needs to be validated. The timeline contains six layers named according to their content:
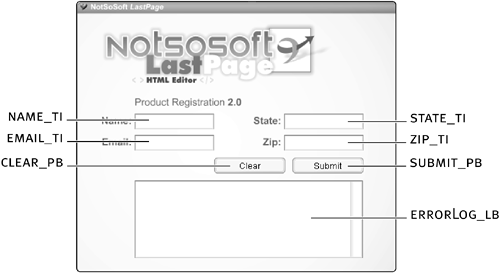
The Background layer contains the project's static graphical content. The Text Components layer contains four TextInput component instances named name_ti, email_ti, state_ti, and zip_ti; and a List component instance named errorLog_lb. The TextInput instances allow the user to input name, email address, and so forth. The List component instance will be used to display any error messages generated during the form's validation process. The Button Components layer contains two button component instances named clear_pb and submit_pb the former will be used to clear all form fields of data; the latter will be used to submit the form, thus initiating our application's form validation process. The Confirm Field layer contains a text field that we'll discuss in a later exercise. The Actions layer will contain all the scripts for this application. The Labels layer contains two frame labels (Registration and Confirm) to represent the application's two states: one containing the registration form, the other containing a "thank you" message. All of the scripting for this project will take place at the Registration label. In a later exercise, we'll script the application to move to the Confirm label when the user has completed the registration form accurately.
With the Actions panel open, select Frame 1 on the Actions layer and add the following script: stop(); var errors:Array = new Array();
The first action prevents the timeline from moving beyond Frame 1 until we instruct it to do so. The second action creates an array named errors that will hold error messages to be displayed as the result of the validation process. (We'll explain this in more detail as we move forward.)
Add the following function definition at the end of the current script: function clearForm() { name_ti.text = ""; email_ti.text = ""; state_ti.text = ""; zip_ti.text = ""; errorLog_lb.removeAll(); errors.length = 0; errorLog_lb.alternatingRowColors = null; }
When called, this function resets the value of scene elements. First we remove any text that has been entered into the four TextInput instances. The next line uses the removeAll() method of the List component to remove any error messages displayed in the errorLog_lb instance. The next line removes any error messages stored in the errors array. The last line sets the alternatingRowColors property of the errorLog_lb instance to null. What does this do, and why are we doing it? Setting the alternatingRowColors property of a List component instance allows you to configure the instance to display items shown in the list with alternating row colors. This is done by creating an array with two or more color values and then setting that array as the value of the alternatingRowColors property, such as the following: var myArray:Array = new Array(0xFFCC00, 0xCC9900, 0x003366); myList_lb.alternatingRowColor = myArray;
Later in this lesson we will script the errorLog_lb instance to display error messages using alternating row colors. When the form is cleared using this function, we want the errorLog_lb instance to revert back to its original all-white row colors. Setting the alternatingRowColors property to null, as this function does, takes care of that requirement. 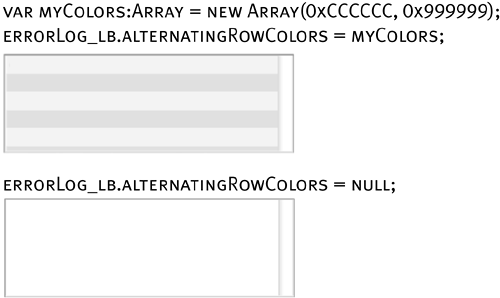
In the end, the scene will be reset to its original state.
With the Actions panel still open, add the following script: clear_pb.addEventListener("click", clearForm);
This script calls the clearForm() function when the clear_pb instance is clicked.
Save this file as validate2.fla. We'll build on this file throughout this lesson. The most important aspect of this exercise was the creation of the errors array, which will play a major role in the way our application handles any errors it detects in the validation process.
|