| As mentioned earlier in this lesson, when validating different types of data (names, phone numbers, email addresses, and so on) it's best to break the process into specialized functions or validation routines. We will begin that process in this exercise. The first type of data our form asks for is the user's name. For our form, the data entered must meet two requirements: NOTE We could define other validation points, such as a maximum length or even that the name begin with a D, but the ones we have chosen are sufficient for our purposes.
In this exercise, we'll create a function for validating the name entered into our project's registration form. Open validate2.fla. We'll build on the project from the last exercise.
With the Actions panel open, select Frame 1 on the Actions layer and add the following function definition at the end of the current script: function validateName() { if (name_ti.text.length < 2 || isNaN(name_ti.text) == false) { errors.push("Please enter a valid name."); name_ti.setStyle("color", 0x990000); } }
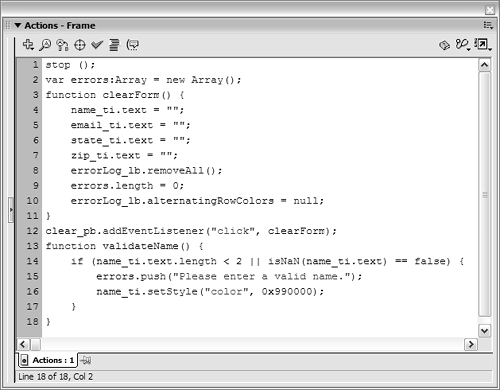
When called, this function checks the data entered in the name_ti instance for two conditions: length and type (the validation points we defined at the beginning of this exercise). The conditional statement here says that if the name_ti instance contains fewer than two characters or is a number (which would be considered an error), the string "Please enter a valid name" should be pushed into the errors array. In addition, we use the setStyle() method to change the color of text in the name_ti instance to red to make the location of the error a little more noticeable. Although we've used the length property in other scripts, some of this syntax is new and thus requires explanation. One of the validation points we've defined for the name_ti instance is that a number entered into it would be considered an error (of course, a name containing a number, such as derek66, would be acceptable). To determine whether data is a number or text string, we would use the isNaN() function. This built-in function verifies that the argument passed to it (within the parentheses) is not a number (hence the name isNaN, or is Not a Number). Take a look at the following examples: isNaN("Box") returns a value of true because the value of "Box" is a string, meaning it's true that it's not a number. isNaN(465) returns a value of false because 465 is a number that is, it's false to state that 465 is not a number. Thus, isNaN(name_ti.text) == false is the same as saying, "If what name_ti contains is a number…" If either of the conditions in the statement exists, data has been input improperly. As a result, the actions within the if statement are executed. The first action within the statement uses the push() method of the Array object to add an element to the end of the errors array. (This element is what's enclosed in the parentheses.) If you think of the errors array as a book, using the push() method is like adding a page to the end of the book, with the string within the parentheses representing the text on that page. The page number of this page would be its index position within the array. 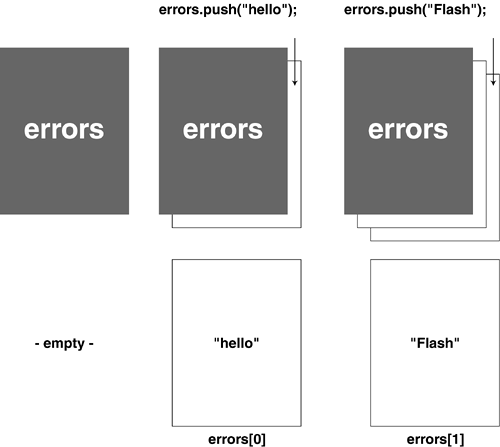
In the case of this function, if the data in the name_ti instance is invalid, the text "Please enter a valid name" is pushed into the errors array. Next, we'll create a function to retrieve this error from the array (if name_ti doesn't contain a valid entry and an error is pushed into the array) and display it in the errorLog_lb List component instance.
With the Actions panel still open, add the following function definition at the end of the current script: function validateForm() { errorLog_lb.removeAll(); errors.length = 0; validateName(); if (errors.length > 0) { errorLog_lb.defaultIcon = "errorIcon"; var altColorArray:Array = new Array(0xF9F2F2, 0xECD9D9); errorLog_lb.alternatingRowColors = altColorArray; errorLog_lb.rollOverColor = 0xFFFFFF; errorLog_lb.selectionColor = 0xFFFFFF; errorLog_lb.dataProvider = errors; } else { gotoAndStop ("Confirm"); } }
In Step 2, we created a validation function to check the data entered into the name_ti instance. As we progress through this lesson, we'll create several more validation functions to validate the data entered into our other TextInput instances. The function created in this step validateForm() is really the mother of all these other functions; eventually it will be used to call all the individual validation functions and then finalize the validation process, including outputting error messages to the errorLog_lb List component instance. Take special note of the sequence of actions in this function: this flow plays an important role in how the function works. The first two actions in this function clear the errorLog_lb instance of any displayed errors as well as any messages that may exist in the errors array. Obviously, the first time the form is validated, these actions are worthless because both begin empty. Any subsequent validation of the entered data will require that the errorLog_lb instance begin the validation process empty of any displayed items, and that any error messages in the errors array be erased. The next line contains a function call to the validateName() function we defined in Step 2. This will cause that function to execute and validate the data in the name_ti instance. As a result, an error message is pushed into the errors array if data is invalid. NOTE We will add more function calls as we define them in the following exercises. The next action in this function is an if statement, which is evaluated only after the validateName() function has completed its job. This is where the sequence of actions becomes important. If an error message is pushed into the errors array as a result of calling the validateName() function, the length property of the errors array is changed to 1, indicating that it contains at least one error message. This if statement then looks at the length property of the errors array and acts accordingly. If the length property has a value greater than 0 (indicating error messages within the array), the resulting actions output those messages to the errorLog_lb List component instance. If errors.length is 0, this means there are no error messages and the data is valid; therefore, a gotoAndStop() action sends the timeline to the frame labeled Confirm. 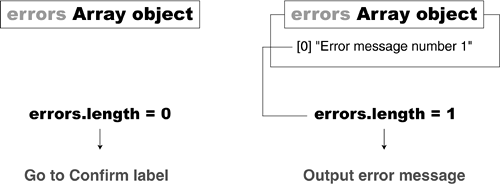
The actions used to output the error messages are fairly straightforward. The first action sets the defaultIcon property of the errorLog_lb instance. The value of this property is the identifier name of a movie clip in the library that will appear next to every item shown in the list. We've set the value of this property to "errorIcon". This is the identifier name of a movie clip in the library that looks like a round circle with an X in the middle. 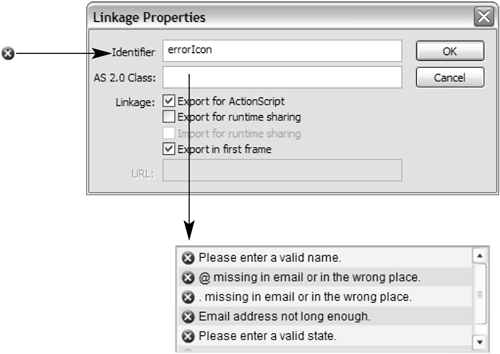
The next two lines of script set the alternatingRowColors property of the errorLog_lb instance. As explained in Step 3 of the preceding exercise, an array is created that holds two or more color values (in this case, altColorArray). That array is then set as the alternatingRowColors property of the errorLog_lb instance. As a result, the rows in that instance will alternate between the colors listed in the altColorArray array. The next two lines of the script set the color values used when items in the errorLog_lb instance are rolled over or selected. Finally, the last line sets the dataProvider property of the errorLog_lb instance. As you can see, we've set the errors array as the value of this property. As a result, any error messages contained in that array will show up as individual items in the list.
With the Actions panel still open, add the following script at the end of the current script: submit_pb.addEventListener("click", validateForm);
This script calls the validateForm() function when the submit_pb instance is clicked, causing the actions within that function to be executed when the button is released.
Choose Control > Test Movie to test the project up to this point. Enter an invalid name into the name_ti instance to see what the validation process turns up. Click the Clear button to reset the scene's visual and data elements.
Close the test movie to return to the authoring environment, and save this file as validate3.fla. We'll build on this file in the following exercise.
|