| By now you know that you can give objects (including movie clips) properties (also known as variables). In a typical Flash application, the value of these properties can change at any time. And just as with real-world objects, a property change can have a couple of results: Not only is the object with the changed property affected, but a number of other objects can be affected as well, in a chain reaction of changes. For example, assume weather is an object and that the condition of the weather (a property of weather, as in weather.condition ) went from sunny to rainy (weather.condition = "rainy"; ). As a result, the sky gets dark, car lights come on, and windshield wipers start working. ActionScript employs the watch() method to watch various properties (variables, such as condition in our example) of objects, so that if a change occurs in the property value, a function can be called so that your project can react to the change. If you were to use this method, it would look something like this: nameOfObject.watch("propertyToWatch", nameOfFunction); If weather were the name of a movie clip instance on the main timeline, condition were the name of a variable in that movie clip instance, and watchCondition() were the name of the function we wanted to invoke when the value of condition were changed, the syntax would look like this: _root.weather.watch("condition", watchCondition); NOTE An object can initiate a watch within itself using this.watch("propertyToWatch", nameOfFunction); .
The watchCondition() function that is called would be set up as follows: function watchCondition(id, oldval, newval){ message.text = id + " used to be " + oldval " but now it's " + newval"; if (newval == "rainy"){ sky.gotoAndStop("dark"); lights.gotoAndStop("on"); wipers.gotoAndPlay("on"); }else if (newval == "sunny"){ sky.gotoAndStop("bright"); lights.gotoAndStop("off"); wipers.gotoAndStop("off"); } } Notice the id , oldval , and newval parameters, which are passed to the function. These parameters are automatically sent to the function when it is called as a result of the watch() method firing. The id parameter represents the name (as a string value) of the property being watched; oldval represents its old value (before the change), and newval represents the new value that caused the watch() method to fire. You can see in the above example how these parameter values can be used in the function. 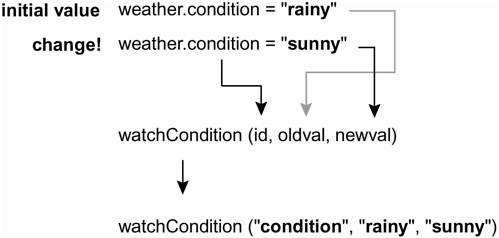 NOTE Although our example doesn't show it, a reference to this in the function would be considered a reference to the object whose property is being watched.
NOTE You must always define the function that will be called by the watch before you initiate the watch() method if everything is to function properly. This is because in the parameters of the watch() method, you identify a function to call when the property changes. You can't specify a function to call if it doesn't exist yet.
If you no longer want a property to be watched, you can invoke the unwatch() method as follows: weather.unwatch("condition"); This line of script prevents changes to condition from causing the watchCondition() function to be called. The following are some important points to remember about using the watch() method: The watch() method works for most objects in ActionScript that have properties (variables), including custom object instances (as discussed in the previous exercises in this lesson). However, you cannot watch ActionScript's predefined properties, such as _x , _y , _alpha , and so on. You can only set one watch for any property. Setting a new watch on the same property will cancel the previous one. If you attempt to 'domino' watches where a watched property is changed, executing a function that changes another watched property, which as a result executes another function that changes another watched property, and so on you will get unexpected results. In the exercise that follows, we'll create a scene in which changes to watched properties will affect different elements. -
Open objectProject1.fla in the Lesson06/Assets folder. We've already set up most of the elements in this scene so that you can focus on the ActionScript. This scene contains four layers: The Background layer contains the gradient background and the project logo. The Head layer contains two instances of the Head movie clip symbol. The smaller instance is named smallHead, and the larger instance is named bigHead. (We'll take a closer look at this movie clip in a moment.) The Head layer also contains a text field at the bottom of the stage named message. The Buttons layer contains all of the buttons our project will use. There are four buttons to the right of the bigHead instance, which we'll use in this exercise: Their instance names are mouthButton, noseButton, eyesButton, and glassesButton. (The remaining buttons, at the top left of the stage, will be used in the exercises that follow.) The Actions layer will contain scripts (which we'll add in the following exercises as well). 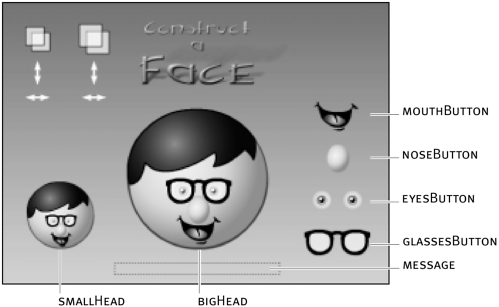 -
Double-click the bigHead instance to edit it in place. The main things to be aware on this clip's simple timeline are four movie clip instances: glassesClip, eyesClip, noseClip, and mouthClip. These instances, which are graphical representations of what their names imply, will be made visible and invisible as watched property values are changed. Our project contains two instances of this clip, which we will set up to react in opposite ways. For example, if the noseClip instance in the bigHead instance is made visible, the noseClip instance in the smallHead instance will be made invisible. -
Return to the main timeline. With the Actions panel open, select the bigHead instance and add the following script: onClipEvent(load){ glassesClip._visible = false; eyesClip._visible = false; noseClip._visible = false; mouthClip._visible = false; glasses = false; eyes = false; nose = false; mouth = false; } This script uses a load event to execute this script as soon as the bigHead instance appears in the scene which it does when the movie begins to play. We will be adding the majority of script for this exercise within this load event. For now, let's take a look at the first several lines of our script. These first four lines will make the instances discussed in the previous step invisible. Thus, bigHead will appear faceless upon loading, and the smallHead instance will be unaffected (that is, it will have a face) because these actions target the instances in bigHead only. The next four lines create and set variable values. The variable names and values coincide with the current state of the aforementioned movie clip instances. It is these four variables (properties) that will be watched for changes. These are their initial values. Let's next define the functions that will be called when one of these property values changes. -
Add the following function definition at the bottom of (but within) the load event: function watchGlasses(id, oldval, newval){ _root.message.text = "I now have " + id + "."; glassesClip._visible = newval; _root.smallHead.glassesClip._visible = oldval; _root.glassesButton.enabled = false; } 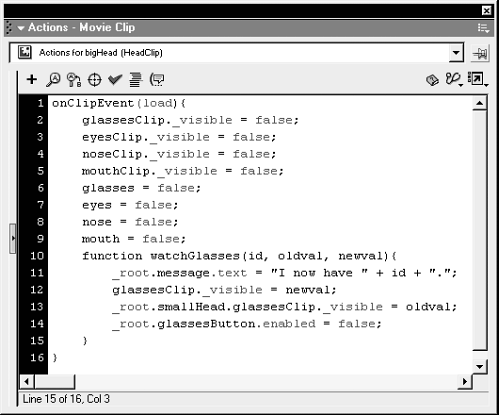 We will eventually set up a watch that will execute this function when the value of glasses changes. Notice the three parameters sent to the function of id , oldval , newval: All three of these parameter values are used in the function. The first line in the function will display a message in the message text field that makes use of the value of id . Because this function will be set up to watch the value of glasses , id will therefore have a string value of "glasses" when this function is called. The resulting message will read, "I now have glasses." The next line of script makes use of the newval parameter value. In the previous step, we gave glasses an initial value of false ; thus, when that value is changed to true (causing this function to execute), newval will have a value of true , which is the new value that the property/variable is being set to. Thus, on the second line, glassesClip._visible is set to true , which will make the glassesClip inside of bigHead appear. The next line makes use of the oldval parameter to set the visibility of the glassesClip in the smallHead instance. Since oldval has a value of false (the value of glasses prior to the change), the glassesClip will be made invisible in smallHead. The last action will disable the glassesButton button. While we haven't given this button any functionality yet, it will be used to change the value of glasses , thus executing this function. After it has been used to change the value of glasses , it gets disabled (thus, it can only be used once). -
Add the following additional function definitions at the bottom of (but within) the load event: function watchEyes(id, oldval, newval){ _root.message.text = "I now have " + id + "."; eyesClip._visible = newval; _root.smallHead.eyesClip._visible = oldval; _root.eyesButton.enabled = false; } function watchNose(id, oldval, newval){ _root.message.text = "I now have a " + id + "."; noseClip._visible = newval; _root.smallHead.noseClip._visible = oldval; _root.noseButton.enabled = false; } function watchMouth(id, oldval, newval){ _root.message.text = "I now have a " + id + "."; mouthClip._visible = newval; _root.smallHead.mouthClip._visible = oldval; _root.mouthButton.enabled = false; } These three functions will handle what happens when the value of eyes , nose and mouth change, respectively. As set up in Step 2, these properties all have initial values of false ; thus, the appropriate function will execute when that value changes to true . These functions work in similar fashion to the one discussed in the previous step. The only changes are in the names of the function, the instance they make visible (in bigHead) and invisible (in smallHead), and which button they disable. Now that we've created our functions, let's set our watches. NOTE Remember that functions used by the watch() methods must be defined first prior to setting a watch, as shown here. -
Add the following lines of script at the bottom of (but within) the load event: this.watch("glasses", watchGlasses); this.watch("eyes", watchEyes); this.watch("nose", watchNose); this.watch("mouth", watchMouth); These four lines will tell Flash to watch for changes in value to the properties shown, and then which function to execute when it does. The first line sets a watch on the glasses property/variable. When the value of this property changes, the watchGlasses() function is executed (as discussed in Step 4). Notice the use of this in setting the watch. This first line says, in essence, "Watch for changes in the glasses property value in 'this' object." If glasses were a variable in a different instance, we would simply use the target path to that instance (and/or function) to set the watch as follows: _root.myMovieClip.watch("glasses", _root.myFunction); The remaining three lines of the above script watch the eyes , nose , and mouth properties, and execute the specified function when their values change. The last thing we need to do is set up our four buttons to change the values of the properties we've been discussing. -
Select the mouthButton button, to the right of the bigHead instance, and attach this script: on(release){ _root.bigHead.mouth = true; } 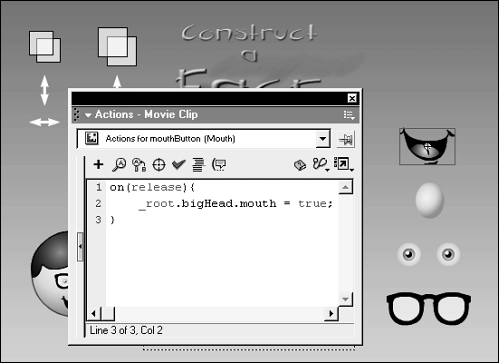 When released, this button will change the value of the mouth property in the bigHead instance from false to true , triggering the watch set up in the previous step. -
Add the following scripts to the remaining buttons: Attach to the noseButton button: on(release){ _root.bigHead.nose = true; } Attach to the eyesButton button: on(release){ _root.bigHead.eyes = true; } Attach to the glassesButton button: on(release){ _root.bigHead.glasses = true; } These scripts will cause each button to work in similar fashion to the button scripted in the previous step. The only difference is the property value that each button changes. -
Choose Control > Test Movie to test the project up to this point. Initially, bigHead will appear faceless. Pressing and releasing a button on the right will update the value of mouth , nose , eyes, or glasses (depending on which button is clicked), which in turn will cause one of the functions we defined to execute. Several changes will occur in the scene, as scripted within the function. -
Close the test movie and save your work as objectProject2.fla. This completes the exercise. You've seen how by using watched properties, a single change in value can trigger a function to execute. Although we could have placed function calls on our buttons to accomplish the same thing, sometimes watching properties, as shown here, can work better especially if a change in an object's property can have a significant bearing on your project's functionality. It's easy to simply watch that property and change its value as needed rather than worry about function calls. In addition, working with properties is a bit easier to conceptualize. |