| In Lesson 4, we introduced you to Flash's prebuilt objects (the objects listed in the Toolbox window of the Actions panel). In that lesson you created instances of prebuilt objects, changed their properties, and used various methods to make the objects perform specific tasks. In the process you got a taste of how objects facilitate interactivity. However, we couldn't explain why objects work the way they do until you understood functions, since these play a critical role in the creation and customization of objects. Now that you know something about functions (which we covered in Lesson 5), you're ready to get down to the real nitty-gritty of creating and customizing objects. Creating Instances of Objects vs. Classes of Objects Right about now you may be saying, "But I thought I created and customized objects in Lesson 4; how is what we're going to do here different?" Well, in Lesson 4 you created instances of prebuilt objects (for example, an instance of the Color object) objects that are built into ActionScript and thus immediately available for use. We showed you the different classes of Flash's built-in objects (Array, Color, Date, String, Sound, and so on), but we didn't explain how to build your own class of objects (that is, your own custom tools) or how to enhance existing ones. To return to an earlier analogy, when the automobile was invented, a new class of objects was created, the Automobile class. This class of objects had doors, steering wheels, headlights, and other features. Now when an automobile rolls off the assembly line, an instance of the Automobile class has been created, not a new class of objects. A new class of objects would be created if someone developed an individual flying machine and named that class FlyingMachine. Instances of the FlyingMachine object would soon start rolling off the assembly line as well. Although we'll touch on this concept in more detail shortly, it's important to understand that a class simply describes how an object is made and works a blueprint, if you will. Instances are what you create from that blueprint. In the end, both the blueprint and the resulting instance must be created. NOTE Instances are also known as objects. In most cases, instances and objects are one and the same.
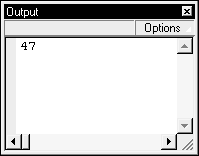
Since the concept of how objects work is a fairly abstract one, the exercises in the following several sections take a slightly different approach than those in the rest of the book. While most of the other exercises are graphical and tangible in nature that is, they involve elements that you can actually see and manipulate in your project the following deal with what's going on behind the scenes. In the following exercises, you'll use the trace action and the List Variables command (Debug > List Variables, in the testing environment) to view data that exists within a movie as it plays but is normally not seen. You've seen the trace action before, but to clarify its use, take a look at the following syntax: trace(_root._totalframes); If this action is placed on Frame 1 of a movie that contains 47 frames, the Output window will automatically open and display the following as soon as the movie begins playing within the testing environment: 47  This simple action provides a great tool for learning how objects work. Let's begin. NOTE If you're already familiar with how objects work, feel free to skip to the "Watching Properties" section.
Object as Containers ActionScript objects are, first and foremost, containers though special ones. As such, they not only hold stuff (for example, data and even other objects, also known as object properties), they also perform specialized tasks (which are usually related to their contents). Flash's built-in String object, for instance, is used to hold a string value for example, "Hedgehogs make great companions" however, it also has methods that allow you to manipulate and work with that content, a principle we'll demonstrate in the following exercise. -
Open Flash and choose File > New to start a new authoring file. With the Actions panel open, select Frame 1 and add the following script: person1 = new Object(); This syntax creates a new instance of a generic object named person1 . NOTE The Object object (as used here) doesn't have a specific use thus, it's a generic object. The above line, then, is an instance of the Object object (not a custom class), which we've created to demonstrate objects' role as containers. You will see a more extensive use of the Object object in the next lesson. At this point, person1 is a real nobody: We've defined no characteristics not even a gender for it. -
Place the following lines of script just below the line you added in the previous step: person1.gender = "male"; trace (person1.gender); trace (person1.age); The person1 object now has a property, known as gender , with a value of "male". We've added a couple of trace actions to see what values exist in our person1 object. Let's test our progress thus far. -
Choose Control > Test Movie to test the project up to this point. The Output window will open and display the following: male undefined The first trace action returns a value of "male" because that's the value that exists at person1.gender (as set in the previous step). The second trace action returns a value of undefined for person1.age because that value has not been set anywhere yet. Now let's add a few more property values to person1 . -
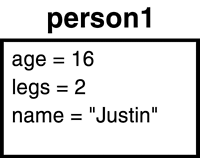
Close the test movie to return to the authoring environment. With the Actions panel open, select Frame 1. Replace the three lines of script you added in Step 2 with the following lines of script: person1.age = 16; person1.legs = 2; person1.name = "Justin"; As you can see, person1 is shaping up nicely: He now has all the basic requirements to enter society.  At this point, a script can access any of the data associated with person1 which we'll demonstrate in the next step. -
Add the following if statement to the end of the current script: if (person1.age >= 21){ trace("I'm going to the Disco"); }else{ trace("I'm going to BurgerHouse"); } This statement looks at the value of person1.age to determine a course of action. -
Choose Control > Test Movie to test the project up to this point. The Output window will open and display the following: I'm going to BurgerHouse Because person1.age has a value of 16, the if statement returns this result when evaluated. Now let's make an addition to our person1 object to demonstrate how objects can contain other objects a concept you're somewhat familiar with from using nested timelines (for example, using one MovieClip object within another MovieClip object). -
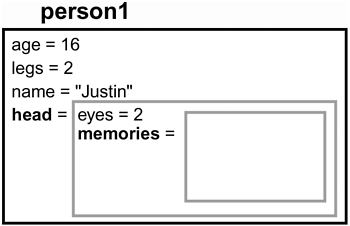
Close the test movie to return to the authoring environment. With the Actions panel open, select Frame 1. Replace the if statement you added in the previous step with the following lines of script: person1.head = new Object() person1.head.eyes = 2; person1.head.memories = new Array(); Here, we've given person1 a head (finally!) made possible by creating a new instance of the Object object and placing it inside the person1 object. We've given head an eyes property, which has a value of 2. In addition, we've placed an Array object (named memories ) inside of the head object.  As you can see, we've placed one object (memories ) inside of another object (head ), which itself resides in an object (person1 ). This is opposed to placing memories directly in person1 , as follows: person1.memories = new Array(); There's a good reason for doing this, which we'll explain in a moment. TIP If you wanted to place an existing array named, say, myThoughts into person1.head (as opposed to creating a new array as shown), you would use the following syntax: person1.head.memories = myThoughts . Now let's add some memories to the memories array. -
Place the following lines of script at the end of the current script: person1.head.memories[0] = "I was born into the world."; person1.head.memories[1] = "I learned the word 'NO.' It was a very productive day."; person1.head.memories[2] = "I learned that if I make a bunch of noise, I get what I want."; These three lines of script will store data in the memories array, which is inside the head of the person1 object. -
Place the following action at the end of the current script: trace(person1.head.memories[1]); -
Choose Control > Test Movie to test the project up to this point. The Output window will open and display the following text: I learned the word 'NO.' It was a very productive day. This is the value contained at person1.head.memories[1] . -
Close the test movie and save your work as object1.fla. We'll use what we've scripted so far in the next exercise. The thing to keep in mind for now is that objects are containers for simple pieces of data or even for other objects. The idea behind placing a variable inside a movie clip instance, or even creating an instance of the Color, Sound, or other objects on a timeline, is a great example of this (see Lesson 4, "Using Objects"). You're placing an object (say, an instance of the Color object) on a timeline (inside an instance of the MovieClip object). When you place a variable in a timeline, you're essentially giving that instance of the MovieClip object a new property. The Parent/Child Relationship When you place a timeline (that is, an instance of the MovieClip object) within another timeline (another instance), as you do with movie clips, a parent/child relationship is created (see Lesson 3, Understanding Target Paths). The same principle applies here with our objects. Continuing with our previous example, take a look at the following: person1.head.memories Here, head is a child object of person1 ; and memories is a child object of both head and person1 . (Thus, head is the parent of memories, and person1 is the parent of both head and memories .) The key thing to be aware of here is that what happens to the parent happens to its children as well which we'll demonstrate in the following exercise. -
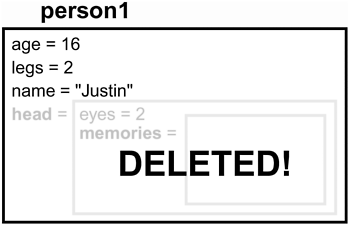
Open objects1.fla in the Lesson06/Assets folder. With the Actions panel open, select Frame1. Remove the trace action added in Step 9 of the previous exercise and attach the following script to the end: delete person1.head; trace(person1.head); trace(person1.head.memories[1]); trace(person1.name); The first action deletes the head of person1 . The trace actions that follow allow us to see how this affects our object. -
Choose Control > Test Movie to test the project up to this point. The Output window will open and display the following: undefined undefined Justin Here, we see that person1.head is now undefined , as is memories[1] , which was inside of head . As the child of head , the memories array was deleted at the same time that head (its parent) was deleted. However, none of the other properties of the person1 object were affected as demonstrated by the value returned by the trace action for person1.name .  As you can see, a properly constructed object can react to circumstances in the same way as physical objects do. And when used in conjunction with actions that have a visual affect on your movie which you'll learn about shortly they can do even more. -
Close the test movie and return to the authoring environment. With the Actions panel open, select Frame 1. Add the following lines of script at the end of the current script, right after where it says trace(person1.name); : person1.head = new Object(); trace(person1.head); trace(person1.head.memories[1]); The first line adds the head object back to person1 . The trace actions that follow will enable us to see the result. These three lines of script are placed just below the four lines you added in Step 1. Thus, when we test the project, the Output window will once again display the result of person1.head being deleted; however, this time that will be followed by the result of adding the head property back. -
Choose Control > Test Movie to test the project up to this point. The Output window will open and display the following: undefined undefined Justin [object Object] undefined The first three lines of output are the same as those explained in Step 2. The last two lines indicate what occurs when the head property is added back to person1 . As a result, person1.head is traced as [object Object] , indicating that the head object exists again (and is an instance of the Object object) but that person1.head.memories[1] remains undefined . The reason for this is that when person1.head.memories[1] was removed earlier (as a result of deleting person1.head ), it was wiped out of the computer's memory (along with the eyes property that was part of the head object). Adding the head property back does not bring back the memories array or the eyes property that were also deleted. In such a case, you would need to re-create the memories array and eyes property and set them with new data (as shown earlier). -
Close the test movie and save your work as object2.fla. This completes our use of this file. We'll build on your knowledge of objects in the next section with a slight twist. |


