Printing Pointers
If you've ever printed a document on a Mac, you know that the process is pretty straightforward. Once you've got a printer set up, you choose File ➣ Print (or press command+P) from within any application, and you're presented with the standard print dialog. If you have more than one printer, you can choose the printer to which you want the document to print from the Printer pop-up menu. If you have any saved printing presets (I'll talk about how in a bit), you can choose one from the Presets pop-up. Finally, you can customize the settings for each particular print job by clicking on the printing options pop-up menu and browsing the options panels. (The options pop-up menu is the one that isn't labeled, but its default is "Copies & Pages.") When you're ready to print you click Print.
| Tip | When you click the Printer pop-up menu in any print dialog, if you hold the mouse over a printer name for a few seconds, a tooltip box will appear that shows you the Location and Host information for that printer. |
However, there are a number of other options available to you, both from within the print dialog and via third-party software. Here are a few of the best tips for printing in OS X.
| Note | A tip not included here is how to print the contents of Finder windows; I covered that back in Chapter 5. |
Saving Custom Print Job Settings
| User Level: | any |
| Affects: | individual user |
| Terminal: | no |
In any print dialog, you can use the Options pop-up menu to choose settings such as the number of copies, the pages to print, page layout, output options, paper trays/feeding, and any application specific printing settings that may appear. If you find yourself using the same custom options frequently, you can save that set of options as a printing preset.
First, choose your settings in each of the Options panels (accessible via the Options pop-up menu). When you're satisfied, click on the Presets pop-up menu and select Save As… Give the preset a name and click OK. The next time you print, you can select the preset from the Preset menu and the document will be printed using that set of custom options.
| Tip | You can see a summary of the settings in a custom preset by selecting the preset and then choosing Summary from the Options pop-up menu. |
You can also delete and rename presets by selecting the preset you want to delete or rename, and then choosing the appropriate command from the Presets menu. Finally, if you want to alter an existing preset, select that preset, make your changes from the various Options panels, and then select Save (instead of Save As…) from the Presets pop-up menu.
"Printing" to a PDF File
| User Level: | any |
| Affects: | individual user |
| Terminal: | no |
Because PDF (Portable Document Format) files preserve a document's fonts, graphics, and layout, and can be viewed on any platform using a free viewer such as Acrobat Reader (or, in the case of OS X, using the Preview or TextEdit applications), PDF has become a universal standard for document publishing and sharing. You've surely downloaded PDF files, or had them sent to you via e-mail.
In Mac OS 9, Windows, and other operating systems, creating a PDF file requires purchasing commercial software such as Adobe's Acrobat. However, PDF is actually a native file format in OS X, which means that if you can print a file, you can create a PDF version of it.
To create a PDF of a document, open the document as if you were going to print it (using whatever application you would normally use to open and print the file). Select File ➣ Print… (or press command+P) to access the print dialog. However, instead of clicking the Print button, click the Save As PDF… button. Choose a location to save the file and click Save. Your document will be converted to a standard PDF file that you can then distribute (or save for posterity).
| Tip | If you've added PDF workflow items to your print dialog (see "Working with PDFs: PDF Workflows"), the Save As PDF... button will instead be a button that looks like a PDF document; clicking this button gives you a pop-up menu of choices, one of which is Save As PDF... |
It's also possible to create a PDF by clicking the Preview button in any print dialog, which opens the Preview application with a replica of the document as it will look when printed out. If you then choose File ➣ Save As… you can save the preview as a PDF. Finally, you can create a PDF of an existing graphic file by opening it in Preview and then using the File ➣ Export… command to convert it to PDF.
| Tip | You can use the Save As PDF feature in your web browser to save copies of online receipts and documents. |
The main difference between OS X's PDF files and those created by the commercial Acrobat software is that Acrobat allows you to include bookmarks, clickable URLs, and other interactive features inside the PDF files it creates. However, for most documents, OS X's simple PDF format is an excellent substitute.
| Note | Preview v1.1, which shipped with OS X 10.1.5, is lacking a few of the features of later versions. However, it also had a bug that doesn't honor some of the security features of many PDF files, most notably the "no printing" setting. Although this was clearly not intended to be a feature, many people find it to be just that—they keep a copy of v1.1 around even after upgrading to a later version of OS X—since it allows you to print copies of PDF documents that can't be printed from Acrobat Reader or newer versions of Preview. |
Working with PDFs: PDF Workflows
| User Level: | normal or admin |
| Affects: | individual user or computer |
| Terminal: | no |
In addition to the ability to save a document as a PDF file, OS X (version 10.2.4 and later) also allows you to process the resulting PDF file using an application, an AppleScript, a Unix application or script, or the Finder. Apple calls this functionality PDF workflow, and it adds enormous potential for working with PDFs.
Oddly enough, at the time of this writing, PDF workflow is actually hidden by default. In order to enable it, you need to manually create one of the following folders:
-
/Library/PDF Services
-
~/Library/PDF Services
Once you've done this, the Save As PDF... button in all Print dialogs will be replaced by a button that looks like an actual PDF document. Clicking this button presents you with a pop-up menu of PDF workflow options (Figure 12.7).
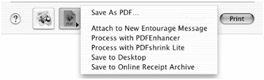
Figure 12.7: The PDF workflow pop-up menu includes whatever items you've placed inside the PDF Services folder(s).
If you haven't placed anything inside your PDF Services folders, unlike Figure 12.7 your only option will be Save As PDF... However, if you place items in your PDF Services folders—/Library for all users, ~/Library for your own account—they will appear as options for creating and processing a PDF file from the current document. (You can actually place items inside /Network/Library/PDF Services, as well, and they will appear in your PDF workflow menu; however, you still need a PDF Services folder inside /Library or ~/Library in order for the menu to be activated.) Here are the kinds of items you can add to your PDF Services folder(s), and what they do when selected from the PDF workflow pop-up menu:
-
Folder (or alias to a folder) Creates a PDF file and save it in the chosen folder. The PDF file is named using the document title. For example, if you use PDFs to save copies of online receipts or documents, place an alias of the folder you use to store those PDFs in your PDF Services folder. Whenever you want to save a PDF of an online document, simply select the folder name from the PDF workflow pop-up menu. The PDF will be created and automatically moved to the folder for you. (If you want to save PDFs to your Desktop, place an alias to ~/Desktop inside ~/Library/PDF Services.)
-
Application (or alias to application) Creates a PDF file and then opens/processes it using the chosen application. For example, if you want to create a PDF and then immediately open that PDF in Adobe Acrobat or another PDF-processing utility, you would simply place an alias of the application in one of the PDF Services folders—select it from the PDF workflow pop-up menu to create the PDF and open it in Acrobat or the selected utility.
Tip If you place an alias of your e-mail client (Mail, Entourage, Eudora, etc.) inside your personal PDF Services folder, selecting it from the PDF workflow pop-up menu will create a PDF file of the current document, and then attach it to a new outgoing e-mail message. The only drawback is that at the time of this writing, the name of the PDF attachment will simply be "Print job." If you want a more descriptive name, you'll need to use AppleScript.
-
AppleScript (or alias to an AppleScript) Processes the PDF file using the chosen AppleScript. Many publishing and graphics companies have complex AppleScript-based document processing systems. Instead of saving a PDF and then manually dropping it onto an AppleScript, you can simply select the AppleScript from the PDF workflow menu.
-
Unix tool (command-line application or shell script) Processes the resulting PDF file using the Unix application or shell script. Selecting a Unix tool from the PDF workflow menu creates the PDF file and then provides the Unix tool with the PDF title, the CUPS options for the print job, and the path to the spooled PDF.
Note When selecting an application, AppleScript, or Unix tool from the PDF workflow menu, unless the application or script actually moves or saves the PDF file somewhere, it will be located in /tmp, the default location for temporary PDF files.
Once you've added items or aliases to the PDF Services folder(s), you can actually rename the items or aliases so that their names more clearly identify what they will do. For example, if you include an alias to a folder in which you want to store PDF files, you can rename the alias "Save to PDF Archive"; this name will appear in the PDF workflow menu instead of the actual folder name. You'll notice in Figure 12.7 that I've renamed the items in my own PDF Services folder in such a manner.
| Note | For more information about the PDF workflow system, check out Apple's own documentation at http://www.apple.com/applescript/print/ and http://developer.apple.com/techpubs/macosx/CoreTechnologies/graphics/Printing/PDF_Workflow/pdfwf_intro/index.html. |
Creating a "Virtual" PostScript Printer (aka Printing to a PostScript File)
| User Level: | any |
| Affects: | individual user |
| Terminal: | no |
If you work in the graphics industry (or if you have ever interacted with those who do), you've probably encountered the concept of "virtual printers"—printers that don't actually print, but instead save a document as a PostScript file. If the virtual printer is set up to be the same printer model as the one that will eventually print the document, it can actually be sent directly to the printer without any formatting or previewing. Doing this in OS X requires two actions: setting up the virtual printer, and "printing" to that printer.
To set up your virtual printer:
-
In Print Center, click the Add Printer toolbar item, and then select IP Printing from the pop-up menu.
-
Enter localhost in the Printer's Address field.
-
Uncheck "Use default queue on server" and give the queue a descriptive name (e.g., "Virtual Printer").
-
Select the printer manufacturer and model from the Printer Model pop-up and resulting list of printers. (If the file will eventually be printed on a specific printer, be sure to select that printer here.)
-
Click Add to create the virtual printer.
To "print" to the printer and create a PostScript file of a document:
-
Open the document as if you were going to print it; choose File ➣ Print… (or press command+P).
-
Select your virtual printer from the Printers pop-up menu.
-
From the options pop-up menu, select Output Options. Check the "Save as File" box, and choose PostScript from the Format pop-up menu.
-
Click Save… and choose a name and location for the saved file, and click Save.
| Note | If you don't set up a virtual printer, you can still create a PostScript file; simply follow the steps for creating a PostScript file, but choose one of your existing printers from the Printers pop-up menu. However, you must choose a PostScript printer or PostScript won't show up as an Output Option. |
Bringing Back OS 9's Desktop Printers
| User Level: | any |
| Affects: | individual user |
| Terminal: | no |
One of the features found in OS 9 that is missed the most in OS X is Desktop Printing. In OS 9 and earlier, setting up a printer also set up a Desktop Printer. If you dragged a file onto the Desktop Printer, it would be printed; if you double-clicked on the Desktop Printer, you could view and manage its print queue.
Opening a printer in Print Center provides virtually identical functionality to Desktop Printing in terms of printing queues, but many people miss the drag-and-drop printing functionality of OS 9. Here are two ways to get it back.
Printing Directly to Print Center
When you open a document in an application and then print it, you're basically sending it to a print queue. One of the little-known secrets of OS X is that you can skip the "opening" phase altogether. If you open Print Center, you can actually drag any document onto a printer/print queue in the Print Center window; it will be added to the queue and printed, using that printer's default settings. (This does require that the application that would normally print the document be open; it will be launched if it isn't. However, you still avoid having to open the document and walk through the printing process.) Alternatively, if you're viewing an individual print queue via its Show Jobs window, you can drag a document directly into the window to add it to the queue. Finally, you can even drag a document onto the Print Center icon (including its Dock icon) and it will automatically be printed using your default printer.
When using these techniques, a few applications that don't support "direct printing" (printing without user input) will still display the printing dialog before printing; unfortunately, there's no way around this.
| Tip | If you control/right-click on a document to get the Finder's contextual menu, and select Print Center from the Open With submenu, it will be printed immediately. |
Printing Using DropPrint
If you'd like something that works as closely as possible as OS 9's Desktop Printing, consider the shareware DropPrint (http://home.attbi.com/~dreamless/dropprint.html). If you drag a file onto the DropPrint icon (in the Finder or the Dock), it will be printed immediately; in this respect it works much like Desktop Printing. However, DropPrint also provides a number of other nice features. My favorite is you can print OS X text clippings without having to first drag the clippings into another application. DropPrint can also send PostScript files (such as those created using the procedure explained earlier in the chapter) directly to PostScript printers via TCP/IP or AppleTalk without having to set up any printers on your Mac. You simply enter the printer's IP address or AppleTalk name/zone in DropPrint preferences, and DropPrint will send the files directly to the printer. DropPrint also has its own Quick Print Text window into which you can drag clippings or paste the contents of the clipboard and print without using any other application. Finally, in applications that support Services, you can select text and then choose ApplicationName ➣ Services ➣ Print This Text to print only the selected text, instead of the entire document.
Printing Selectively
| User Level: | any |
| Affects: | individual user |
| Terminal: | no |
Do you ever find yourself printing an entire web page, when all you really want is some portion of the text on that page? Or printing an entire e-mail message or Microsoft Word document, only to find that you throw most of the printout away? I'd guess that this is a pretty common occurrence for most people. One solution is to copy text from the web page or document and then paste it into a new document, but this can get quite tedious. If this is an issue for you, the shareware utilities iPrint, PrintMagic, and WebPrint Plus (all from MacEase, http://www.macease.com/) provide a novel solution.
All three of these utilities offer the ability to select just the content you want to print—including the ability to filter out web graphics and ads from web pages—and then print it using a key combination similar to OS X's own (control+option+P). So instead of printing out a messy four-page website, you can select just the few paragraphs you want to print. This "selective printing" not only saves you the trouble of having to scour through long printouts; it also saves toner/ink, and if you choose to filter out graphics and ads, it makes printing web pages significantly faster.
PrintMagic and WebPrint Plus also add the ability to print text clippings and highlighted text via drag-and-drop: drop them onto the application's icon and you can print it immediately, or after editing and/or annotating the text. Both also allow you to add date/time stamps, URL stamps, and your own notes to printouts. Finally, both can also be used as "Desktop Printers" (much like DropPrint, discussed earlier).
WebPrint Plus, the most feature-rich of the three, adds the ability to print text out using various spacings (to leave room for handwritten comments). But it also lets you edit the content of your printout on the fly via a built-in text editor, and then lets you take that content and either print it, save it to your hard drive, or transfer it to the clipboard or another application via drag-and-drop or copy/paste. These features make WebPrint Plus an excellent note-taking and data-mining utility in addition to its printing abilities.
Problematic Printing
Although printing generally works smoothly in OS X, sometimes things go wrong. I can't get into every possible problem, or every possible solution, but there are two solutions that generally fix the most common printing problems.
Running Repair Disk Permissions
Many printing-related problems are due to one or more files that are used by the printing system having incorrect permissions. This can happen due to corruption, a misbehaving printer driver installer, or any number of other causes, but when it happens, the only thing you can do is get the permissions set correctly. Running Disk Utility's Repair Disk Permissions function, as described earlier in the book, is the best solution and will fix many printing problems.
Using Print Center Repair
The shareware Print Center Repair (http://www.fixamac.net/software/pcr/) offers a variety of printing-related "fixes." Like Disk Utility, it can reset file permissions (although it confines its permission-fixing to printing-related files, whereas Repair Disk Permissions affects all non-user files on your startup volume). However, Print Center Repair can also repair problems with printing spools and the CUPS directory itself, delete troublesome temp and preference files, and even delete printer drivers (by manufacturer). It also keeps a log of all of its functions. Unfortunately, I don't have the space to cover all of its functions in detail, but the ReadMe file that accompanies Print Center Repair provides a good deal of information about each function, including appropriate warnings about those functions that warrant them.
|
|