Printer Prep: Setting Up and Managing Printers in OS X
Setting up a printer in OS X is remarkably easy, as most printers are genuinely "plug and play." Provided you have the appropriate driver or PPD file installed, when you connect a printer to your Mac, OS X will automatically detect it, recognize the manufacturer and model, select the appropriate driver or PPD file, and create a print queue for it. However, there are several ways you can access printer options, manage printers, and customize print queues in OS X, and there may be times when you need to set up a print queue/printer manually. The two most common and convenient ways to manage printing in OS X are the Print Center utility and the new CUPS web interface.
Note that when you add or set up a printer in OS X, what you are really doing is creating a print queue. OS X uses this queue to manage jobs for the printer. When you print "to" a printer, you're actually sending a document to its queue; when the printer is available, the next document in the queue is printed. As I talk about managing printers and print jobs, it's helpful to remember this distinction.
| Note | It's also possible to manage printers and print queues using Terminal and NetInfo Manager. However, Apple has provided Print Center and the CUPS web interface so that you can avoid having to use these tools, so I'm not going to spend time on them here. |
Using Print Center
| User Level: | any |
| Affects: | all users |
| Terminal: | no |
The hub, if you will, of printing in OS X is the Print Center utility (/Applications/Utilities/Print Center). Using Print Center, you can add and delete printers, configure printers, and start and stop print queues (Figure 12.1). It also launches automatically whenever you print to allow you to manage your print jobs—its Dock icon shows you the number of pages left to print—and quits automatically when printing is complete (unless you had manually launched it, in which case it remains open). Here's how to use Print Center, and how to take advantage of some features that aren't quite obvious.
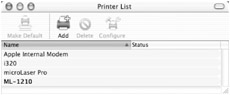
Figure 12.1: The Print Center utility
| Warning | I mentioned in Chapter 7 that you shouldn't move Apple's applications from their default locations. This is especially true for Print Center; if you move it out of the Utilities folder, you may not be able to print. |
Adding Printers
As I mentioned previously, in most cases OS X will automatically detect and configure your printer. However, in the even your printer isn't automatically set up in Print Center when you connect it, you'll need to set it up manually. This is also generally the case when you need to add a printer that is not connected directly to your Mac. How you manually add a printer depends largely on how it's connected.
Adding USB, Rendezvous, and AppleTalk Printers
If the printer you wish to use is connected to your Mac via USB, or is accessible over a local network:
-
Click the Add Printer toolbar item (or choose Printers ➣ Add Printer…).
-
In the resulting dialog, select the connection method—USB, Rendezvous, or AppleTalk—from the pop-up menu. A Rendezvous printer will generally be a printer that is shared by another Mac running OS X, or a network printer that supports Rendezvous. (For more on Rendezvous, see Chapter 9.) If you select AppleTalk and your network is divided into AppleTalk zones, select the zone in which the printer is located from the zone pop-up menu. Finally, you may see other options here that have been provided by third-party printer drivers (e.g., Epson AppleTalk, Epson USB); the applicability of these other options is generally fairly obvious. For example, Epson AppleTalk printers may not be visible via the AppleTalk item; you need to select Epson AppleTalk instead.
Note If you are trying to add a printer that is being shared by another Mac OS X computer (via Printer Sharing), you must first enable "Show printers connected to other computers" in Print Center preferences.
Note To connect to an AppleTalk printer, make sure AppleTalk is enabled for the appropriate connection type (Ethernet, AirPort, etc.) in Network preferences.
-
A list of printers available to you via the chosen connection method will appear. Select the printer you want to add. In most cases, OS X will automatically select the correct printer driver or PPD for the printer (assuming it is available on your Mac), and "Auto Select" will be shown at the bottom of the dialog box. If you see "Generic" or an incorrect model number listed, select the correct manufacturer from the Printer Model pop-up, and then select the correct model number from the list of printer models from that manufacturer that will appear. If you still don't see the correct PPD or driver for your printer, but you know it's installed, you can select Other… from the pop-up menu and navigate to it manually.
-
Click Add to add the printer.
Adding LPR Printers (Print via IP)
If you have access to a printer that has its own IP address (common in business environments), you can print to it over a local network or the Internet via Line Printing (LPR). However, setting up an LPR printer is slightly different than adding most other printers:
-
Click the Add toolbar item or select Printers ➣ Add Printer….
-
In the resulting dialog, select IP Printing from the pop-up menu.
-
Enter the IP address or domain name (if applicable) of the printer in the Printer's Address field. If you're printing to a print queue on a server, enter the IP address of the queue instead. For most IP printers, you should keep "Use Default Queue on Server" checked.
-
You can print using the "Generic" setting, but to take advantage of printer-specific features, select the printer manufacturer from the Printer Model pop-up. A list of models from that manufacturer will appear; choose the appropriate model.
-
Click Add to add the printer.
Adding a Printer Shared by a Windows Computer
Due to OS X's built-in Samba support, you can print over a local network, or even over the Internet, to a printer connected to—and being shared by—a Windows computer. However, at the time of this writing, there is a minor bug in OS X that requires you to enter a command in Terminal to get this feature working, so first launch Terminal and type sudo ln -s /usr/bin/smb-spool/usr/libexec/cups/backend/smb <RETURN>. Then restart your Mac. (I hope by the time you read this Apple will have fixed this bug; if so, entering this command won't hurt anything.)
Once that step is out of the way, printing to printers shared by Windows computers should work fine forevermore. To add such a printer in Print Center, follow these steps:
-
Hold down the option key and click the Add Printer toolbar item—this enables some advanced features in the Add Printer dialog.
-
From the pop-up menu, select Advanced (it should appear at the bottom of the menu).
-
In the resulting Advanced dialog, select "Windows Printer via SAMBA" from the Device pop-up menu (Figure 12.2).
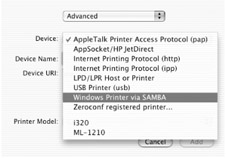
Figure 12.2: Setting up a printer being shared by a Windows computer -
Enter the SMB URL of the printer in the Device URI field; use the format smb://username:password@workgroup;serveraddress/printer. Serveraddress is the name of the server or computer that is sharing the printer, and printer is the name of the printer share set up on the Windows computer. If a username, password, and/or workgroup are not required, you can leave them out (e.g., smb://serveraddress/printer).
-
Choose the printer manufacturer from the Printer Model pop-up menu, and then choose the specific printer model from the list of models.
-
Click Add to add the printer.
| Note | Since many Windows printers don't have drivers or PPD files for OS X, you may need to install third-party drivers in order to print to a printer shared via Windows. See "Supporting Unsupported Printers," later in this chapter. |
Adding a Printer via Directory Services
OS X also supports Directory Services, which are common in large network environments. To add a printer that is available via Directory Services, simply select Directory Services from the pop-up menu in the Add Printer dialog (instead of USB, IP Printing, etc.). You'll get a list of available printers; select one and click Add. All printer configuration has already been handled by your network administrator.
Configuring Printers/Print Queues
Once you've added a printer/print queue to Print Center, you have two ways to customize and configure it. The first, available for all printers, is to select the printer and choose Printers ➣ Show Info. The resulting Printer Info window has three panes, accessible from the pop-up window. The Name & Location pane allows you to rename the printer—this is the name that shows up in the Print Center window as well as in the Printer pop-up menu in print dialogs. The Location field is a description of the printer's location; you can change this to something more meaningful to you (e.g., Room 3027) if you like.
The second pane, Printer Model, is generally fixed for non-PostScript printers. However, for PostScript printers, you can use the manufacturer pop-up menu to change the PPD file associated with your printer. Choose the printer's manufacturer, and a list of installed PPDs for that manufacturer's printers will appear in the Model Name box; select the desired one. If your PPD isn't listed, you can choose Other… from the menu and navigate to it manually. Finally, the Installable Options pane provides a way to choose settings for printer-specific features—these features, such as default paper tray and memory settings, are actually provided by the PPD file you've chosen for the printer. Once you've made changes to a printer using the Show Info window, click Apply Changes to save them.
| Tip | Although OS X is very good about automatically selecting the appropriate printer driver/PPD file for a new printer, it sometimes doesn't configure the new print queue to take advantage of all of your printer's installed options. Be sure to check the "Installable Options" panel to make sure you're taking full advantage of features like multiple paper trays and extra printer RAM, if applicable. |
The second way to configure a printer—and this option is available only for inkjet printers—is by using the third-party printer utility for your model of printer. These utilities are located in /Library/Printers, by manufacturer. For example, the utility for my Canon inkjet printer is located at /Library/Printers/Canon/BJPrinter/Utilities/BJPrinterUtility. Luckily, you don't have to dig through your hard drive to access these utilities; simply select your printer in Print Center and choose Printers ➣ Configure Printer (or press the Configure toolbar item). The printer utility for your printer will automatically be launched. These utilities vary in their functionality but most let you clean print heads, check ink tank levels, and set printerspecific options. (Note that third-party printer utilities do not work if your printer is connected to an AirPort Base Station's USB printer port.)
In addition to printer-specific options, you can also set the default paper size for all printers in Print Center preferences.
| Tip | If you have multiple printers configured, you can choose which is the default printer—the one your Mac will print to unless you specifically tell it otherwise—by selecting it in Print Center and choosing Printers ➣ Make Default (or pressing command+D). |
Deleting Printers
To delete a printer (which deletes the printer's queue, as well), select the printer in Print Center and click the Delete toolbar item (or choose Printers ➣ Delete Printer). If there are print jobs queued for that printer, you'll be asked if you want to wait for them to finish or delete the printer immediately (which cancels pending print jobs).
Managing Print Queues
As I previously mentioned, every printer you add to Print Center is actually a representation of a print queue that is used by OS X to manage jobs for the respective printer. This is an important distinction because it means that up until the very last moment, when the print job is actually spooled to your printer for printing, it is actually queued on your computer (or, if printing to a printer hosted by another Mac, on their computer). Print Center provides you with a way to manage these queues.
Stopping/Starting Print Queues
If you want to put all print jobs for a particular printer on hold, select the printer in Print Center and then choose Printers ➣ Stop Jobs; the queue for the printer will be stopped. You can still "print" to the printer queue, but your documents will not actually be sent to the printer until you restart the print queue (Printers ➣ Start Jobs). You can also double-click a printer name in Print Center, or select it and choose Printers ➣ Show Jobs to view its queue, then click the Stop Jobs toolbar item to put the printer queue on hold; the toolbar items changes to Start Jobs to indicate that the queue is currently stopped (Figure 12.3). Click Start Jobs to resume the queue.
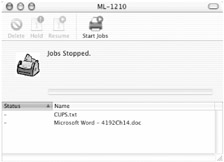
Figure 12.3: Stopping a printer queue via the Show Jobs window
If you or any other user tries to print to a stopped queue, you'll receive a dialog asking you if you want to restart the queue or simply add your document to the queue. If you choose the latter, your document will be printed whenever the queue is started again. In fact, under OS X 10.2 and later, when you click on the Printer pop-up menu in any print dialog, you'll see an exclamation point next to those printers that are currently on hold.
| Tip | Use print queues to your advantage: if you're on the road with your PowerBook or iBook(or if you're at home but for some reason your printer is unavailable), stop the print queue for your printer. You can print as many jobs as you like, and they'll all be queued. Once you're connected to your printer again, start the queue and all of your print jobs will be printed. |
Holding Individual Print Jobs
There are times when you want to hold a particular print job, but not all print jobs. As an example, sometimes I print documents at a friend's home office; he doesn't mind a few pages here and there, but he'd be a bit less understanding if I tried to print a 150-page software manual using his inkjet printer. You can actually put an individual job on hold but still but allow other jobs to proceed. (This can also be quite helpful if you have a small print job stuck behind a large one; you can put the large one on hold until the small one prints.)
To do this, select the appropriate printer/print queue in Print Center, and then choose Printers ➣ Show Jobs (or double-click on the printer). You'll see the list of currently queued jobs at the bottom of the window. Select the job you want to hold, and then click the Hold toolbar item (or choose Jobs ➣ Hold Job). The Status column changes to "Hold" and the document will not print until you select it and click the Resume toolbar item (or choose Jobs ➣ Resume Job). Other jobs in the queue, however, will print normally.
Deleting Print Jobs
If you ever change your mind about printing—perhaps you realize that you need to make a few changes to a document—you can delete individual jobs or all jobs at once. Open the Show Jobs window for the affected printer queue, and then select the job you want to delete (command-click to select multiple jobs). Click the Delete toolbar item and the print job(s) will be permanently deleted. Note that if the job has already started printing, any pages that have already been spooled to your printer will still print.
Moving Jobs between Printers/Print Queues
If you've printed a document to one printer, and decide that you would rather print it to another, it's actually easy to do so (assuming, of course, that the job is still in the queue and hasn't yet printed). Open the print queue the document was originally printed to (by double-clicking on the printer or selecting the printer and choosing Printers ➣ Show Jobs), and then drag the job (or multiple jobs) from the queue window onto the desired printer in the main Print Center window (or into the desired printer's own Show Jobs window); the print jobs will be moved to the new printer's queue.
| Tip | In addition to dragging print jobs between printers, you can actually drag documents themselves onto printers in Print Center (or into a printer's Show Jobs window) to print them. I'll talk more about this feature later in the chapter (see "Printing Pointers"). |
Customizing Print Center
| User Level: | any |
| Affects: | individual user |
| Terminal: | no |
In addition to the features I've already mentioned, Print Center has a few options of its own that make it a bit more convenient to use. Like most Cocoa applications, you can customize the Print Center toolbar. In addition to the standard toolbar items—Make Default, Add, Delete, and Configure—you can also include buttons to show pending jobs or show info for a particular print queue, as well as to stop and start a print queue.
In addition—and this is one of the hidden gems of Print Center—you can add several columns to the Print Center window that provide very useful information. The View ➣ Columns submenu lists several columns that you can show or hide. By enabling these columns, the main Print Center window can show you a good deal of additional information about each printer, including whether it is stopped or printing; the actual driver or PPD used by the printer; whether it's a local or remote printer, and which computer or server is sharing it ("Host"); the printer's Location note (normally only visible in the Printer Info window); and the number of jobs currently in its queue.
| Tip | If you have a lot of printers set up (this can happen if you've used several different printers, or if there are a lot of networked and/or shared printers accessible by your Mac that have been automatically set up by OS X), enable the Favorite column in Print Center, and then uncheck any printers that you don't use. All printers will still show up in Print Center, but only those selected as "Favorites" will show up in the Printer pop-up menu in printing dialogs. |
Using the CUPS Web Interface
| User Level: | any |
| Affects: | all users |
| Terminal: | no |
Although some of the benefits provided by CUPS—such as the ability to write new drivers and to manage printing via the Terminal—are tasks that most users will never undertake, CUPS' web interface is handy for even the novice user. You can access this interface from any web browser by entering the address http://127.0.0.1:631/. (You may need to enable Printer Sharing in Sharing preferences before this URL will work; you can then disable Printer Sharing if you're not using it.) I'll show you how to use some of its features over the next few pages.
| Note | You can theoretically access any OS X Mac's CUPS web interface via http://serveraddress:631/. However, by default only someone accessing the CUPS web interface from the same computer can make changes. If you want to prevent others from viewing the web interface on your computer at all, you should block port 631 using a firewall, as described in the next chapter. |
As you'll see in some of the examples I present, for most printer/print queue management, Print Center is much easier to use. However, some features are only available via the web interface. If you'd like to learn more about CUPS or the CUPS web interface than what I include here, the CUPS Software Administration Manual is available at any time (it's actually installed on your computer) at http://127.0.0.1:631/sam.html.
| Note | The address http://127.0.0.1 is a URL that tells your Mac to connect to itself rather than to another computer. Your Mac may also be able to connect to itself by using its own Rendezvous name: http://RendezvousName.local. In fact, sometimes Mac OS X—in the interest of "ease of use"—will tell your web browser to substitute the latter URL for the former. Unfortunately, the CUPS web interface will not allow you to make any changes to printers or print queues unless you specifically use http://127.0.0.1. If you can't connect to the CUPS web interface, or if you can connect, but get an error that "You don't have permission to access the resource on this server" when you try to make changes, check the URL and make sure you're accessing 127.0.0.1:631, and not RendezvousName.local:631. |
Adding Printers
For USB printers, you're generally better off using Print Center; however, if you're connecting to a networked printer and you have the printer's address, it's fairly simple to use the web interface.
-
Go to http://127.0.0.1:631 in any web browser.
-
Click the "Do Administration Tasks" link.
-
Under Printers, click Add Printer (Figure 12.4).
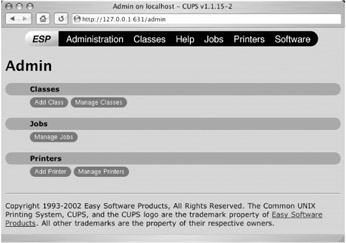
Figure 12.4: CUPS' printer administration web page -
Give your printer a name, location, and description (e.g., Office_Printer, Room 3027, Laser Printer on 3rd Floor). Note that the printer's name is actually the queue name, and can only contain letters, numbers, and the underscore symbol. The "description" field will show up later in Print Center as the "name" field. Click Continue. These fields are mainly used for identification purposes, which can be quite helpful if you have a number of printers.
-
On the Device screen, select the appropriate connection method from the Device pop-up menu—this is the connection or protocol used to communicate with the printer. For LPD printing, select "LPD/LPR Host or Printer"; for a printer being shared by a Windows computer, select "Windows Printer via SAMBA"; and so on. Note that in some cases, you'll actually see your printer listed in this menu; that means OS X automatically recognized it.Click Continue.
-
On the Device URI screen, enter the URI (Uniform Resource Identifier, similar to a URL) for the printer. For networked printers, this will be in the format http://, ipp://, or smb://, as described earlier when I talked about setting up printers using Print Center. Generally the person who set up the printer will be able to provide you with the correct URI (or your printer's manual will tell you how to get it). If your printer is connected via USB, open Terminal and type lpinfo -v <RETURN> to get a list of connected devices and their URIs; for example, my laser printer has a URI of usb://Samsung/ML-1210?serial=0. (Although if you have a USB printer, I highly recommend using Print Center rather than the web interface.) Click Continue.
-
On the Model/Driver screen, select your printer's manufacturer and click Continue. On the second Model/Driver screen, select the correct PPD file or driver for your printer. Click Continue.
You should get a message that your printer has been added successfully. You can open Print Center and see the printer just as if you'd added it from within Print Center.
| Tip | If the CUPS web interface didn't provide the correct PPD file as one of the choices in Step 7, you can choose any PPD file, and then later change to the correct one using Print Center's Show Info window. |
Configuring/Modifying Printers
Just as you can use the Show Info window in Print Center to change the name, location, and PPD for a printer, you can use the CUPS web interface to change these settings from your web browser. From the main CUPS screen, click Manage Printers. Scroll to the printer you want to modify, and click Modify Printer (you can also click on the printer name or icon to go to a dedicated screen for that printer, and then click Modify Printer).
The Modify Printer procedure walks you through the same steps you would go through to add a printer; however, the existing values for your printer are already entered. On each screen, make any desired changes and then click Continue. (Simply click Continue if no changes are needed on a particular screen.) This feature basically lets you alter an existing printer's name, location, address, and/or PPD file without having to delete it and start over.
Unlike the Printers ➣ Configure Printer command in Print Center, which launches a printer-specific utility for those printers that have one installed, the "Configure Printer" button in the CUPS web interface doesn't do anything. Perhaps in a future update it will provide some functionality, but for now you'll have to access printer utilities through Print Center.
| Tip | One other nice feature of the CUPS web interface, when it works, is the "Print Test Page" button, available for any printer on the Manage Printers page and on each printer's own configuration page (accessible by clicking on the printer icon or printer name). The test page features a gradient sample and color wheel and is helpful for checking color accuracy and toner levels. It's also a useful troubleshooting tool if you're having trouble printing from within a particular application: if the test page prints, you know your printer is connected and working, and the problem is most likely with the application. (Unfortunately, the test page doesn't work at all for some people; so if it doesn't print, that doesn't necessarily mean your printer is broken.) |
Deleting Printers
To delete a printer/print queue from the web interface, access the Manage Printers screen (click Manage Printers from the main page or from the Administration Tasks page). Find the printer you want to delete and click the Delete Printer button. (You can also click on the printer's name or icon to go to the printer's own page, then delete it from there.) You'll be asked if you're sure; click Continue.
| Warning | Unlike deleting a printer in Print Center, the CUPS web interface will not warn you if there are pending print jobs in the printer queue. The printer will be deleted immediately, along with any and all queued jobs. |
Creating Printer Classes
One feature available via the CUPS web interface that isn't available in Print Center is the ability to create and manage printer classes. Printer classes are collections of printers, grouped together. Instead of printing to a particular printer, users can print to a class; the print job is queued in a class queue rather than a printer queue. Jobs in the queue are forwarded to the first available printer in the class. Although printer classes are probably overkill for most home users, in large network environments printer classes help distribute printing among several printers, spreading the workload and generally ensuring that print jobs are processed as quickly as possible. Unfortunately, when you print to a class, you don't get any feedback letting you know which printer actually handled the job, so this feature is most useful when the printers in the class are located physically near each other.
To create a print class, first you need to set up the printers that will be included in the class and add them via Print Center or the CUPS web interface. Then follow these steps:
-
From the main CUPS web interface click Manage Printer Classes.
-
On the Printer Class page, click Add Class.
-
Just as you would a new printer/print queue, provide a name, location, and description of the new class (which is really just a new queue). The name of the queue can only contain letters, numbers, and the underscore character.
-
On the next page, "Members for ClassName," select the members you would like to include in the printer class. Hold down the command key as you click to select multiple printers (Figure 12.5). Click Continue. Note that if you have previously created other printer classes, they'll also be listed—you can actually include classes within other classes.
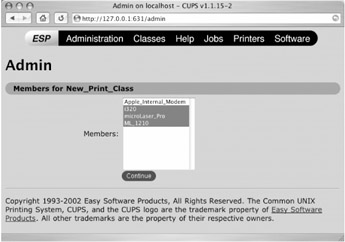
Figure 12.5: Selecting printers to be added to a printer class
The new printer class queue has been created. In fact, if you open Print Center, you'll see it listed as an available printer. It will also show up as an available "printer" in all print dialogs.
| Tip | If you enable Printer Sharing (discussed later in this chapter), any printer classes you have defined will also be shared. You've created, in effect, your own multiple-printer print server! |
| Note | To delete a printer class, you need to select it in Print Center and click the Delete toolbar item (or choose Printers ➣ Delete Printer). There isn't any easy way to delete a printer class via the web interface. |
Managing Print Queues
The CUPS web interface gives you similar control over print queues as Print Center; however, it also provides one extra feature: the ability to reject new print jobs without affecting jobs already queued.
Stopping/Starting Print Queues
By clicking Manage Printers on the main CUPS web page, you're taken to a list of all printer queues. Clicking the Stop Printer button for any printer will stop the corresponding print queue, and all pending jobs will be held. The Stop Printer button will change to read Start Printer, and the icon for the printer will change so that the printer is not currently active (Figure 12.6). You can of course start the printer again by clicking Start Printer. (You can also access the Start/Stop Printer buttons from the printer's own page, which I talk about below.)
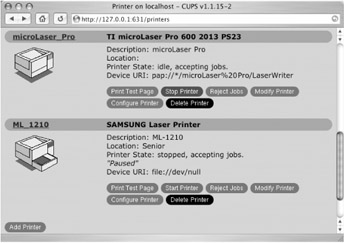
Figure 12.6: Active (top) and stopped (bottom) printers in the CUPS web interface
Rejecting/Accepting New Print Jobs
Immediately to the right of the Stop/Start Printer button is the Reject Jobs button. This feature, unique to the web interface, allows print jobs that are already in that printer's queue to print, but prevents any new jobs from being printed to it. Users will see the "stopped" symbol (the grey exclamation point) next to the printer in print dialogs as if the printer has been stopped, but existing jobs will still be allowed to proceed.
Managing Pending Print Jobs
There are two ways to manage jobs via the web interface. To view just the jobs for a particular printer, go to the Manage Printers screen, and then click on the name or icon for a particular printer. You'll see a list of all pending jobs for that printer. If you want to view all jobs pending for all printers, click Manage Jobs on the main web interface page. You'll see a similar list of pending jobs, but this one includes all printers (on both screens, you can tell which printer a job will be printed to by looking at the ID column).
| Note | Keep in mind that you'll only see jobs if there are currently jobs waiting to be printed; if you don't print many documents at once, you'll rarely see a long queue of print jobs. If you're really curious, stop a printer queue and then print several documents to that printer; you'll then be able to "Manage Jobs." (When you're done you can just delete the jobs without printing them.) |
The information presented for each job is the same, whether you're looking at all jobs or just those for a specific printer. The Name column tells you the name of the document. The User column tells you the username of the person who printed the document. The State column tells you the current status of the job; if it's been waiting, the column will tell you when it was initially "printed" by the user.
The Control column provides you with the same controls as the Show Jobs window of Print Center. The Cancel Job button deletes a print job from the queue. The Hold Job button keeps the job in the queue, but allows other jobs to print ahead of it; it won't be printed until you resume it.
Viewing Logs of Completed Print Jobs
Another feature unique to the web interface is the completed jobs log. The Show Completed Jobs button is located on both the printer-specific and master Manage Jobs screens. Clicking it shows you a history of jobs printed via your computer. (If you click Show Completed Jobs from a particular printer's job screen, you'll see a history of jobs printed by that printer; if you click it from the overall jobs screen, the list will include jobs printed by all printers.) The info is similar to that on the pending jobs screen—job ID, document name, user, and state—but includes a Size column that shows the size of each printed document. This information is culled from the file /private/var/log/cups/page_log; you can actually edit the CUPS configuration file to control how many jobs are logged (see below).
The Completed Jobs screen also includes a Restart Job button next to each job; however, unless you manually enable the "Preserve Job Files" setting in the CUPS configuration file this button will give you an error.
Editing/Enabling CUPS Options
| User Level: | admin |
| Affects: | computer |
| Terminal: | no |
The CUPS configuration file is located at /private/etc/cups/cupsd.conf, and contains most of the settings for the CUPS web interface and server. Although any user can open the cupsd.conf file to view it, it can only be edited with root access (which means that to make changes you'll have to run a text editor as root as described in Chapter 1). Here are a few settings you may be interested in.
| Note | Some OS X system updates replace your CUPS configuration file with an updated version, so if you make changes to it, you may have to re-add those changes to the new cupsd.conf file after the update. |
-
#PreserveJobHistory Yes Whether or not the Completed Jobs log is enabled; default is Yes.
-
#PreserveJobFiles No Whether or not actual print jobs are saved; default is No. If you set this to Yes, the Restart Job button on Completed Job screens will actually allow you to reprint an old print job. However, if you enable this feature, you definitely want to reduce the number of jobs logged (see the next setting), because CUPS will store a complete copy of every print job—that can eat up quite a bit of hard drive space.
-
#MaxJobs 500 The maximum number of recent print jobs logged by CUPS; default is 500. If you change it to "0" there will be no limit. To disable logging, instead use the PreserveJobHistory setting (above).
To change any of these settings, open the cupsd.conf file (as root) in a text editor. Find the line that contains the setting you want to change, and remove the # symbol from the beginning of the line. (The # symbol tells CUPS to ignore that setting and use the default; removing the # tells CUPS to pay attention to the line.) Enter the new value (Yes, No, or the appropriate number), and then save the file. You'll need to restart your Mac for the settings to be applied, as CUPS loads its configuration file at startup.
There are actually many, many more settings in the cupsd.conf file that can be edited. Many are easy to figure out (especially using the instructions that are included right in the file), but others are intended mainly for IT types. I encourage you to skim through the file to see what a server configuration file looks like. You can even experiment with various settings.
| Warning | As with any important system file, be sure to make a backup copy of the cupsd.conf file before making any changes. If something goes wrong, you can always replace the edited version with the original. |
Setting Up Printers in Classic
| User Level: | any |
| Affects: | depends on Classic preferences |
| Terminal: | no |
I discussed the Classic Environment in Chapter 9; however, I didn't talk about printing in Classic. For good or bad, Classic doesn't use OS X's printing technologies, and thus doesn't use the printer(s) you've set up in Print Center or the CUPS interface. In fact, printing is one of the areas where Classic behaves just like a Mac running OS 9. In order to print from Classic applications, you need to set up your printers within Classic; in fact, once you do so, you can print from within Classic even if you've never set up a printer in OS X itself.
To print in Classic, you need to first make sure your printer has drivers available for OS 9—if it doesn't you're pretty much out of luck. If it does, you need to install them in the Classic System Folder. For drivers that can be manually installed via drag-and-drop, you can actually do this when booted from OS X. In addition, some Classic printer driver installers will run in the Classic Environment. However, some Classic printer driver installers will only run from OS 9, so you may need to reboot into OS 9 to install.
If you find yourself in the rare situation where (1) your printer's drivers can only be installed using an installer; (2) the installer will only run when booted into OS 9; and (3) your Mac is one of the newer models that won't boot into OS 9, then things are a bit trickier. You'll need to find a Mac that will boot into OS 9, install the drivers there, keep track of exactly what is installed and where, and then manually copy those files over to your Classic System Folder.
| Note | In addition to installing Classic drivers for your printer, printing in Classic requires that the Print Monitor application be installed in the Classic System Folder's Extensions folder. This shouldn't be a problem, since it is installed there by default by OS 9; however, if you have moved it elsewhere manually, you won't be able to print in Classic. |
Once you've installed the OS 9 drivers for your printer, start the Classic Environment, then open the Chooser utility (either by navigating to /Classic System Folder/Apple Menu Items/Chooser, or by switching to a Classic application then selecting Apple Menu ➣ Chooser). Choose your printer using the instructions provided with your printer, and then close the Chooser.
| Tip | If you've enabled "Use preferences from home folder" in Classic preferences, each user will have to set up the printer in Classic on their own (although you'll only have to install the Classic printer drivers once). If you don't have this checked, you'll only have to select a Classic printer in the Chooser once, as all users will share the same printer preferences. |
Once you've up your printer in Classic, you can print from within any Classic application.
Using Classic to Print to Unsupported Printers
| User Level: | any |
| Affects: | individual user |
| Terminal: | no |
If you have a printer that is supported in Classic, but is not supported in OS X (even using open-source printer drivers, as discussed in "Supporting Unsupported Printers"), you can take advantage of Classic to print. As I'll show you a bit later in the chapter, OS X allows you to "print" to a PDF file from within any application. You can then open the resulting PDF file in the Classic version of Acrobat Reader (usually installed with OS 9—if not, you can download it from the Adobe website at http://www.adobe.com/products/acrobat/readstep.html), and print from there. I actually know users who never use Classic to run Classic applications but keep it running all the time to print this way because their older printers aren't supported in OS X.
Cleaning House: Removing Unnecessary Printer Drivers
| User Level: | admin |
| Affects: | computer |
| Terminal: | no |
Although OS X includes drivers and PPD files for hundreds of printers, if you're like most users you only use one or two printers. You can actually delete the support files for other printers and save quite a bit of hard drive space—400MB or more! To delete extra drivers, navigate to /Library/Printers and follow these steps:
-
Manually delete the folders for printer manufacturers (Canon, Epson, HP, Lexmark, etc.) other than the one for your printer. Do not delete the PPD Plugins or PPDs folders. Note that if you have a SmithMicro folder, you shouldn't delete it, as it actually contains the fax software (FaxSTF) that came with your Mac, and you should also not delete the DAVE folder, if present, as it contains support files for the DAVE Windows file sharing, networking, and printing package.
-
Open the PPDs folder and navigate to PPDs/Contents/Resources. If you're only using U.S. English support in OS X, you can delete all but the en.lproj folder. If you're using other language support, you should keep the en.lproj folder plus the folder that corresponds to the language you use (fr.lproj for French, it.lproj for Italian, etc.).
| Note | Although deleting extra printer drivers will free up some disk space, if you've got a big hard drive with lots of free space there's really no reason to do so—having extra drivers won't hurt anything, and if you ever get a new printer (or, in the case of a PowerBook or iBook, need to connect to a different printer while you're on the road), you'll probably end up having to reinstall the correct drivers. |
|
|