Sharing Remotely: Personal File Sharing
| User Level: | admin to enable and configure; any user can share files |
| Affects: | computer |
| Terminal: | no |
If you'd rather not have to upload files to an iDisk to share them, you can use one of OS X's built-in file sharing services. These services allow others to access files that actually reside on your computer, over a network or the Internet. Like Mac OS 9 before it, Mac OS X provides—via Personal File Sharing—Apple's own File Sharing protocol (also called Apple File Protocol or AFP), which is the best way to share files with other Macs over a local network. However, unlike OS 9, it is also a fast and reliable way to share files over the Internet.
What Does It Share?
By default, Personal File Sharing provides non-admin users with remote access to the files in their own user folder, and to files in other users' Public folders. This means that if you want other users to be able to access files using Personal File Sharing, be sure to put those files in your Public Folder. However, it's possible to further restrict access, or to provide access to additional directories; I'll talk about how to do both under "How Do I Configure It?"
| Note | When admin-level users connect over Personal File Sharing, they have the same access to files as they would if they were sitting at the computer. In other words, they can access any file except for those inside other users' private directories. |
Who Can Access Files?
By default, individuals with a user account on your computer can access their own user folder, and other users' Public folders, via Personal File Sharing. In addition, users without an account can connect as Guest (more on that in a bit), but their access is restricted to just Public folders. The only caveat is that to connect, remote users must have a Mac that supports Apple File Protocol over TCP/IP (which is basically Mac OS 9 or OS X).
| Warning | By default, an admin-level user can also remotely connect as any other user via Personal File Sharing by using the user's username and their own admin-level password (more on connecting below). This is a true administration feature, as it allows the administrator to test normal user accounts and their Personal File Sharing access. However, because this feature can be misused in the wrong hands, it's yet another reason not to provide admin access to anyone who doesn't absolutely need it. |
How Do You Configure It?
Once you've got a network or Internet connection, Personal File Sharing requires little configuration for basic operation. First, you give your computer a Computer Name and a Rendezvous Name in the Sharing pane of System Preferences. The first is your computer's "official" name—this shows up in Finder windows and in Terminal—whereas the Rendezvous Name is your computer's name as it appears to Rendezvous-enabled devices. (I discussed Rendezvous in the previous chapter.) Then you simply check the box next to Personal File Sharing in the Services tab (Figure 10.3). To stop sharing files this way, either uncheck the box, or select Personal File Sharing and click the Stop button on the right. Once you've enabled Personal File Sharing, you'll see a helpful message at the bottom of the window: "Other Macintosh users can access your computer at afp://yourIPaddress/".
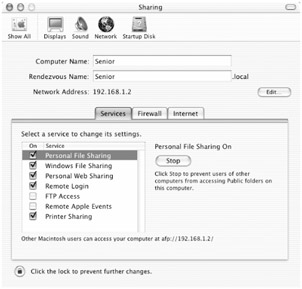
Figure 10.3: Enabling Personal File Sharing in Sharing preferences
| Note | If you're behind an Internet router, the IP address provided by the Sharing preference pane will only be valid for other users on your local network; in addition, if you have a dynamic IP address, it will only be valid until your ISP provides you with a different one. See the sidebar "Your IP Address: Internet Routers, Port Caveats, and Dynamic IPs" for information on working around these limitations. |
Although enabling Personal File Sharing for basic operation is quite simple, there are a number of options available to you via third-party utilities. You can disable Guest Access, create sharing-only user accounts, disable the sharing of some or all Public folders, enable the sharing of additional directories, and much more. Here are some of the most convenient and useful options and how to enable them.
Disabling Guest Access to Personal File Sharing
By default OS X's Personal File Sharing allows Guest users—users who don't have their own account on your computer but can still connect and access a limited group of files (those in Public folders). Although this feature is quite useful for providing access to certain files for remote users without having to create local accounts for them, it also means that anyone who knows your IP address can potentially connect as a Guest user and access Public files. Although this is not a major security issue—the only "damage" a Guest user can do is to download copies of files in Public folders—you may not want to completely open up your Public files to the… um, public.
If Guest Access concerns you, you can disable it (and re-enable it at any time) using the donationware SharePoints (http://www.hornware.com/sharepoints/). A few other, simpler, utilities out there allow you to toggle Guest Access, but SharePoints does so much more, and I'll use it for so many of the examples in this section, that I consider it to be the Swiss Army Knife of Personal File Sharing utilities. (It also has other capabilities; you may have used it in Chapter 1 to set up a new group.) It's available as both a preference pane and an application. I personally prefer the preference pane version (it seems more intuitive to me to work with Personal File Sharing settings in System Preferences), but I'm going to use the application version for this discussion because the screenshots are clearer. Both versions function identically. To disable Guest Access, launch SharePoints and then follow these steps:
-
Click on the AFS Properties tab (AppleFileServer Properties in older versions of SharePoints).
-
In the Miscellaneous Properties section, uncheck the box next to Allow Guess Access.
-
Click the Update AppleFileServer Properties button. You'll be asked for your admin-level username and password.
-
Click the Restart AppleFileServer button to restart Personal File Sharing. (If it is currently disabled, this will start it up for you.)
Other users will no longer be able to log in as Guest and access user Public folders. (See "How Do Others Access Files?") To re-enable Guest Access (or if for some reason your Mac never had it enabled), use the same procedure but check the box next to Allow Guest Access instead.
| Tip | Most of the Personal File Sharing custom settings I discuss in this chapter are accessible via Terminal and/or NetInfo Manager. However, using a utility like SharePoints is so much easier and—because there's no chance for mistyping—safer that there's really no reason not to use it. |
Creating File Sharing Only Users
If you've disabled Guest Access, you may be wondering how you allow remote access to Personal File Sharing to individuals who don't have a local account. You could create a single, extra user account and then provide that username and password to everyone you want to be able to access files over Personal File Sharing. However, that would be a rather inconvenient and messy solution. A better solution is to create "File Sharing Only" users. Again, Share-Points is the easiest way to do this.
File Sharing Only users can connect to Personal File Sharing, but can't log in locally, don't have their own user directory, and cannot log in using the Remote Login feature (discussed later in this chapter when I cover SFTP sharing, and in the next chapter when I talk about Remote Access). These types of user accounts are ideal for users who will never actually sit down at your computer and log in, but with whom you want to share files. To create a File Sharing Only account using SharePoints:
-
Click on the Users & "Public" Shares tab.
-
Under Individual Users, fill in the user's full and short name (just as if you were setting up a new account in Accounts preferences).
-
In the Group pop-up menu, select "staff." (If you've set up any groups of your own, and you want the new user to be a member of one of those groups, you could select that group name instead.)
-
Click the Get Next UID button; SharePoints will automatically assign the new user the next available user ID (Figure 10.4).
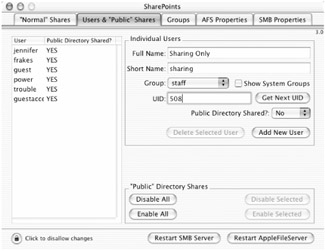
Figure 10.4: Setting up a File Sharing Only user in SharePoints -
Ignore the Public Directory Shared? pop-up menu; users created within SharePoints do not have Public folders. (This option exists to allow you to edit existing user accounts, as described in the next section.)
-
Click Add New User (provide your admin username and password if prompted), then click Restart AppleFileServer to restart Personal File Sharing.
The new user you just created will be able to log in via Personal File Sharing and view Public folders, but will have no other system privileges.
Disabling/Enabling Sharing of Public Directories
What if you don't want remote users to be able to access certain, or all, user Public folders? You can use SharePoints to disable the sharing of individual Public folders, or you can choose to disable all Public folder sharing and then manually enable the sharing of other folders (using the next tip). For example, you could choose to disable all Public folder sharing, and then provide access to the Shared folder instead. To edit the sharing of Public folders:
-
Click on the Users & "Public" Shares tab.
-
In the User column on the left, select the user whose Public folder you want to prevent from being shared.
-
In the "Public" Directory Shares section, click Disable Selected. (Or click Enable Selected if you had previously disabled sharing for that user and want to re-enable it.) If asked, enter your admin-level username and password.
-
Repeat Steps 1–3 to disable/enable sharing for additional users' Public directories.
-
Click Restart AppleFileServer to restart Personal File Sharing.
| Tip | You can quickly disable or enable the sharing of all Public directories using the Disable All and Enable All buttons. |
Enabling Sharing of Additional Directories
If you want to share files in directories other than, or in addition to, Public folders, you can do this by creating what are called sharepoints. (This is actually where SharePoints got its name—it was originally just a utility to help you create new sharepoints.)
-
Click on the "Normal" Shares tab.
-
In the Share Name field, enter the name of the share. This can be the name of the folder you plan to share, or anything else. However, since this name will be included in the list of shares users see when they connect to Personal File Sharing, it should be something unique and descriptive.
-
Click the Browse… button next to the Directory field. Navigate to the folder you want to share, select it, and then click the Open button. The path to your chosen folder will appear in the Directory field.
-
Click Create New Share to create the share; if prompted, enter your username and password. Then click Restart AppleFileServer to restart Personal File Sharing.
You can delete a share by selecting it from the list of shares and then clicking Delete Selected Share. You can also use SharePoints to quickly change the permissions of the shared directory by selecting a share and then clicking then Show File System Properties button. A drawer will slide out that shows the current owner, group, and permissions for the selected share. You can change them via the pop-up menus. However, SharePoints can only change the permissions for the top level of the shared directory. To provide more or less access to the files within the directory, you should use the Finder's Get Info command or a third-party file utility.
| Tip | To disable a custom share without deleting it, select the share in the list of Normal shares, select "Disabled (-)" from the AppleFileServer (AFS) Sharing pop-up menu, click Update Share, and then click Restart AppleFileServer. |
Enabling Personal File Sharing over AppleTalk
Although Mac OS X shies away from AppleTalk (it will only use it for local networking if you specifically enable it), AppleTalk is still the predominant networking protocol for many older Macs. In fact, some older versions of the Mac OS—still in use on older Macs and in many schools—don't even support Apple's IP-based file sharing protocol. This can present a problem if you're trying to share files with these computers. However, although Apple doesn't advertise it, Mac OS X does support File Sharing via AppleTalk. To enable it, launch SharePoints, and in the AFS Properties tab, check the box next to Use AppleTalk in the Miscellaneous Properties area. You'll need to click the Restart AppleFileServer button to restart Personal File Sharing; once it starts up again, your Mac will be visible on an AppleTalk network.
Activating the Personal File Sharing Log
Users of Mac OS 9 may remember the File Sharing Monitor, which provided you with a list of connected File Sharing users. Mac OS X doesn't include such a feature (it's reserved for OS X Server); however it does include the ability to keep a detailed log of all Personal File Sharing activity. Fire up SharePoints again, and in the AFS Properties tab, look at the Logging Properties section. If you check the Enable Logging box, OS X will begin to log any or all of the types of activities checked in the boxes to the right (Logins, Logouts, etc.). By default, the log is located at /Library/Logs/AppleFileService/AppleFileServiceAccess.log. Remember that you have to click the Update AppleFileServer Properties button, and then the Restart AppleFileServer button, for your changes to be applied.
You can view the log in text editor like TextEdit at any time; however, you won't be able to automatically view updates. If you want to watch the log in real time, you can use one of the log-viewing utilities I mention in Chapter 14. In addition, a quick and easy way to view real-time updates is to open a new Terminal window and type tail -f /Library/Logs/ApplefileService/AppleFileServiceAccess.log <RETURN>. This will show the log in the Terminal window, including additions to the log (i.e., activity) as they are written.
Other Options in SharePoints
In addition to the options I've discussed here, SharePoints also provides a number of other features you'll have to explore for yourself. I mentioned the ability to create groups in Chapter 1, but you can also create a welcome message that other users will see when they connect, change the ports used by Personal File Sharing, and even set up idle timers so that users are automatically disconnected if they are idle for too long. You can also configure and customize OS X's Windows File Sharing (which I'll talk about later in the chapter).
How Do Others Access Files?
How other users access Personal File Sharing on your Mac depends on whether they're connecting over a local network or over the Internet, and whether they're connecting from Mac OS X or Mac OS 9 and earlier. To make things easier, I'm going to talk about each separately. Once connected, regardless of the method, the user will get a dialog to enter their username or password (unless they're using Guest Access, in which case they'll skip that step). They'll then get a dialog box where they can choose which sharepoints (for guest, normal, and File Sharing Only users) or which volumes (for admin users) they want to mount on their own Desktop. From there they can access files just as they would on any other mounted volume.
-
Local network: Mac OS X From another Mac running OS X on a local network, the user simply has to choose Go ➣ Connect to Server… (or press command+K) in the Finder, and then click the triangle to expand the Connect to Server window (to show the server browser). Due to the magic of Rendezvous, your Mac will show up in the browser by its Rendezvous name; they should select it and click Connect. If the browser is taking a long time to locate your Mac, they can also enter afp://rendezvousname.local in the Address field (where rendezvousname is your computer's Rendezvous name), and then click Connect.
-
Local network: Mac OS 9 Users of Mac OS 9 should choose Apple Menu ➣ Chooser. On the left side of the Chooser window, select the AppleShare icon. Then on the right, click the Server IP Address… button. In the resulting dialog, they should enter your local IP address (if both computers are behind an Internet router, or have been given their own static IP addresses, this will be the IP address provided in Sharing preferences), and then click Connect. Note that if you enabled AppleTalk File Sharing, when they click the AppleShare icon, your Mac should show up on the right side of the Chooser; they should simply select it and click Connect.
-
Local network: Mac OS 8.x and earlier If you've enabled AppleTalk File Sharing, users of pre-OS 9 systems should choose Apple Menu ➣ Chooser, and then click the AppleShare icon on the left side of the Chooser. They should then select the icon for your Mac on the right side (it should show up automatically) and then click Connect.
-
Via the Internet: Mac OS X Mac OS X users accessing your Mac over the Internet should choose Go ➣ Connect to Server… (or press command+K) in the Finder to bring up the Connect to Server dialog. In the Address field, they should enter afp://yourIPaddress(or replace yourIPaddress with your domain name, if you have one assigned to your Mac), and then click Connect.
-
Via the Internet: Mac OS 9 Mac OS 9 users accessing your computer over the Internet should follow the same procedure they do when accessing over a local network; the only difference is that they should enter your Internet IP address (or domain name) rather than your local one. If you have a static IP address and are not behind an Internet router, the two will probably be the same.
If you don't have a static IP address, or you're behind an Internet router, this adds a few wrinkles when other users try to access your Mac over the Internet. See "Your IP Address: Internet Routers, Port Caveats, and Dynamic IPs."
In many of the methods for file sharing that I discuss in this chapter—specifically, Personal File Sharing, Windows File Sharing, Personal Web Sharing, FTP, and SFTP—users trying to access your files will need to provide your computer's IP address. If the other users are on your local network, they can simply use the IP address listed in the Services tab of Sharing preferences (the one that appears when you enable a Sharing service). However, users accessing your Mac over the Internet may need to use a different IP address.
If your ISP or network administrator provides your computer with a static IP address, and your computer is not behind some sort of Internet router, you don't need to worry; the address listed in Sharing preferences is the same for locally networked and Internet users. However, if your computer is behind an Internet router, you'll need to do some work of your own to allow others to connect. (I discussed Internet routers in the previous chapter; they're basically devices that allow multiple computers to share a single Internet connection; many are hardware devices, but if you're connected to another Mac that's sharing its Internet connection with you—using OS X's Internet Sharing—that Mac is acting as an Internet router.) In addition, if your ISP or network administrator doesn't provide you with a static IP address—one that remains the same at all times—you'll need to do some additional legwork to make it easy for others to connect.
Internet routers and IP addresses
If you connect to the Internet through an Internet router, your ISP-assigned IP address identifies the router, not any individual computer connected to the router. This presents a problem when sharing files over the Internet, as a user who connects to your IP address actually connects to the router instead of your computer. The end result is that the user will receive an error.
Luckily, there's a solution to this problem. As I'll discuss in more detail in Chapter 11, every computer connects to the Internet over a multitude of ports, each dedicated to certain types of data. These ports are different from OS X's network ports; in terms of Internet service and protocols, a port is specific service on a computer or server that deals with a certain type of data. For example, Apple's File Sharing Protocol uses port 548 by default—when your computer receives data intended for port 548, it directs that data to the Personal File Sharing service. Using specific ports in this manner allows data to be transferred more efficiently and effectively.
By taking advantage of these service-specific ports, you can enable what is called port mapping or port forwarding on your Internet router. Basically, port mapping is a way to tell your Internet router that data intended for certain port should always be directed to a specific computer behind the router. For example, you can elect to have all attempts to connect to Personal File Sharing (which uses port 548) on a specific computer forwarded—or mapped, in tech-speak—to that computer.
To set up port forwarding, you should consult your Internet router's manual or help files. On most models, it's as easy as entering the port number you wish to forward, followed by the name or internal IP address of the computer to which you want data for that port to be forwarded. To help you out, here are the port numbers for most of OS X's sharing services:
-
FTP (FTP Access): 20, 21
-
SSH (Remote Login and SFTP): 22
-
HTTP (Web Sharing): 80, 427
-
SMB (Windows File Sharing): 139
-
AFP (Personal File Sharing): 427, 548
(You can see a complete list of ports used by Mac OS services at http://docs.info.apple.com/article.html?artnum=106439.)
One downside to port mapping when it comes to sharing files over the Internet is that only a single computer behind your router can provide each type of sharing service. For example, if your computer is mapped for Personal File Sharing, all requests on port 548 will be directed to your computer, even if another Mac behind your router also has Personal File Sharing enabled.
Port Caveats
While I'm on the topic of ports, I should mention another potential drawback of the port system: the ability of ISPs to prevent certain ports from transferring data. Some ISPs prohibit their users from setting up "servers"—their term for any service used to distribute files over the Internet. To prevent such services while still allowing standard Internet access, they generally block only known "server ports"—ports used by well-known file sharing services. Some of the most commonly blocked ports are those used by HTTP (Web) servers and FTP servers. In addition, ports used by file sharing systems such as Kazaa and Napster may also be blocked. If you're having trouble sharing files with others, or accessing files on your own computer from another computer, you may be the victim of port blocking. (Although I understand the motivation behind port blocking, I personally think that there's a difference between sharing pirated music and software and sharing personal files. In my opinion, ISPs should concentrate on monitoring excessive data transfers, rather than preventing all file sharing, legitimate or not.)
Fortunately, because Mac users usually constitute a minority of an ISP's customers, many ISPs aren't familiar with all of the sharing services available in OS X. As a result, the ports used by many Mac-only services (e.g., Personal File Sharing) are rarely blocked. So if one sharing method doesn't work for you, consider using a different method.
That being said, if you're set on using a particular service but your ISP blocks the port used by it, you can change its port by editing the /etc/services file (which must be done as root). Each service in this file has an entry, or several entries, that looks like this:
ftp 21/tcp #File Transfer [Control] ftp 21/udp #File Transfer [Control]
where 21 (in this FTP example) is the port number. You would simply change the port number to one that isn't blocked by your ISP (either by asking them which ports they do and do not block, or by trial and error). Just make sure that you aren't changing to a port used by another service—the services file is organized by port number, so you can generally just read down the list until you find a port that isn't used by anything else. After making a change, you'll need to save the file and then restart, since services and services information are loaded at startup, prior to login.
Note that for other users to access a service on a non-standard port, they'll need to explicitly include the port number after your IP address, separated by a colon (e.g., serveraddress:port).
Dynamic IP addresses and sharing
If your connection to the Internet is via PPP or PPPoE, or if your office network provides you with an IP address via DHCP, your IP address may change periodically—this is called a dynamic address. Unfortunately, dynamic IP addresses are a major pain if you're trying to share files over the Internet; if you give someone your IP address, they have to connect to your computer before your IP address changes, and there's no guarantee that your IP address will be the same the next time they attempt to connect.
There are really only two ways to deal with dynamic IP addresses and sharing files. The first is to simply provide your current IP address to others each time they want to access your computer. The excellent freeware DockIP (http://www.kainjow.com/dockip.html) is a great little app with a Dock menu that provides your current IP address—if you're behind an Internet router, it even provides your external IP address instead of just your local (router-assigned) IP.
If you'd rather not have to give others your IP-address-of-the-moment each time you want to share files, you'll have to use one of the dynamic DNS services out there. These services provide you with either your own domain name, or a sub-domain of their main domain (e.g., yourname.theirdomain.com). Using a small client application that you run on your own computer, these services keep track of your IP address each time you connect to the Internet and then forward any requests intended for your domain to your actual current IP address. Thus instead of giving other people your IP address, you simply give them your domain name.
Although I've never used any of these services, the most popular seem to be http://www.DynDNS.org, http://EasyDNS.com, and http://ZoneEdit.com. At the time of this writing, the dynamic DNS client of choice (which provides your current IP address to the dynamic DNS hosting service) for OS X seems to be DNSUpdate (http://www.dnsupdate.org/).
|
|