Getting the Most from Mac OS X Applications and Utilities
As I mentioned earlier, Mac OS X comes with an impressive number of applications and utilities. Some of them you probably know well and may even use on a regular basis; others may be sitting on your hard drive unbeknownst to you. I'm going to talk about many of these programs, especially the gems that most people don't use but should.
| Note | Some of the OS X applications you're probably most familiar with are the "iApps" (iTunes, iPhoto, etc.), Mail, and Address Book. These are probably the most well-known and widely used OS X applications, and as such have entire books, websites, and mailing lists dedicated to them. Meanwhile, your Mac is full of other useful applications and utilities that rarely get mentioned. It's the latter group of applications I'm going to spend time on here. However, even though I don't talk about the iApps, Mail, and Address Book here in these pages, I still have some good tips for them. If you're interested, you can access these tips from the book's website: http://www.macosxpowertools.com/. |
To give this discussion some semblance of organization, I'm going to split the built-in applications into two groups: "applications" (non-iApps that aren't utilities) and utilities (loosely defined as any Apple-provided application that resides in /Applications/Utilities). Unfortunately, the sheer number of applications (and the fact that some of them are quite simple in what they do or how they work) means that I'll gloss over a few; rest assured that if I don't give a particular application its fair shake, it's probably because you can easily figure it out on your own, or because I talk about it elsewhere in the book.
Mac OS X Applications
The "applications" are those applications that are located in /Applications (in other words, not in the Utilities folder). In a few cases, an application will have its own sub-folder; I've noted where that is the case.
Backup
The Backup application actually isn't installed by Mac OS X; it's only available to subscribers to Apple's .Mac service. (If you're a member, you can download Backup by browsing to http://www.mac.com/ and going to the .Mac Downloads area.) Backup allows you to back up files, folders, or volumes to your iDisk or removable media such as CD-R or DVD-R. I talk more about using Backup (and other backup utilities) in Chapter 14.
Calculator
The Mac OS has always included a basic calculator application, but Mac OS X provides a much improved, and much more capable version. Besides the normal functions you find on your average calculator, it provides three new features:
-
Advanced Functions By clicking the Advanced button, the Calculator application expands to a full-featured scientific calculator, replete with trigonometric functions, exponentials, memory registers, and log functions. (If only it provided an option for RPN entry….)
-
"Paper" Tape Click the Paper Tape button and a drawer expands with a record of any calculations you've performed using Calculator. You can copy any part of the tape for pasting in another application, or you can save the entire tape to a text file by choosing File ➣ Save Tape As….
-
Conversions Probably the coolest feature of Mac OS X's Calculator is its conversion functionality. Type in an amount (area, length, weight, temperature, power, etc.), then choose the type of conversion you wish to perform from the Convert menu. Calculator gives you a window to choose the unit of measurement you're converting from and the measure you're converting to, and then does the conversion for you. It will even convert currency using the latest currency exchange rate (choose Convert ➣ Update Currency Exchange Rates to make sure you have the most recent rates).
| Tip | By clicking the zoom button (the green one in the upper left), you can reduce the Calculator to just the display; you can still control it using the keyboard, but you won't see the body of the calculator on the screen. In fact, if you're an awesome touch-typist, you can have Calculator read any total to you by choosing Speech ➣ Speak Total—you'll never even have to look at the Calculator application. |
Chess
The Chess game lets you play against the computer, play against another person, or just watch the computer play itself (good for learning the game). If you play against the computer, you can choose (from the preferences dialog) how difficult the computer is to beat. You can view the board as a two-dimensional board, but using the three-dimensional setting shows off your Mac's graphics a lot better.
Chess also offers some nice extras. You can save your game in progress to finish it later. You can use Speech Recognition to play the game hands-free (e.g., "Knight b1 to c3"). Finally, if you're stuck, you can choose Move ➣ Hint to get a hint.
| Tip | If you want to disable the speech feedback window, choose Chess ➣ Preferences, and then uncheck the Use Speech Recognition check box. |
Clock
The Clock application is one of those applications that doesn't get used much because of Mac OS X's built-in menu bar clock. Many users figure that since they've already got a clock in the menu bar, why waste screen space with a floating clock? Here's a tip—with the proliferation of application menus and menu bar items, most of us could use a little bit of extra menu bar space. Turn off the menu bar clock (in Date & Time preferences), and set the Clock application (via its preferences dialog) to display in the Dock. You can choose analog or digital display, but the digital display has the advantage of also showing the date.
DVD Player
If you've ever watched a movie on your DVD-capable Mac, you've used DVD Player. Although most of the controls and preferences are fairly straightforward, there are a few functions and commands that most people haven't discovered.
At any time you can view information about the current movie (time elapsed/remaining, chapter/track number, audio information) by choosing Window ➣ Show Info. When the info window is visible, Show Info changes to Hide Info. You can control the color and size of the info window via the DVD Player preferences dialog.
Advanced Controls
One of the most common questions about DVD Player is how to take advantage of special controls such as scan, slow motion, and frame-by-frame advance. At first glance, it actually doesn't appear to provide such functionality, yet it really is there. To scan, simply hold down the forward/reverse track buttons; the speed of the scan is determined by the setting in the Controls ➣ Scan Rate menu.
To access other advanced controls (Figure 7.1), click on the three small dots at the edge of the controller (on the right side for a horizontal controller, at the bottom for a vertical controller). A drawer will slide out with six additional controls: Slow, Step, Return, Subtitle, Audio, and Angle (hold the mouse over a button to see a tooltip that tells you what the button does).
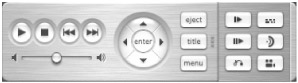
Figure 7.1: DVD Player's advanced controls
If you don't like showing and hiding the controller manually via the Window menu, check the Hide Controller If Inactive For box in the Player tab of the preferences dialog. Enter a time, such as 10 seconds, and the controller will disappear whenever the mouse hasn't moved for 10 seconds; to get it to reappear, simply move the mouse or press the escape key.
Playing DVDs Automatically
If you want a DVD to start playing automatically when you insert it into your Mac, the procedure isn't entirely clear. First, you need to open the CDs & DVDs pane of System Preferences, and select Open DVD Player in the "When you insert a video DVD" pop-up menu. Second, in DVD Player preferences, you need to go to the Player tab and check the box next to Start Playing Disc in the "On Startup" section. When you have both these settings selected, inserting a DVD video will cause DVD Player to launch and automatically start playing the disc.
| Tip | If you tend to watch movies on your Mac at night, you may find the shareware iSleep (http://isleep.free.fr/) useful. It works with DVD Player and allows you to choose any of a number of actions to be performed when the movie has finished, or after a certain amount of time: pause, stop, quit, put the computer to sleep, or shut down the computer. |
Taking Advantage of DVD Player Scripts
Like iTunes and a few other Mac OS applications, DVD Player has its own script menu and includes several AppleScripts. From the script menu you can go directly to a specific chapter or a specific time on the DVD. Even cooler, if you have a favorite spot in a movie, you can use the Preferred Playback script to bookmark it—selecting Preferred Playback again will start the DVD at that spot. There are also a few other scripts for you to play around with, as well as a couple of AppleScript applets—scripts saved as standalone applications—available from the Applets sub-menu. The Preview Movie applet, for example, lets you view the first few seconds of each chapter of a DVD in sequence.
| Tip | If you like the idea of bookmarking DVDs, check out DVD Navigator (http://www.blankreb.com/). It allows you to create your own chapter catalogs for a DVD, and then lets you use those catalogs to navigate the disc. (You can still use the DVD's own chapter/scene selections, as well.) |
Taking Screenshots of DVDs
Unfortunately, you can't take a screenshot of a DVD using the standard Mac OS X screen-shot functionality. However, you can do so using the freeware DVD Capture (http://www.blankreb.com/). When launched, DVD Capture provides its own controller that allows you to play and pause the DVD (you should pause the DVD before taking a picture of it). You can choose to take a screenshot of the entire screen or of just the DVD Player window, and choose to save it to the clipboard or to a file. You can also choose to delay the capture for a few seconds, in case you want to include any menus or the controller in your picture.
Image Capture
Image Capture is used by iPhoto to automatically download pictures from your digital camera; however, most users aren't aware that you can also use Image Capture by itself—in fact, for some uses it's much faster and more convenient than iPhoto, and offers features not available anywhere else.
From the Image Capture preferences dialog, you can decide on the action you want Mac OS X to take when you connect your digital camera: nothing, open iPhoto, open Image Capture, or open another application. (You can make a similar decision if you have a supported scanner; you can choose what application to open when a button is pressed on the scanner.)
Once you've connected your camera, Image Capture provides you with several options. First, you can choose where you want images to be downloaded (from the Download To pop-up menu). Second, from the Automatic Task pop-up, you can decide what you want Image Capture to do with the photos once they're downloaded. The default is to do nothing, but you can have it create a slide show or web page, automatically resize the pictures to various dimensions, or Preview the images (using the Preview application). Click the Download button to download all the photos on your camera using the settings you've selected.
Where the more advanced features of Image Capture come into play are under the Options and Download Some screens. Click the Options… button and you'll see several tabs. The Download Options tab lets you delete photos from the camera after downloading, as well as adding custom data (custom icons, Get Info comments, and ColorSync profiles) to photos as they're downloaded. You can also choose to have photos downloaded automatically upon connect, and to set your camera's date and time. The Device Options tab provides information about the camera or scanner that is currently connected.
The View Options tab provides some interesting settings (icon size, list view columns, etc.), but you may be wondering where this mysterious "view" is located? That's where the Download Some screen comes in. If, instead of clicking Download to download all the pictures on your camera, you click Download Some…, you're presented with an advanced screen that shows (by icon or list view) previews of all the photos currently on your camera. If you choose list view (from the View toolbar item or the View menu), you're also provided with all of the columns you checked in the View Options dialog (Figure 7.2). Some of this information is incredibly useful, and not easily viewed anywhere else in Mac OS X (aperture, exposure, shutter, f-number, etc.).
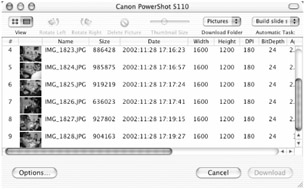
Figure 7.2: The Download Some screen of Image Capture
In the Download Some window, you can also rotate photos left (counterclockwise) and right (clockwise) before downloading them. You have the same options available in the main Image Capture window (download locations and automatic tasks), as well as quick access to the Options dialog. To choose photos for downloading, command-click on them, or drag the mouse across multiple photos. Once you're ready, click the Download button to download the selected photos.
| Tip | In the Download Some window, you can customize the toolbar to add a Thumbnail Size slider that allows you to dynamically resize the photo previews shown in icon view. You can also change the order of columns in list view by dragging the column header left or right, or sort by a column by clicking on the column header. |
Internet Connect
Internet Connect is a catchall application for initiating dial-up, AirPort, and VPN connections. I'll cover each of these functions in Chapters 9 and 11.
Mac Slides Publisher
Like Backup, Mac Slides Publisher isn't installed by Mac OS X; it's only available to .Mac subscribers. I mentioned in Chapter 2 that you can publish photos on your iDisk to be used as a slide show by the Screen Effects preference pane. Mac Slides Publisher allows you to do this quickly and easily. Simply select a group of photos in the Finder or in iPhoto (make sure they're all in JPEG format) and then drag them onto the Mac Slides Publisher icon. It will optimize them for size and then upload them to your iDisk (using the member name and password entered in the .Mac tab of Internet preferences).
To subscribe to another member's slide show (or your own, for that matter), open the Screen Effects tab of System Preferences. Select the .Mac screensaver, and then click the Configure button. Enter the .Mac member name, choose your preferred Display Options, and then press OK. Since you'll be downloading the pictures from an iDisk, you must be connected to the Internet for this to work, but if so, you'll now have a slide show screen saver using the pictures the .Mac member has provided.
Preview
Preview is Mac OS X's universal graphics viewer and converter. It can view all of the following image/graphics formats: BMP, GIF, JPEG, JP2 (JPEG2000), MacPaint, PDF, Photoshop, PICT, PNG, QuickTime Image Format, SGI, TGA, and TIFF. In addition, using File ➣ Export…, it can export to all of these formats except GIF. While viewing an image file in Preview, you can also zoom in and out, rotate it left or right, or flip it on either axis (making Preview a nice tool for quickly performing basic image editing functions).
If you open a multipage PDF file, or a multipage fax document, in Preview, a drawer will slide out of the Preview window, presenting you with thumbnail previews of each page of the document. You can choose to hide the thumbnail drawer by clicking the Thumbnail item in the toolbar. The thumbnail drawer is also helpful if you want to open multiple files. If you drag them onto the Preview icon one at a time, or use the Open menu item and select them individually, each file will open in a new Preview window. However, if you drag multiple files onto the Preview icon in the Finder or the Dock, a single Preview window will open, and you can switch between images using the thumbnails in the drawer.
One of my biggest complaints about the thumbnail drawer is that it really slows Preview down. Luckily, you can choose whether the thumbnail drawer provides an image of each page (and the size of the image), the page/graphic name, or both, from Preview preferences. I set mine to show only the page/graphic name, and Preview is much faster.
| Tip | You can actually view animated image files (such as animated GIFs that are common on the Web) in Preview. Choose View ➣ Customize Toolbar, and add the Play button to the toolbar. Open the animated file in Preview and then click the Play toolbar item to view the animation. (When you view such a file in Preview, the thumbnail drawer will also show each frame as a separate thumbnail.) |
Always Use Preview Instead of Acrobat Reader
Any PDF file created by Mac OS X or Preview will be opened by Preview. However, most PDF files you download from the Web or receive via e-mail will, by default, open using Acrobat Reader. Although Reader offers some features that Preview doesn't (text copying and form editing, to name a couple), many users prefer Preview for most PDFs. You can force Mac OS X to open all PDF files in Preview using a trick I mentioned in Chapter 5:
-
In the Finder, select any PDF file that has an Adobe Acrobat icon.
-
Choose File ➣ Get Info (or press command+I).
-
Expand the "Open with" panel.
-
Select Preview from the pop-up menu.
-
Click the Change All… button.
If you have a particular PDF file you want to open using Acrobat Reader, you can still drag it onto the Acrobat Reader icon, or choose File ➣ Open… from within Adobe Acrobat.
Using Preview to Save Edited Adobe Acrobat Forms
Acrobat Reader includes the ability to fill in PDF forms for printing. However, it does not allow you to save the form, meaning that if you close the PDF file, the next time you open it you have to fill in the form all over again. If this sounds familiar to you, here's a time-saving tip. Fill out the form in Acrobat Reader, and then choose File ➣ Print…, but don't click the Print button. Instead, at the bottom of the window, click the Save As PDF… button. Choose where to save the file and click Save. The resulting PDF file will look exactly like the original form, but with your information saved. You won't be able to further edit the form using Acrobat Reader, but you still have the original for that.
| Note | Mac OS X's printing dialogs actually use the Preview application to save files to PDF format. I'll talk more about this feature in Chapter 12. |
This ability, and the ability to re-save PDF files from within Preview, is not always a good thing from the point of view of a PDF creator. PDF files created by Adobe Acrobat can implement certain security features that prevent things like printing and copying text. Resaving a PDF file from within Preview, or (if printing is enabled) "printing" to a PDF file, effectively defeats many of these protections. Preview was actually a worse offender in Mac OS X 10.1 and earlier—it didn't honor any of these protections at all (you didn't have to resave a file to defeat its security).
QuickTime Player
QuickTime Player allows you to play multimedia files, including such common audio and video formats as MP3, MPEG-4, WAV, AIFF, AAC, and AVI (and QuickTime, of course). You can view or listen to multimedia files stored on your own computer, or you can play back streaming multimedia content over the Internet.
| Tip | If you get annoyed by the promotional video for some new movie or game that always pops up when you launch QuickTime Player, open the QuickTime Player ➣ Preferences ➣ Player Preferences... dialog and uncheck the "Show Hot Picks movie automatically" box. |
If you click on a link for a supported streaming media format in your Web browser, Quick-Time Player will open automatically and begin to play it. If you have the URL of a streaming media file, choose File ➣ Open URL in New Player… and type (or paste) the URL into the dialog box. You can control playback options such as the size of the playback screen using the Movie menu, and you can save your favorite movies and streaming URLs as favorites using the Favorites menu.
| Note | Some AVI movies don't play properly on the Mac. You may be able to convert these problematic AVIs to QuickTime's .mov format using DivX Doctor II (http://doctor.3ivx.com/). |
Each QuickTime Player window has its own volume and playback controls, but there are a couple hidden controls, as well. If you click the mouse in the progress bar in a Player window, you can jump directly to any part of the file. (If the file is located on your computer, playback will resume immediately at the chosen location; if it's a streaming file, it will take a few seconds to re-buffer the content at the new point of playback). If you have a mouse with a scroll wheel, rotating the scroll wheel during playback will enter frame-by-frame mode; you can use the scroll wheel to advance or rewind one frame at a time (click the play button or press the space bar to resume normal playback).
If you're playing a file with audio content, you'll see a graphical audio display on the right side of the progress bar. If you click on this display, the progress bar will switch to an audio control panel with balance, bass, and treble controls (click the display again to switch back).
Finally, if you find that you just can't get QuickTime Player to play loud enough, hold down the shift key as you press the up arrow key (volume up). When the volume slider is all the way to the right, keep pressing the up key and you'll find that the volume continues to get louder!
| Note | If you upgrade to QuickTime Pro, QuickTime Player provides additional editing and import/export options, video effects and codecs, and the ability to create your own Quick-Time files from scratch. |
Script Editor
The Script Editor application is actually located inside the AppleScript folder (inside the Applications folder). It allows you to write, record, and run scripts, as well as to view the AppleScript Dictionary for any application that supports AppleScript. I talk about Apple-Script in the Online Bonus Chapter. If you end up learning how to write your own scripts, chances are you'll start out using Script Editor.
Sherlock
Depending on what version of the Mac OS you're using, Sherlock is one of any number of different applications or utilities—Apple seems to change their mind about what they want it to be with each system release. As of Mac OS X 10.2, it's Apple's Internet information search tool, which, when connected to the Internet, allows you to search for information via channels. Although it has an Internet search channel that scours a number of the major Web search engines, as well as a Picture channel that uses those search engines to search for images, most of the channels are, in fact, very topic specific (Figure 7.3).
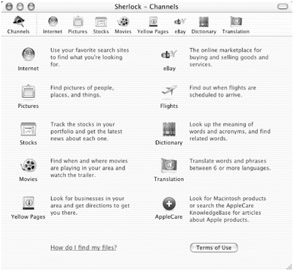
Figure 7.3: Sherlock's channels
Some examples of information you can gather using Sherlock's channels are movie times and locations in your area (and even view movie trailers); the latest stock updates and news; business information using the local yellow pages, word definitions and translations; and items for sale on the eBay auction site. You can even get the latest flight status information from major airlines.
Sherlock doesn't do any of this searching itself; rather, it queries available search engines and then returns the results to you from within its own window. You won't get "better" results than if you used these engines yourself, but you get a nice, neat, all-in-one interface to many different search engines and data sources on your Desktop.
Sherlock sounds like a great utility, and it is; however, I really don't use it much. Overall, I prefer the shareware Watson.
My Dear Watson: A Better Sherlock
The shareware Watson (http://www.karelia.com/watson/) is a utility that looks and works similarly to Sherlock; in fact, with their toolbars configured similarly, as in Figure 7.4, it's a bit difficult to tell them apart. Whereas Sherlock offers "channels," Watson provides "tools"—both being content-specific modules that allow you to gather information via the Internet. However, Watson offers most of the features of Sherlock, plus many more.
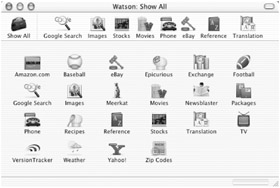
Figure 7.4: Watson, Sherlock's more capable twin
As Table 7.1 shows, Watson's tool list is quite extensive, and provides access to many additional types of information, from news to recipes to weather. Watson is also extensible via a plug-in architecture (some of the currently available modules were provided by third parties), so new tools are available regularly.
| Sherlock "Channels" | Watson "Tools" |
|---|---|
| Internet | Google, Yahoo |
| Pictures | Image Search |
| Stocks | Stock Tracker |
| Movies | Movies |
| Yellow Pages | Phone Book (white, yellow, toll-free) |
| eBay | eBay Watcher |
| Flights | - |
| Dictionary/Thesaurus | Reference |
| Translation | Translation |
| AppleCare | - |
| - | Amazon.com |
| - | Baseball Scores |
| - | Epicurious (recipes) |
| - | Exchange Rates |
| - | Football Scores |
| - | Meerkat (tech news/information) |
| - | Newsblaster |
| - | Packages (tracking for Airborne, FedEx, UPS, USPS) |
| - | PriceGrabber (shopping price comparisons) |
| - | Recipes |
| - | TV Listings |
| - | VersionTracker |
| - | Weather |
| - | What's Better? (whatsbetter.com interface) |
| - | Zip Codes |
| Note | Both Watson and Sherlock accept plug-ins to add additional search tools, so the feature comparison in Table 7.1 is by no means exhaustive. |
The channel in which Sherlock has a clear advantage over Watson's tools is AppleCare. You can search and view the entire AppleCare Knowledge Base of articles, making Sherlock a quicker way to access this content than even Apple's own website (although if you click on a link within a document, it will open in your web browser). Sherlock's Yellow Pages channel also has a few nice touches. Once you locate a business, Sherlock downloads a local map showing you the location of the business, and (if you've entered your address in the preferences dialog), can provide you with specific driving directions. Finally, whereas Watson used to have its own airline flight status tool, it was removed in a recent version.
However, apart from these channels, I find Watson's tools to be either comparable or preferable. For example, Watson's Phone tool searches white pages, yellow pages, and toll-free directories; its Reference tool searches many more databases, and many more types of databases, than Sherlock's Dictionary channel; and its Translation tool lets you choose between multiple online translation engines, compared to Sherlock's one. Sherlock is free with Mac OS X, but if you do a lot of online searching and information gathering, Watson is well worth the price.
| Note | There's actually a bit of controversy surrounding Sherlock and Watson. When Watson was first released, Sherlock looked and worked much differently (truth be told, it wasn't very popular). Watson got rave reviews, and even won Apple's own "Most Innovative Mac OS X Product" award. Come OS X 10.2, Sherlock got a major makeover that left it looking (and working) suspiciously like Watson. The two utilities aren't exactly the same, but they're close enough to raise some eyebrows. |
Using Sherlock Location Files
If you find yourself doing frequent searches using a particular Sherlock channel, you can actually create Sherlock location files that, when opened in the Finder, launch Sherlock to the appropriate channel and initiate your search. Unfortunately, I don't have the space to show you how to do this here; however, you can visit the book's website at http://www.macosxpowertools.com/ for the juicy details.
Stickies
The Stickies application is the Mac OS X adaptation of the old Mac "Post-It Note" standby. You can quickly create notes and "stick" them on the screen. Although many users consider Stickies to be something of a novelty with limited functionality, those who haven't yet used OS X's version may be surprised by what it can do.
As with Classic Stickies, you can create as many notes as you like, each with styled text and the "paper" color you choose. You can also import text from a text file or export the contents of a note to a text file (although in OS X's Stickies you can also export to RTF and RTFD, which is an RTF file with graphics).
However, the similarities stop there. Stickies now supports text colors, character-level formatting (the old version would only allow one format and font for an entire note), inserted graphics (drag any picture or graphic into a note), and unlimited note size (the old version limited notes to 8,000 characters). It also provides Find and Replace functionality that works within a single note or across all notes.
In addition, Stickies also sports some OS X touches. From the Note menu, you can make individual notes translucent, and you can also choose to make certain notes "float," meaning that they float above other application windows (making them behave like real notes stuck to your screen). Stickies also take advantage of OS X's Cocoa spell checker, available from the Edit menu. Finally, in any Cocoa or Services-compatible Carbon application, you can select text and then choose Application Name ➣ Services ➣ Make New Sticky Note to create a new note with the selected text as its contents. (I'll talk more about Services later in this chapter when I talk about working with text.)
| Tip | If you upgraded to OS X from Mac OS 9, and used Stickies under OS 9, you can choose File ➣ Import Classic Stickies… to import your old notes into the OS X Stickies database (the old database is located at MacOS9 System Folder/Preferences/Stickies file). |
TextEdit
If you ever used SimpleText in Mac OS 9 or earlier, you know that it was (1) the built-in text editor; and (2) not very powerful or functional. TextEdit is similar to SimpleText in that it's Mac OS X's built-in text editor, but that's where the similarities end. TextEdit is an extremely powerful text editor with enough functionality to actually be called a word processor. It supports files of unlimited size, complex formatting (such as colors, kerning, ligatures, and super/subscripts), paragraph-level justification, find/replace, and graphics. It can open, edit, and save RTF formatted documents, supports Unicode text, text-to-speech, and can even render HTML and PDF files (drop an HTML document on TextEdit and watch it render the page, including linked graphics). Like Stickies, it supports Services and Mac OS X's spell-checking features, but unlike Stickies, you can enable on-the-fly spell-checking (via the preferences dialog), just like Microsoft Word. Finally, when working in rich text format, you can view and use a formatting bar and a ruler with tab stops and margin settings. You probably didn't even know about half of these features, right? Here are a few more tips.
Using Graphics in TextEdit Documents
To include a graphic in a TextEdit document, drag it to the desired position in the document. A bit counterintuitively, to apply justification to a graphic, select it in the document and then choose Format ➣ Text ➣ justificationtype. When you save the resulting document, the file extension will be .rtfd rather than .rtf. This signifies that the document includes graphics; in fact, it also signifies that the document is actually a package rather than a single file. You can control/right-click on the document and choose Show Package Contents from the contextual menu; you'll see that the package contains a standard RTF document along with any graphics included in the document.
Setting Up Default Document Attributes
Because TextEdit is so versatile, you need to decide what new documents will look like; you do this from the preferences dialog. You can choose between rich text (.rtf) and plain text (.txt). (Note that many complex formatting features are not available in plain text documents; if you are working with a document in one document type and want to change to the other, you can quickly do so by choosing Format ➣ Make Plain Text or Make Rich Text.) You can choose the default window size, word wrap, and fonts for new documents (including a different default font for rich text and plain text files), and you can choose what type of text encoding to use when you open and save documents (I generally recommend "Automatic" unless you have a specific reason otherwise). Finally, you can choose to enable or disable the toolbar ruler and OS X's built-in spell checker, and set your preferences for saving documents, which I talk about in the next section.
Options for Saving in TextEdit
The preference dialog gives you several options for saving files. By default, whenever you open and edit a file in TextEdit, it creates a backup of the original; when you save your changes, the backup file is deleted. By unchecking "Delete backup file," you can keep the backup as well as your newly edited version. You can also choose to overwrite files that have been marked as read-only (via Format ➣ Prevent Editing), and to save such files in writeable format.
| Warning | If you use TextEdit to create or edit preference and/or configuration files (as discussed in various places in this book), make sure that before you save any changes to a document that TextEdit is treating the document as a plain text file. To be sure, check the Format menu—if it says "Make Rich Text," you know that the document is currently plain text. If it says "Make Plain Text," you should select that command to convert it to plain text. The reason for this is that rich text (.rtf) files contain formatting characters that will prevent your preference/configuration files from working properly. |
Zooming in TextEdit
You can actually zoom in on and out of a document in TextEdit; this can be useful for examining small details or for seeing the big picture of how a document looks as a whole. (By zooming in, you can also see how beautiful text rendering is in Mac OS X—no matter how much you magnify text, is still looks sharp and smooth.)
To use this feature, choose Format ➣ Wrap to Page. The document view will change to a page layout orientation, and a zoom menu will appear in the lower-right corner. Select a zoom amount (from 10% to 1600%) and the page will be reduce or enlarged accordingly (Figure 7.5). To get back to window view, select the same menu item (which now reads Wrap to Window).

Figure 7.5: Using TextEdit's zoom function
The Utilities
I usually describe "utilities" as applications that let you change or monitor your Mac's behavior, or that help you better take advantage of your Mac's built-in capabilities. Although that's a good catchall description, for the purpose of this section we're going to use Apple's practical categorization of what a utility is: any application found in /Application/Utilities.
AirPort Admin Utility and Setup Assistant
These two utilities allow you to set up and manage AirPort networks. If you have a Mac with an AirPort card installed, the AirPort Setup Assistant walks you through the steps needed to join an existing AirPort network or to set up an AirPort Base Station from your computer.
The AirPort Admin Utility allows you to manage an AirPort Base Station. Using the Admin Utility you can restart your Base Station, upload firmware, upload a saved Base Station configuration file, set up an AirPort network password (Equivalent Network Password), and configure various other AirPort Base Station settings (e.g., DHCP, NAT).
| Note | The AirPort Setup Assistant requires you to have your AirPort settings set to DHCP; if you do not want to use DHCP you need to use the AirPort Admin Utility. |
Apple System Profiler
Apple System Profiler provides comprehensive information about your Mac. The information available via Apple System Profiler is divided into six general areas:
-
System Profile Provides information on the version of the Mac OS your computer is running; the current user; general information about the computer itself; the amount of installed RAM and the RAM configuration; and the current network.
-
Devices and Volumes Provides information about the various buses on your computer (IDE, PCI, USB, FireWire, etc.) and the devices connected to each bus (including hard drive/volume information).
-
Frameworks Provides information on installed frameworks (function-specific portions of the OS), including version numbers and modification dates.
-
Extensions Provides information on installed kernel extensions, including version numbers and modification dates. The Get Info String column can sometimes be used to identify which kernel extensions were provided by Apple and which were not.
Note Under OS X 10.1, the Extensions tab provided very specific information about which kernel extensions were provided by Apple and which were not. Strangely, under OS X 10.2, Apple removed this functionality.
-
Applications Provides details on every non-Classic application installed on your computer, including version numbers. This tab can be an extremely useful quick reference guide when you need to check on application versions.
-
Logs Provides quick access to system and application crash logs generated by the Console utility (see "Console," later in this section, for more details).
You may find that a developer requests an Apple System Profiler report if you request technical support for their products. You can save such a report (in several formats) via Apple System Profiler's File menu; you can also open and view saved reports.
| Tip | You can actually access Apple System Profiler from the Apple Menu's "About This Mac" window. Just click the "More Info…" button and Apple System Profiler will launch. (If you just need to get the serial number of your Mac, click the OS X version number in the "About This Mac" window.) |
Running Apple System Profiler from Terminal
In addition to using Apple System Profiler via the application's own interface, you can also use it in a more limited manner directly from Terminal. Type AppleSystemProfiler > PathToFile <RETURN>, where PathToFile is the path to, and name of, the file you want the Apple System Profiler report saved to (e.g., ~/Desktop/Report.txt).
Bluetooth File Exchange
If you have a Bluetooth wireless adapter and another Bluetooth-equipped device (such as another Mac with a Bluetooth adapter), you can send files to the other device using the Bluetooth File Exchange utility:
-
Make sure both devices are set as "discoverable" (in Mac OS X, from the Settings tab of Bluetooth System Preferences).
-
Drag the file onto the Bluetooth File Exchange icon in the Finder or the Dock.
-
Click the Search button to locate any Bluetooth devices that are in range.
-
When the other device is found, click the Send button. (If the device is password-protected, you'll need to enter the device password to proceed.)
ColorSync Utility
The main function of the ColorSync Utility is to verify and repair any ColorSync/ICC device profiles on your Mac. These profiles, for displays, printers, scanners, cameras, and other ColorSync-compatible devices, ensure color accuracy across devices. You can verify or repair profiles via the Profile First Aid panel.
You can also view any installed profiles from the Profiles panel. Click on the disclosure triangle next to any group to view the contents of that group of profiles; clicking the small triangle in the upper-right corner of the Profile window allows you to group profiles by location, class, or space.
Finally, you can view information about connected devices from the Devices panel. Click on a device (a display, scanner, camera, printer, etc.) and you'll be presented with information about the device to the right. From the info area you can also select a different ColorSync profile for the device.
Console
While your Mac is running, OS X is quietly keeping track of low-level system errors and messages. When you launch Console, the console.log file shows these errors and messages. (Don't worry—even though it looks like there are a lot of problems, it's normal for the log file to be filled with incomprehensible messages.) More importantly for most users, Console lets you track application crashes and view the logs of those crashes. This functionality is disabled by default, but I recommend enabling it, as it can often provide you with clues as to the cause of an application crash (useful if you're trying to track down a persistent problem), and many developers will request a crash log if you request tech support. To enable crash reporting, choose Console ➣ Preferences, click on the Crashes tab, and check the box next to "Enable crash reporting." You can also choose to have crash logs displayed automatically; I personally find this option annoying, because each time an application crashes, Console will launch and pop up a window with the resulting crash log.
After an application crash, you can manually view the crash log from within Console (choose File ➣ Open Log…), from any text editor, or via Apple System Profiler. The log files themselves are located in ~/Library/Logs/CrashReporter, identifiable by the name of the offending application. (If a developer ever asks you to send a crash log, this is where you get it.) The log file will tell you what the "Exception" was (what caused the crash), and will tell you which of the application's threads actually crashed ("Thread # Crashed"). Most of the time this info won't make much sense to the average user; however, a couple times I've been able to make educated guesses about what the problem was (a corrupt font is one example).
| Note | Multiple crashes for the same application will be appended to the same log file (Mail.log for Mail, for example). You can identify details for a specific crash via the Date/Time tag. |
CPU Monitor
CPU Monitor provides several graphical representations of the load on your Mac's CPU(s), which can be enabled from the Processes menu (Figure 7.6). The Standard window provides a single meter (0–100%) that rises and falls with CPU usage. The Expanded window provides a moving representation of CPU use over time, and separates processes (via color) into system, user, niced, and background processes. The Floating window provides the same data as the Standard window, but presents it in a thin, translucent meter that can be arranged horizontally or vertically. Since CPU Monitor is something you would probably have running all the time if you used it, you can also choose to hide its icon from the Dock via its preferences dialog.
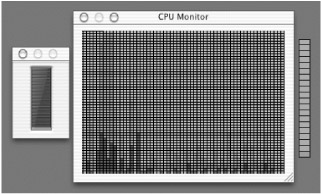
Figure 7.6: CPU Monitor displays (left to right)— Standard, Expanded, Floating
| Tip | You can orient the Floating window horizontally (via CPU Monitor Preferences), and drag it to the menu bar to get a menu bar CPU monitor. When I have it active, I have it set up vertically and place it at the very right edge of my screen. |
DigitalColor Meter
Used mainly by those in the graphic arts and design fields, DigitalColor Meter allows you to translate colors anywhere on your screen into color values in RGB, CIE, or Tristimulus format. From the pop-up menu in the DigitalColor Meter window, choose the color value format, and then move the mouse over any item or pixel on the screen to see its color value. You can control the aperture size of the selector using the Aperture Size setting, and the degree of magnification of the DigitalColor Meter inspector window from the preferences dialog.
Once you've found a color you want to use, press shift+command+H to "hold" it—you can then copy the color using the Color menu, or drag it from the color swatch to the storage area in Apple's Color Picker window. You can also save the contents of the inspector window for later use. If you're a graphics professional, DigitalColor Meter has a number of other useful features (and you're quite likely to already know exactly what they are and how to use them).
Directory Access
The Directory Access utility is used to configure access to directory services such as AppleTalk, LDAP, SLP, NetInfo, and Rendezvous. If you're using your Mac at home and these terms mean nothing to you, don't worry. Directory access is pre-configured for use in small networks such as a home or small office, and you can safely ignore it. If you're connected to a larger network that takes advantage of such services, chances are your network administrator will tell you how to set up Directory Access, or will do it for you.
"Disc Burner"
If you're looking for this utility, you won't find it, because it's not really an application. "Disc Burner" is what Apple used to call the Finder's ability to burn CDs and DVDs directly from the Finder. It's really a function of the Disk Copy utility. However, since it works a bit differently (and more simply) than Disk Copy, I'm going to talk about this functionality separately.
If you have a Mac or Mac laptop with a CD-R or DVD-R drive, inserting a blank CD (CD-R or CD-RW) or DVD brings up a dialog box asking you what you want to do with it. If you choose Open Finder, the blank disc will appear in the Finder. You can drag items onto it (up to the point where you fill it to capacity), and they will be "copied" to the disc (they actually aren't being copied to the disc; they're being copied to an invisible image of the disc which will later be burned). When you're ready to burn the disc, select it in the Finder, and then choose File ➣ Burn Disc… (Or, even easier, drag the disc to the Dock's Trash icon, which will turn into a "burn" symbol; dropping the disc on the symbol will burn it and then eject the finished product). You'll be asked what speed you want to burn the disc at (choose one equal to or less than the blank disc's speed rating, usually printed on the face of the disc), and then you can burn it.
| Note | CDs burned in the Finder are automatically created as hybrid CDs, meaning they are compatible with both Macs and Windows computers. DVD-Rs burned in the Finder are only compatible with Macs. |
If you instead choose to open the blank CD or DVD in iTunes or (if you have a Super-Drive Mac) iDVD, the appropriate application will appear from which you can burn an audio or MP3 CD, or a DVD. Finally, you can choose to open the disc in Disk Copy, which provides additional options as explained next. (You actually have the additional options of opening the disc in another application, such as another CD/DVD-burning utility, or running a script, if you've set up an AppleScript to work with blank discs.)
| Note | In Mac OS X 10.1.x and earlier, inserting a blank CD instead brings up a dialog to create a Standard (HFS Plus/ISO 9660), iTunes (Audio CD), or MP3 (ISO 9660) disc. The first is a hybrid data CD, the second an audio CD that can be read by any audio CD player, and the third a CD of MP3s that can only be played using an MP3 player such as iTunes or an audio CD player that supports MP3 discs. |
Disk Copy
If you've ever downloaded a disk image, you've seen Disk Copy in action; it's the utility that mounts disk images in the Finder. However, it can also create disk images—of folders, volumes, hard drives, CDs, or from scratch—and burn disk images to CD/DVD. You may wonder why you'd ever create a disk image, but they can actually be quite useful. For one thing, if you're sending a bunch of files to another OS X user, creating a disk image of the files means you can send just one file (and if you choose to create a compressed disk image, that file will be much smaller than the sum of all the files' sizes). For another, you can encrypt disk images as described below; no one but you, or anyone you give the image's password to, will be able to mount it or view its contents.
Creating/Converting Disk Images
You can create three kinds of disk images using Disk Copy. You can create a new, empty image by choosing File ➣ New ➣ Blank Image. You're presented with a dialog that lets you choose the size of the new image (the Size pop-up menu provides a few standard sizes, or you can choose your own), the format of the disk image (Mac OS, MS-DOS, or Unix), and, if desired, to use encryption. (By default, new disk images are created in read/write format, since the only reason you'd create a blank image is to add things to it.) Once you've chosen a location to save the new image and a name for the image, the Create button creates it; if you chose an encrypted image, you'll be asked for a password.
You can create a new image that is an exact copy of a hard drive, CD, DVD, or other removable media by choosing File ➣ New ➣ Image from Device. After selecting a device or mounted image, you'll be presented with a similar Save dialog; however, instead of disk format (which will automatically be copied from the device's disk format), you can choose the image format: read/write, read/only, compressed, or DVD/CD master. You can perform an identical action for a folder or volume by choosing File ➣ New ➣ Image from Folder or Volume. Finally, you can convert an existing image from one image format/encryption combination to another by choosing File ➣ Convert Image….
| Tip | You can also create an image from a folder, device, or volume by dragging the item onto the Disk Copy icon in the Finder or Dock. You can mount any image using the same action. |
If you create a new disk image with either the read/write or CD/DVD master format (or convert an existing image to one of these formats), the resulting image will be editable, meaning you can delete files from the image or add files to it. If it turns out that your existing image is too small to hold the files you want to add to it, select File ➣ Resize Image… and select the image in the Open dialog. Using the pop-up menu at the bottom of the Resize Image window (Figure 7.7), you can choose to resize by measures of kilobytes, megabytes, or actual volume sectors.
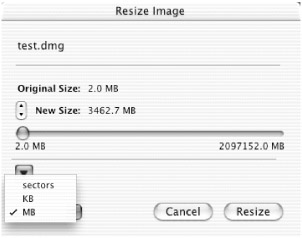
Figure 7.7: Using Disk Copy to resize a disk image
| Note | Most of the Disk Copy functions are also available from its Dock menu; control/right-click on the Disk Copy icon in the Dock to access them. This allows you to access Disk Copy functions without having to switch to the application itself. |
If you're interested, you can actually view a log of all Disk Copy activity by choosing Utilities ➣ Show Log; you can also clear the log from this menu—mine was over 200 pages long!
Burning Disk Images to CD/DVD
If you have a disk image that you want to burn to CD or DVD, choose File ➣ Burn Image…. Select the image and press the Burn button and you'll see the Burn Disc dialog. For more options, click the expand triangle in the upper-right corner; you'll be able to choose the burn speed and a few post-burn options. If you want to be able to burn additional sessions to the same disc (in other words, to create a multi-session disc), check the "Allow additional burns" box; you'll be able to burn additional content to the disc (provided you've placed it on a disk image and use the Burn Image command) in the future.
Creating Multi-Session CDs
It is possible to burn multiple sessions to CDs in Mac OS X. However, to do so, you must burn your data to CD using images and Disk Copy; you cannot use the Finder (Disc Burner). I hinted at this procedure in the previous tip:
-
Create a new disk image (new blank, from folder, etc.) with the first session of data.
-
Use the Burn Image command to burn the data to CD; in the Burn Disc dialog, expand the options and check the "Allow additional burns" box. This will burn the first session.
-
The next time you want to burn data to the CD, create a new image with that data (again, a new blank image, or an image from a folder). Select the Burn Image command again; this time the Burn Disc dialog will say "Append" instead of "Burn." Click the Append button to burn another session (again making sure that the "Allow additional burns" box is checked).
-
Repeat this process until the disc is full or you no longer want to burn further sessions to it (if the latter is the case, uncheck the "Allow additional burns" box).
| Note | If this procedure is too much of a hassle, the shareware CD Session Burner (http://www.sentman.com/burner/) provides a nice, neat interface for session burning. |
Erasing Rewriteable Discs
If you have a Mac with a drive that supports CD-RW or DVD-RW discs (rewriteable), you can erase them completely for reuse by inserting a disc, and then choosing File ➣ Erase CD/DVD-RW Disc… and selecting the disc in the resulting dialog.
Advanced Disk Image Creation Using DropDMG
When you create a disk image using Disk Copy, you have the option of choosing a compressed image or an encrypted image—there's no way to have both. Using the shareware DropDMG (http://www.c-command.com/dropdmg/) you can create images that are both compressed and encrypted, using the same drag-and-drop or menu-driven process as Disk Copy. In addition, DropDMG offers additional image formats unavailable in Disk Copy (including images that will mount under Mac OS 9 and earlier), the ability to post-process disk images (further compress them, for example, for posting online), and can automatically limit images to a user-definable size (e.g., if the limit is set to 1MB, a 4MB folder will be split over four 1MB images). As a nice touch, you can also make your disk images auto-open when mounted (by default, disk images mount on the Desktop, and the user has to open them manually). If you use disk images a lot, DropDMG is well worth the small shareware fee.
Creating a Bootable Mac OS X CD Using BootCD
One thing you can't do using Disk Copy (nor most other CD or disk image utilities) is create a bootable CD that boots into Mac OS X. Such a disc, filled with your favorite utilities, would be an excellent "emergency CD" that you could use to boot up your computer in case of major problems. The good news is that the freeware utility BootCD (http://www.charlessoft.com/) can actually create a bootable disc image—using the copy of Mac OS X you have installed on your computer—which you can then burn to CD using Disk Copy. If you're in the market for such a bootable CD, the BootCD documentation provides excellent step-by-step instructions. (Be sure to read the section about how to boot your computer using the new CD!)
Alternatives to Disk Copy for Burning CDs and DVDs
If you burn a lot of CDs, and/or have specialized CD/DVD-burning needs, you might want to consider a dedicated CD/DVD-burning utility such as Discribe (http://www.charismac.com/Products/Discribe/) or Toast (http://www.roxio.com/en/products/toast/). Both utilities do everything that Mac OS X can do via Disc Burner and Disk Copy, but in a single package (in OS X, you can do some things in the Finder, but other things require Disk Copy). Plus both Toast and Discribe offer additional CD formats (such as VideoCD, XA, UDF, mixed mode, and CD Extra); simpler multi-session burning; Disc-At-Once and Track-At-Once burning (for creating professional audio CDs); CD copying; digital audio extraction; support for BURN-Proof drives; and disk image creation. Finally, both Toast and Discribe support far more CD and DVD drives than Mac OS X/Disk Copy/Disc Burner.
Toast costs a bit more than Discribe, but it also includes additional applications for creating photo albums, working with MP3 files, and recording audio from your Mac's audio inputs to CD. Both Toast and Discribe have interfaces that, though different from each other, are extremely easy to use. I highly recommend either of them if you do a lot of CD or DVD burning, and especially if you need to burn in a format other than MP3, audio CD, or simple hybrid data.
Disk Utility
I've already mentioned the Repair Disk Permissions feature of Disk Utility; however, it has a good deal of additional functionality, divided into five main areas:
-
Information Select a disk or volume in the disk/volume panel and you'll be provided with detailed information about that disk/volume, including the format, capacity, space available, number of files and folders, and (if a disk) the bus type, connection type, and whether the drive is designated as master, slave, or cable select.
-
First Aid Select a volume (a non-partitioned disk, or a volume of a partitioned disk) from the disk/volume panel to verify or repair permissions, or to verify or repair the volume itself. Note that you can only repair permissions on the boot volume, but you can only repair a non-boot volume. I talk more about this tab in Chapter 14.
-
Erase Select a disk or volume to erase it; you can choose the volume format (Mac OS Extended is recommended), the name of the volume post-erase, and whether or not you want the volume to be usable when booted into Mac OS 9. In OS X 10.2.3 and later, if you select an entire disk, you can click Options... to access the "Zero all data" feature. This feature not only erases the disk directory, but also overwrites every single sector of the disk with zeros, making recovery of the disk's contents much more difficult. This is a good idea if you're getting rid of your hard drive or computer. Note that whatever options you choose, you cannot erase the boot volume.
Note If you're interested in securely erasing your hard drive so that it's virtually impossible to recover its contents, I show you how in Chapter 13.
-
Partition If you want to divide a disk into two or more volumes (partitions), select the disk and then use the Volume Scheme panel to choose the number and size of the partitions. Note that you cannot partition the disk that contains the boot volume without first booting up off of a different disk. I talk more about partitioning drives in Appendix B.
-
RAID You can use the RAID tab of Disk Utility to set up a RAID (redundant array of independent disks) across multiple drives. Disk Utility offers a rather simple version of RAID, with only two options: striped (splits data across multiple disks for faster read/write access) and mirrored (duplicates data across multiple discs for reliability or for access by multiple users simultaneously). If you've set up a mirrored RAID, Disk Utility will also allow you to rebuild it in the case of a drive failure. To set up a RAID, drag multiple volumes to the Disk window and then select the scheme, name, and format. Note that RAID drives must be the same size, and that you cannot set up a RAID using the startup disk.
| Warning | Using the Erase, Partition, or RAID features of Disk Utility will erase the affected volumes/ disks. Be sure this is what you want to do! |
| Note | I talk more about disk maintenance, and third-party disk utilities, in Chapter 14. |
Display Calibrator
Display Calibrator is more accurately known as the Display Calibrator Assistant, as it allows you to calibrate your display and then walks you through a procedure to create a custom ColorSync profile for that display (which can then be chosen in the ColorSync pane of System Preferences). The procedure is largely self-explanatory; however, by checking the Expert Mode box on the Introduction (first) screen, you'll be presented with a few more options for calibration.
If you're not a graphics professional or someone for whom color accuracy is important, ColorSync and Display Calibrator won't be much use to you. However, Display Calibrator does allow you to change the gamma and white point settings of your display, so if you find your display to be too bright or dark, or the color to be "off," you can always experiment with the gamma and white point values to create a more pleasing display profile.
Grab (and Screenshots in General)
If you're a longtime Mac user, you're familiar with the keyboard combination shift+command+3 to take a picture of the screen (a screenshot). This still works in Mac OS X, as well as a plethora of other keyboard combinations.
| Tip | You can combine Mac OS X's zoom feature (in the Seeing tab of Universal Access preferences) together with any of the procedures listed below to take close-up pictures of any on-screen item. |
Screenshots via the Keyboard
The following keyboard combinations can be used to take various types of screenshots in Mac OS X. The resulting screenshot will be saved in PDF format on the Desktop.
-
command+shift+3: screenshot of the entire screen.
-
command+shift+4: screenshot of part of the screen. The cursor will change to a crosshair/marquee, which you can use to select the area of the screen you wish to capture. When you release the mouse button, the screenshot will be taken. If you want to cancel the screenshot, press the escape key before releasing the mouse.
-
command+shift+4, followed by the space bar: screenshot of any item on the screen. The cursor will change to a camera icon; as you move the camera around the screen, whatever item is directly under it will become highlighted. When you click the mouse button, the screenshot will consist of the highlighted area. This is a great way to take a shot of a particular window, the menu bar, the Dock, the Desktop (even behind windows), or any Dock or Finder icon.
| Tip | Pressing the control key simultaneously with any of these combinations will cause the screenshot to be saved to the clipboard instead of to a file. You can then paste it into any graphics-capable application. Note that if you have multiple monitors/screens, only the main screen—the one with the menu bar—will be copied to the clipboard. |
Screenshots in a Format Other than PDF
By default, screenshots in Mac OS X are saved as a PDF file. In earlier versions of Mac OS X you could use a utility like TinkerTool to change this format; unfortunately that's no longer possible as of OS X 10.2. You can get around this limitation using a third-party utility, as I discuss later in this section, but there's a two-step way to do it using Preview.
-
Take a screenshot in Mac OS X, but save it to the clipboard instead of to a file (by holding down the control key as you press the appropriate keyboard combination).
-
Switch to Preview and choose File ➣ New From Pasteboard. Preview will show the screenshot in a new Preview document.
-
Choose File ➣ Export... to save the screenshot in any format you like. (You can also choose to print the screenshot or save it as a PDF.)
You could also open the standard PDF screenshot file in Preview and then export it to a different format, but the above procedure saves you a couple of steps and an extra file.
Screenshots Using Terminal
You can take screenshots using the screencapture command, which works identically to the various keyboard combinations. Type screencapture <RETURN> to see a list of options and the correct syntax for the command. (By selecting interactive mode, the space bar and escape keys function exactly as they do when calling a screenshot from the keyboard.) One advantage of this command is that it can be called from any script that can be run from Terminal.
Screenshots Using Grab
The Grab utility is a bit more limited than the various keyboard screenshot commands in that you can't take a picture of individual items. However, you can still use the marquee to select an area for a screenshot in Grab, and it has a couple of advantages of its own. First and foremost, it allows you to take timed screenshots—when you click the Start Timer button you have 10 seconds to prepare the screen for the screenshot. This is the only way to take a screenshot of a menu without using third-party software. Second, when you take a screenshot using Grab, it isn't automatically saved to the Desktop or the clipboard. Instead, a new window is opened in Grab with the contents of the screenshot. You can choose to copy the screenshot to the clipboard, save it to a file (wherever you like), or close the window and discard it. In other words, you get to inspect the screenshot and decide what to do with it immediately.
Via the Grab preferences, you can also choose to make the cursor visible (it's invisible in screenshots taken using the keyboard), as well as choose which of the Mac OS X cursors is used. Finally, if you choose Edit ➣ Inspector, an Image Inspector window opens that tells you the size and bit depth of each screenshot you take using Grab.
Third-Party Screenshots: Snapz Pro X
Although OS X's built-in keyboard commands and Grab utility provide a good deal of screenshot functionality, if you take a lot of screenshots you'll want an industrial-strength utility. Snapz Pro X (http://www.ambrosiasw.com/utilities/snapzprox/) is the OS X version of the longtime king of Mac OS screenshot utilities. Using Snapz Pro X you can take a picture of the screen, any object on the screen (including menus), or any selected part of the screen. When choosing a selected part of the screen, you can resize and move the selection to fine-tune it before the screenshot is taken. Using the Extra version of Snapz Pro X, you can also record movies of the screen.
In addition to the standard screenshot ability, Snapz Pro X also offers many more options than the standard Mac OS X functionality (Figure 7.8). You can assign your own keyboard command for screenshots, and you can choose what graphics format screenshots are saved in and where they're saved (they can also be copied to the clipboard or printed immediately). Other options include borders, scaling, watermarks, and color depth. If it's any indication of how versatile Snapz Pro X is, all of the screenshots in this book were taken using it.

Figure 7.8: Screenshot options in Snapz Pro X
iDisk Utility
The little-known but extremely useful iDisk Utility is not installed by Mac OS X; like the Mac Slides Publisher application, it is only available to subscribers to Apple's .Mac service. (If you're a .Mac subscriber, login to your account at http://www.mac.com/ and go to the .Mac Downloads area.) iDisk Utility provides four tools for working with iDisks:
-
Open Public Folder Allows you to quickly access another user's iDisk Public folder by typing in the user's member name (if the Public folder is password-protected, you'll be asked for the appropriate password).
-
Open iDisk Allows you to access your own iDisk (by default it uses the member name and password entered into the .Mac tab of Internet System Preferences) or another member's iDisk (provided you have the correct member name and password). Although you can always access the iDisk listed in Internet preferences via the Go menu in the Finder, this feature of iDisk Utility is useful if you have more than one .Mac account. (I'll talk about other ways to access multiple iDisks in Chapter 12.)
-
Public Folder Access Allows you to change the privileges other users have when accessing your own Public folder (Read-Only vs. Read-Write), and allows you to password-protect your Public folder. These options are exactly the same as the Public Folder Access options available from the iDisk tab of Internet preferences.
-
iDisk Storage Shows the current capacity of your iDisk as well as how much of that capacity is currently being used. (It also provides you with a button to quickly go to Apple's website to buy more space.) These are the same data available from the iDisk Storage section of the iDisk tab of Internet preferences.
Installer
The Installer utility, as discussed in Chapter 4, provides a common interface for developers (including Apple) to use for installing software packages. If an application or OS update is provided in .pkg format, it will be installed using the Installer utility.
Key Caps
Have you ever wanted to type a nonstandard character, such as the trademark symbol (™), the copyright symbol (©), or the ¿ used when writing questions in Spanish? The Key Caps utility lets you figure out such mysteries. When you launch Key Caps, it provides you with a graphical keyboard that mirrors the current keyboard attached to your Mac (or your PowerBook or iBook keyboard). If you press a key on your keyboard, the corresponding key will be highlighted on the Key Caps keyboard. But press any of the text modifier keys (shift, option, or shift+option), and the Key Caps keyboard will change to reflect the characters that are possible via those modifier keys (Figure 7.9). You can see that in the current font, ™ is typed by pressing option+2, © is accessed via option+G, and you can get ¿ by pressing shift+option+? What's more, to save you the trouble of retyping characters in another application, you can type them in Key Caps, copy them from the Key Caps text field, and then paste them in any other application.
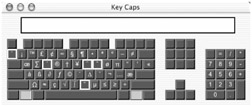
Figure 7.9: Using Key Caps to view characters in the current font that are accessible via the option key
Keep in mind that the current layout and key combinations are only applicable for the currently selected font. In other words, if you're using Times New Roman in your word processor, make sure you select the Times New Roman font from Key Caps' font menu before using it to find a particular character.
Alternatives to Key Caps: CharView and PopChar X
Although Key Caps is extremely helpful, it still requires you to figure out which key combination produces the desired character, and then either type that combination or copy and paste the character into another application. The excellent shareware utilities CharView (http://www.alxsoft.com/mac/charview.html) and PopChar X (http://www.macility.com/products/popcharx/index.html) both provide pop-up windows, accessible from the menu bar, that show all the possible characters in a chosen font (Figure 7.10). You can click on a character to have it copied to the clipboard, or even have it typed in the active application.
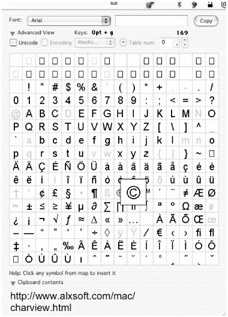
Figure 7.10: CharView lets you quickly pick and type any character in any font
| Note | Mac OS X also includes its own character palette that lets you choose a character from any font. I talked about this palette in Chapter 2, when I discussed the Input Menu tab of International preferences. |
Keychain Access
Keychain Access lets you edit, manage, and control your Mac OS X Keychain and any passwords or notes stored in the Keychain. If you have no idea what your Keychain is, you're not alone—this is another one of those underused and even less understood parts of OS X. I'll tell you all about it in Chapter 13.
NetInfo Manager
NetInfo Manager lets you edit and manage NetInfo databases. I covered NetInfo databases and NetInfo Manager in depth in Chapter 1, and we'll actually work more with both of them in the chapters to come.
Network Utility
Network Utility is a fairly comprehensive application that allows you to monitor many facets of network traffic and Internet connectivity. The Ping tab is useful for verifying network connections: Enter a known site or server and click Ping; if you get a response, you can communicate with that computer.
Print Center
Print Center is, well, the center of printing in Mac OS X—where you manage printers and print jobs. I'll talk more about Print Center in Chapter 13, "Printing Practicalities."
Process Viewer
Process Viewer is a utility that shows currently running processes, provides information about each, and (using the Processes menu) allows you to quit or force quit them. (I'll talk about force quitting applications later in the chapter when I talk about frozen applications.) By default, it shows you every running process, along with the user that started each process (the current user's username for user-level processes, root for system-level processes); the status (running or idle) of each process; the current percentage of CPU time being used by each process; and the amount of memory being used by each process. You can sort the process listing by any of these values by clicking on the appropriate column head (the triangle symbol to the right of the column heads reverses the sort order). This can be quite useful for monitoring which applications are bogging down your CPU or hogging lots of memory. You can also choose to view only user-level or only root-level processes using the Show pop-up menu.
You can use the Find field to quickly find a particular process. If you click on the disclosure triangle next to More Info (at the bottom of the window), you can get detailed info on a selected process, such as the process ID and the parent process ID (if the process was launched by another process). For example, the parent process ID for the service syslogd (ID 1) tells you that it was launched by Mac OX's boot initialization routine.
Finally, you can change the refresh rate (how often Process Viewer refreshes the information on each process) using the "Sample every x seconds" box.
| Note | Classic applications will not be listed in Process Viewer; only the Classic Environment itself will be visible (as "TruBlueEnvironme"). To see a listing of Classic processes, open the Classic pane of System Preferences and select the Memory/Versions tab. |
Terminal
Terminal provides an interface for Mac OS X's command-line interface. We've already talked about Terminal many times in the book, and you've probably used it several times as you followed along with the examples I've provided. I'll talk more about Terminal and its various settings and functionality in Chapter 15; however, here are a couple tips you may find useful if you end up using Terminal regularly.
Splitting the Difference: Split Windows in Terminal
If you ever find yourself scrolling up and down in Terminal because you want to see something a few pages back in the buffer, while at the same time trying to type in a command, you'll love Terminal's split-screen mode. In the upper-right corner of any open Terminal window, just above the vertical scroll column, you'll see an icon that looks like a square that's been torn in two (circled in the upper-right corner in Figure 7.11). Click it and the window will be split in two. The bottom section will always show the command prompt, while you can scroll through the buffer in the top section. You can click on the divider and drag it up or down to change the relative sizes of the two sections.
Figure 7.11: Split-screen mode in Terminal— the split-screen button (top) and split-screen mode (bottom)
Saving Custom Window Settings and Commands
In the Window Settings… dialog, also known as the Terminal Inspector (accessible via the Terminal application menu), you can set your preferred window settings, including colors, dimensions, display font and styles, buffer size, and window processes for the frontmost window. At the bottom of the window is a "Use Settings as Defaults" button that you can use to set the current preferences as the defaults for all new windows. However, if you tend to use different groups of settings, you can save each group individually. To do this, open a window, resize it to your preferred size, then select your settings from the Window Settings… dialog, and then close the Terminal Inspector. Then choose File ➣ Save As…, choose Main Window from the "What to save" pop-up menu, and save the Terminal window in a convenient location (it will automatically be saved with a .term file extension). You can even choose to have your saved Terminal window open automatically when Terminal starts up by checking the box in the Save dialog.
| Tip | One of my favorite Terminal window preferences is transparency, accessible by choosing Color from the Terminal Inspector window's pop-up menu. By increasing the transparency, you can view windows and files hidden behind the Terminal window. This can be extremely helpful when you're trying to view the spelling of a file or directory, or when you're trying to follow a tutorial from a website. |
When you want to use these saved window settings, double-click on the saved Terminal file, or choose File ➣ Open… from within Terminal and select the saved Terminal file. You can use this procedure to save as many different groups of Terminal window settings as you like.
Note that if you want this saved Terminal file to automatically execute a specific command when opened, you can edit the file using a text editor such as TextEdit or BBEdit. Scroll to the end of the file, and insert the following text before the final </dict>:
<key>ExecutionString</key> <string>command</string>
For example, you could type sudo -s to give yourself root access whenever this Terminal window is opened (you'd still need to provide your admin password), or ssh username@ serveraddress to automatically connect to a remote server via SSH.
|
|