Keeping Sensitive Data Safe
For the most part, securing your Mac (physically and over a network) means that your data is safe, as well—if no one else can get to your data, no one else can use it. However, if you're really concerned about security, it's good to have an additional layer of protection. After all, there's always the chance that someone can gain access to private files and folders. For example, if your computer is ever stolen, all bets are off. Likewise, if someone, somehow, gains admin access to your Mac, they can use the root account and/or sudo in Terminal to access any user's files, even those in your private user folder. Finally, remember that OS X's permissions are not enforced when booted into OS 9. Thus if you have data that is particularly sensitive—confidential documents, passwords for online accounts, etc.—you may want to consider additional security.
Mac OS X provides a few solutions for securing sensitive data and personal information, including the Keychain and file encryption. In addition, third-party software provides other options such as secure file deletion and network monitoring. I'll talk about all of these in this section. In addition, if you have multiple volumes and/or partitions, be sure to check out the section on permissions and security in Appendix B, as non-boot volumes handle permissions differently than your main OS X volume.
| Note | Many people use invisibility as a mild form of security (e.g., making files invisible so that other users can't see them). This is only a passable tactic for hiding files, and it's definitely not a legitimate method for securing data. Any semi-experienced user will be able to easily find such files using the Finder's Find command or Terminal. |
The Mac OS X Keychain
The Mac OS X Keychain is another one of those features that is incredibly powerful but rarely understood. What is it? The short answer is that—like its namesake, a ring that holds all your keys—the Keychain is a database that holds all your passwords. The long answer is that the Keychain is a secure database that not only stores passwords for everything from websites to servers to encrypted files and images, but also provides a mechanism whereby applications can access those passwords automatically (with your permission, of course). It also allows you to securely store other information as needed.
The idea of the Keychain is fairly revolutionary: when you log in to your account, your Keychain is unlocked. Whenever you encounter a password dialog—on a website, in a "Connect to Server" dialog, when mounting a protected disk image—the Keychain asks if you want to store that password. If you say yes, a new password entry is entered into your Keychain. The next time that same password dialog appears, the application requesting your password connects to the Keychain and says "Hey, can I have the password for this?" Assuming you've given that application permission, the Keychain responds with "Sure, here it is." You don't have to remember each and every password, nor do you have to manually type passwords every time you want to access a password-protected site, server, disk, or file.
There are two caveats to realizing the potential of the Keychain. First, applications must be written to be Keychain-aware. In other words, if an application doesn't explicitly work with the Keychain, your passwords cannot be automatically stored and, more importantly, can't be automatically retrieved. The second is actually a built-in security measure: to add a password to the Keychain, you must specifically tell Keychain to add it, and for an application to access that password you must specifically allow it. (I'll talk more about how to do both in the next section.)
In addition to its ability to work with applications to make your password-laden life easier, the Keychain also has two other convenient uses. You can use it to store any password you want by manually adding it, and you can store larger batches of text using secure notes. I'll talk about both in a bit.
| Note | Your original Keychain was created when your user account was created, and by default has the same password as your user account. This allows your Keychain to be unlocked automatically when you log in. However, you can lock and unlock your Keychain manually at any time, and you can change your Keychain password so that it isn't automatically unlocked at login. I'll talk about these options in "Working with Your Keychain: Keychain Access." |
Using the Keychain with Keychain-Aware Applications
Using the Keychain with applications that are Keychain-aware is actually quite easy. The first time you provide a password (e.g., when connecting to a server, mounting an encrypted disk image, checking e-mail), you'll see a check box that says something to the effect of "add password to Keychain" (different applications phrase it differently). If you agree, your password is saved. (What you've actually done is create a new Keychain entry; I'll talk more about these entries in the next section.)
The next time you access that same server, image, e-mail account, etc., the application (or the Finder) will access your Keychain and attempt to automatically retrieve the correct password. You'll receive a dialog asking if you want to allow access (Figure 13.4). Clicking Deny prevents the application from grabbing the password this particular time (in which case you'll need to enter it yourself). Allow Once allows access this particular time, but you'll be asked again the next time this password is requested by the application. Always Allow will allow the application to access the password this time and any time in the future (although you can manually reverse this decision as described in the next section).
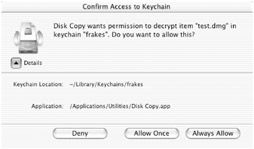
Figure 13.4: You can deny or allow an application access to your Keychain.
The key here is that applications must be Keychain-aware. For example, e-mail clients like OS X's Mail and Microsoft's Entourage support the Keychain, as do web browsers like Safari and Camino. The Finder is also Keychain-aware, which means that you can save passwords for any server you access via "Connect to Server…" Unfortunately, Microsoft's Internet Explorer, one of the most popular Mac web browsers, does not support the Keychain at the time of this writing.
| Note | If an application changes in any way—for example, if you update it or install a new version—its access to the Keychain is reset, even if you previously chose to Always Allow access to a particular password. The next time it requires that password, you'll be asked to Deny or Approve access again. |
Working with Your Keychain: Keychain Access
| User Level: | any |
| Affects: | individual user |
| Terminal: | no |
Your Keychain generally operates in the background, working with applications when needed. However, there are a number of reasons why you would need direct access to it. OS X provides this access via the Keychain Access utility, located in /Applications/Utilities. When you launch this application, you're presented with a list of all the items in your Keychain (Figure 13.5), including information about the item's name, kind, creation date, and modification date. You can sort the listing by any of these attributes by clicking on a column header (or by choosing View ➣ Sort). You'll notice that your Keychain can actually contain both passwords (Internet passwords, application passwords, disk image passwords) and secure notes. I'll talk about secure notes in a bit under "Adding Keychain Items: Secure Notes."
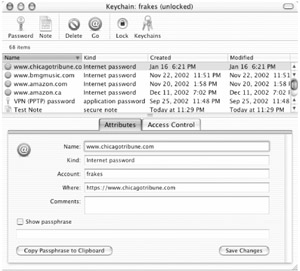
Figure 13.5: A list of Keychain items in Keychain Access
Viewing and Editing Keychain Items
Clicking on any Keychain item provides information about that item at the bottom of the window. The Attributes tab provides information about the contents of the item. In the case of passwords, it lists the name of the item (often the domain of the website or server, or the name of the application it applies to); the kind of item; the account name, if applicable; the specific URL, application name, or disk image name the password is used for; and any comments you may have added about the item. In addition, if you check the "Show passphrase" box, you can view the password stored in that item (you'll be required to enter your Keychain password to do so). The "Copy Passphrase to Clipboard" button will copy the password to the clipboard so that you can paste it in another application (again, after providing your Keychain password).
In the case of secure notes, the Attributes tab shows the name of the note, the creation and modification dates, and a "Show note" box instead of a "Show passphrase" box (although it works the same way).
You can edit any of these fields by simply clicking in the field; however, the only ones you should generally change are the Comments field and the passphrase field (which, oddly enough, isn't labeled, but is just below the "Show passphrase" checkbox), and even then, only if your password has actually changed. When you're done editing, make sure you click the Save Changes button at the bottom of the window.
The Access Control tab is where you control access to the Keychain item. By selecting "Always allow access to this item," any application that requests the password or note can access it without any interaction from you. If you select "Confirm before allowing access," a dialog will appear each time an application requests access—this is the dialog I mentioned earlier that gives you the choice to Deny, Allow Once, or Always Allow. In addition, if you enable the "Ask for Keychain password" option, this dialog will also require your Keychain password for an extra layer of security. The "Always allow access by these applications" box lists any applications you've given permission to access this item. If you want to add applications (for example, if you change e-mail clients or web browsers, and want the new one to be able to access your e-mail or website passwords), click Add and navigate to the application. Again, after making any changes here, click Save Changes to apply them.
| Tip | If you want to compare two or more Keychain items simultaneously, you can create multiple Keychain Access windows by choosing Window ➣ New Viewer Window. |
Adding Keychain Items: Passwords
In addition to allowing applications to add new Keychain passwords, you can manually add them yourself. To create a new Keychain password, click the Password item in the toolbar, or choose File ➣ New ➣ New Password Item…. A dialog will appear asking you for the name of the new item (e.g., Mac.com e-mail account), the account or username associated with the password (e.g., frakes), and the password/passphrase you want stored in the Keychain. If you check the Show Typing box, you'll be able to see the password as you type it. Click Add to create the new item. If you want to associate the new password item with a particular application, select the item and then add an application in the Access Control tab as described above.
| Tip | You don't have to restrict your Keychain to just passwords used by applications. It's also a great place to store any other passwords or numbers you need to remember: bank "phone-tellers," PIN numbers, ATM card passwords, even software serial/registration numbers. In fact, using your Keychain is a lot more secure than writing them down on paper! |
Adding Keychain Items: Secure Notes
In addition to storing passwords in your Keychain, you can also create secure notes. Secure notes are just standard text notes, but because they're part of your Keychain, they're safe from prying eyes—no one can view them unless they have your Keychain password. They're a great way to store sensitive data—anything you need to keep private. Secure notes are one of those "hidden" features that Apple should make more obvious.
To create a secure note, click the Note item in the toolbar, or choose File ➣ New ➣ New Secure Note…. In the New Secure Note Item dialog, enter a name for the new note, and the contents of the note. Click Add and the note is created.
Deleting Keychain Items
If you ever need to delete a Keychain item (you cancel an account, you no longer need a secure note), just select the item and click the Delete item in the toolbar (or choose Edit ➣ Delete). You can also control/right-click on the item and select Delete from the contextual menu.
"Going" to Keychain Items
The Keychain Access toolbar has an item called Go that looks like the @ character (visible in Figure 13.5). What this button does depends on what kind of Keychain item is selected when you click it. If a secure note is selected, Keychain Access simply switches the Attributes display to that note. However, for password items, the item is actually "opened." Internet passwords open your preferred web browser to the URL listed in the Where field of Attributes. Disk image passwords attempt to mount the password-protected disk image. iTools/iDisk passwords attempt to mount your iDisk in the Finder. Application passwords launch the application listed in the Access Control tab. Although I personally don't use this feature much, I can see how it might be a nice shortcut.
Locking and Unlocking Your Keychain
Even if your Keychain is unlocked, passwords and notes contained in your Keychain are inaccessible by default. However, chances are you've enabled Always Allow access to many passwords for convenience, so some applications have free reign over their passwords, so to speak. If you want to temporarily prevent any applications from accessing passwords in the Keychain, or if you're stepping away from your computer and want to make sure no one can access the information in your Keychain, you can lock it. A locked Keychain is inaccessible by applications, and can only be opened/enabled/unlocked by using your Keychain password (by default, your account password).
There are several ways to lock you Keychain. The first is to launch Keychain Access and click the Lock item in the toolbar (which then changes to Unlock). You can also choose File ➣ Lock keychain name or File ➣ Lock All Keychains (if you have multiple Keychains—see "Creating and Deleting Additional Keychains"). To unlock the Keychain again, click the Unlock item (or choose File ➣ Unlock keychain name) and provide your Keychain password.
Another way to lock and unlock your Keychain is to use the Keychain menu extra, enabled by choosing View ➣ Show Status in Menu Bar from within Keychain Access. Once enabled, you can lock and unlock your Keychain (or Keychains, if you have more than one) by simply clicking on the Keychain menu extra. You'll be asked for your Keychain password, of course, to unlock a Keychain. (You'll remember the Keychain menu extra from earlier in the chapter when I showed you how to lock your screen.)
Finally, you can have your Keychain automatically locked after a period of inactivity, as described in the next item.
Keychain Settings (Including Changing the Keychain Password)
The Keychain Access application doesn't have its own preferences; however, each Keychain has settings that control the behavior of the Keychain itself. To access these settings, launch Keychain Access and choose Edit ➣ keychain name Settings.
| Note | If you have multiple Keychains, each has its own settings. Click the Keychains item in the toolbar (or choose View ➣ Show Keychains) to see a list of Keychains; select a Keychain and then access the Settings dialog. |
The first setting, "Lock after x minutes of inactivity," will automatically lock the Keychain after the number of minutes of inactivity you choose here. Activity is defined as your accessing the Keychain, including viewing or editing any Keychain item, or any application accessing the Keychain. Note that if your e-mail client stores your e-mail account passwords in the Keychain, and checks for new mail frequently, it's possible that your Keychain may never lock using this feature.
The second option, "Lock when sleeping," automatically locks your Keychain when your computer goes to sleep. When you wake it up, you'll be required to enter your password before you or any application can access your Keychain.
Finally, you can change the password for your Keychain by clicking Change Passphrase…. Enter the new password twice, and then click OK. However, if you want your Keychain to be automatically unlocked at login, it must use the same password as your user account. Thus, if you change your Keychain password, you might want to also change your account password so that they match.
| Note | If you change your own account password in My Account or Accounts preferences, your Keychain password will automatically be changed to match. However, if you use your admin power to change another user's account password, their Keychain password won't be automatically updated, and thus won't automatically be unlocked when they log in. They'll need to change their Keychain password, in Keychain Settings, to match their new account password. |
Creating and Deleting Additional Keychains
Although every user has a single Keychain by default, it's actually possible to have more than one. For example, perhaps you want to keep your personal Keychain data separate from your business/professional Keychain data. To create a new Keychain, choose File ➣ New ➣ New Keychain…. You'll be asked to name the new Keychain, and then provide and verify a Keychain password; this password can be the same as or different from your existing Keychain password.
There are a few things to be aware of when working with multiple Keychains. First, by default Keychain Access shows the contents of your original Keychain. To view others, click the Keychains item in the toolbar, or choose View ➣ Show Keychains, and a Keychain Files drawer will slide out of the side of the main Keychain Access window. If you select one of your Keychains from the list, Keychain Access will show its contents.
| Tip | You can view multiple Keychains simultaneously by opening multiple Keychain Access viewer windows and choosing a different Keychain in each. |
The second thing to consider is that one of your Keychains is automatically designated as your default Keychain. You can change this setting by selecting another Keychain in the Keychain Files drawer and then choosing File ➣ Make keychain name Default. Which Keychain you select doesn't affect the ability of applications to access Keychain information; however, when you choose to add a password to the Keychain, it is always added to the default. Thus if you're using one Keychain for personal info, and one for business info, you need to switch the default back and forth each time you want to add a password to one or the other.
Finally, only your default Keychain will be unlocked at login, even if all of your Keychains use the same password as your user account.
To delete a Keychain, select it from the Keychain File drawer and then choose File ➣ Delete keychain name. You'll be asked if you want to delete just the references to the file (meaning the Keychain file will still exist, but it won't show up in Keychain Access unless you add it again—see "Transferring a Keychain to a Different Account or Different Mac"), or if you want to delete references and the Keychain file itself.
You can also delete Keychains manually in the Finder—they're stored in ~/Library/Keychains. If you quit Keychain Access and then drag a Keychain to the trash, then next time you launch Keychain Access the Keychain will be gone.
| Warning | Once you delete a Keychain, it's gone for good, as is all the data contained in it. Be sure you really don't need it, or you've transferred its contents to another Keychain, before deleting it. |
Transferring a Keychain to a Different Account or a Different Mac
| User Level: | any |
| Affects: | individual user |
| Terminal: | no |
If you've built up a hefty Keychain—one with a lot of entries, notes, etc.—you can actually use that Keychain with a different user account or on a different Mac. Some examples are if your main Keychain is on your desktop Mac, and you want to use it on your PowerBook; if you've just created a new user account and want to transfer over all of your passwords; or if you're using a friend's Mac or a Mac in a lab. Here's how you do it. (If you have multiple Keychains, just follow the procedure here for each one.)
-
Make your Keychain (located at ~/Library/Keychains) accessible by the other computer or account. You could burn it to a CD or copy it to a portable hard drive, or even copy it to an iDisk and then connect to the iDisk from that computer or account. If you're just moving the Keychain between accounts, you could put the file in the Shared folder and change permissions to allow access by everyone—don't worry, no one can open it without your password.
-
Log in to the account you'll be using.
-
Launch Keychain Access and choose File ➣ Add Keychain.
-
Navigate to your Keychain in the Open dialog, and click Open.
-
When prompted, provide the Keychain password. Your Keychain will be added.
After adding your Keychain, you'll probably actually have two or more Keychains, since the account you're using already had its original Keychain.
When Keychains Break: Keychain First Aid
| User Level: | any or admin |
| Affects: | individual user's Keychain |
| Terminal: | no |
Because the Keychain manages so many different pieces of information—and the more information it manages, the more frequently it is accessed—it's possible for your Keychain file to eventually develop minor corruption. Keychain corruption is generally manifested in problems such as your e-mail client repeatedly asking you for your mail account password, even though it's saved in your Keychain; your .Mac password not being saved in Internet preferences; or OS X repeatedly asking you to unlock your Keychain. If you experience such odd behavior, there's a good chance your Keychain needs to be repaired.
Apple provides a utility called Keychain First Aid for download at http://docs.info.apple.com/article.html?artnum=107234. Once you download and launch it, enter your username and password, select Verify, and then click Start. Your Keychain will be checked for problems. If any are found, you'll see a description of each, and you'll be prompted to repair them (Figure 13.6). Select Repair, and then click Start. You can print, copy, or save the log of any verification or via the Edit and File menus.

Figure 13.6: Keychain First Aid found problems with this Keychain.
An administrative user can also verify and repair other users' Keychains. Instead of entering your own username and password, enter the username and password of another user. (Unfortunately, you must know the user's password, or else change it first using Accounts preferences.) When you click Start, you'll be prompted for an admin username and password. One main difference is that when verifying or repairing another user's Keychain, you won't see the details of the verification or repair.
| Note | By default, repairing a Keychain using Keychain First Aid resets the settings for that Keychain to unlock at login and remain unlocked until logout. You can change this behavior by editing the Keychain First Aid preferences. |
Alternatives to the Keychain
Although the Keychain is incredibly useful, and does what it does very well, many people find its secure notes and general password/data storage functionality limiting. If you want a more flexible way to store sensitive text, the shareware LittleSecrets (http://www.mani.de/) allows you to create multiple note databases, each encrypted and requiring its own password. Each database can store as many separate notes as you want, using styled and colored text (the Keychain only supports plain text). In addition, each database of notes is searchable, which is a major plus if you're working with lots of text. Finally, LittleSecrets is Keychain-savvy, so you can store your database passwords in the Keychain.
If you're looking for a more convenient way to store passwords and other information for use in non-Keychain-savvy applications (or just information like PIN numbers, credit card numbers, and other private info), a search for "password" on the VersionTracker or MacUpdate websites will present you with a number of choices. My favorites are the shareware Web Confidential (http://www.web-confidential.com/) and Password Retriever (http://www.koingosw.com/). Web Confidential has the advantage of integrating nicely with many browsers (it's related to URL Manager Pro, which I recommended earlier in the book), and is Keychain-aware itself, so you can save your Web Confidential database password in your Keychain. On the other hand, Password Retriever has, in my opinion, a better interface—you can view multiple items at once, like Keychain Access, and there are more options for categorizing and viewing items. Both utilities will automatically generate random passwords for you, and both encrypt their databases using extremely secure algorithms.
Encrypting Data
| User Level: | any |
| Affects: | individual user |
| Terminal: | no |
If you're careful with account passwords and file permissions, your data is pretty safe from other users—provided they can't access your user account. If that's a risk for some reason, or if you're just the careful type, you can add another layer of security by encrypting especially sensitive files and folders so that even if someone can get to them, they can't use them. Although there are a number of third-party utilities that provide the ability to encrypt files, OS X lets you do this using the Disk Copy utility, which I described in Chapter 7. Drag a folder of files onto the Disk Copy icon in the Finder or the Dock, and a Save dialog appears (Figure 13.7). Select the desired Image Format (use read/write if you want to be able to edit or change the files you're encrypting), and select "AES-128 (recommended)" for Encryption (this uses 128-bit encryption, which is a very secure algorithm for encoding files), and then click Save. You'll be asked for a password, and whether or not to add that password to the Keychain; click OK and the image will be created.

Figure 13.7: Encrypting a folder of files using Disk Copy
| Warning | To quote Apple, "the encryption used by Disk Copy is 128-bit, equivalent to that used in the banking industry. If you forget the password to your encrypted disk image, your data will be irretrievably lost." |
Instead of encrypting an existing folder, you can also create a blank encrypted image and then drag documents to it as needed. Regardless of which method you use, the resulting disk image can only be mounted and used by someone with the password you provided (or, if you added the password to the Keychain, access to your Keychain). Although I explained how to do this in Chapter 7, Apple's official instructions can be found at http://docs.info.apple.com/article.html?artnum=107333.
| Tip | If you create an encrypted image to store sensitive documents, be sure to delete the original documents afterwards—I've forgotten to do this myself. If you want to securely delete such files, check out the next section. |
One other cool use of encrypted disk images is to send data securely over the Internet—if you encrypt a file or files and then send the encrypted image as an e-mail attachment, it's virtually impossible for anyone who might intercept that e-mail to gain access to the data (provided you didn't include the password in the body of the e-mail, of course).
If you'd like an even higher level of encryption, and/or if you'd prefer the ability to encrypt files and folders directly (instead of via disk images), you may want to consider a third-party utility like the commercial software Tresor (http://www.warlord.li/english/products.html). Tresor uses even better encryption technology than Disk Copy, and lets you drag and drop files and folders onto the Tresor icon to encrypt them immediately.
Secure Deletion
| User Level: | any |
| Affects: | individual user's data |
| Terminal: | no |
One of the biggest myths of computer use is the idea that "deleting" a file really gets rid of it. Most people assume that when you empty the Trash, your file is gone forever. The truth is that the file is still sitting exactly where it was before you deleted it. What actually happens is that the operating system "forgets" the file exists, and makes a notation in the disk directory that the space occupied by that file is now available to store other data. But until other data—a file, an application, etc.—is actually saved to that location, the original file is still there. In fact, it's possible to "undelete" the file, and there are utilities available on every computer platform that do just that. (I'll talk about a couple for OS X in the next chapter.) In addition, there are companies (and, for the X-Files fans, government agencies) whose sole business is retrieving "deleted" data from hard drives.
This is normally not a problem, as you usually don't care if an item is technically still on your hard drive—you just don't want to see it and you want to make the space it occupied is available for other data. However, if you have especially sensitive data that you want to delete, and you want to make sure no one can retrieve it, you want to delete it securely. Secure deletion is the process by which a file is not only removed from the disk directory, but the area of the drive where it was stored is actually overwritten by new data—sometimes by a constant stream of zeros (since all data on a hard drive is actually a series of zeros and ones), sometimes with a random sequence of data. In addition, the more times you overwrite the space, the less likely it is that anyone would ever be able to retrieve the file. (The government's intelligence agencies actually have a standard number of overwrites that they classify as "secure.")
There are a number of secure deletion utilities for OS X; one of the best is also free: SafeShred (http://codetek.com/php/safeshred.php) offers security protection from "Home User" to "Secret Agent" (basically, how many times a file is overwritten with random data). To securely delete a file, you simply drag it onto the SafeShred icon.
| Warning | When you drag an alias onto an application, the application will try to open the original file—that's how aliases are supposed to work. However, this also means that if you drag an alias onto SafeShred or any other secure deletion utility, the original file will be deleted, not the alias! |
Finally, what if you've previously deleted files that you wish you'd securely deleted? Many utilities allow you to securely overwrite all "free" space on a drive to ensure that any files that have previously been deleted aren't retrievable. The shareware Shredder (http://www.dekorte.com/Software/OSX/Shredder/), for example, provides secure file deletion like SafeShred, but also has a Shred Free Disk Space feature that overwrites free disk space using a procedure "based on the standard outlined in U.S. Department of Defense Manual 5220.22 M." In other words, it should be adequate for you and me.
| Warning | Before you use any utility that securely deletes files, or securely erases free disk space, be sure you don't want the file, or that there are no deleted files that you might ever want to try to unerase—these procedures will make that virtually impossible. |
Before You Get Rid of Your Drive or Computer...
Along the lines of the previous paragraph, what if you're about to sell your computer, or get rid of a hard drive, and you want to make sure no one can retrieve any data from it? Your best bet is to use a utility like Shredder to securely erase free disk space. However, if you're using OS X 10.2.3 or later, another option is to use Disk Utility's "Zero all data" option (accessible via the Options... button on the Erase tab). This will write a value of 0 to every single block on the drive. For additional security, run this option multiple times—magnetic media can sometimes have a "memory" effect that make it possible to extract previous block values, and multiple "zeroing" reduces the chances of this.
| Note | The "Zero all data" option of Disk Utility is only available for entire hard drives, not individual partitions. In addition, it may not be available for some third-party hard drives. For more information about this feature, check out http://docs.info.apple.com/article.html?artnum=107437. |
|
|