Manipulating Files with the File Object
| Visual C# includes a powerful namespace called System.IO (the IO object acts like an object property of the System namespace). Using various properties, methods, and object properties of System.IO, you can do just about anything you can imagine with the file system. In particular, the System.IO.File and System.IO.Directory objects provide you with extensive file and directory (folder) manipulation. In the following sections, you'll continue to expand the project that you've created. You'll write code that manipulates the selected filenames by using the Open File Dialog and Save File Dialog controls. Watch Out! The code you're about to write in the following sections is "the real thing." For example, the code for deleting a file really does delete a file. Don't forget this as you test your project; the files selected as the source and as the destination will be affected by your actions. I provide the cannon, and it's up to you not to shoot yourself in the foot. Determining Whether a File ExistsBefore attempting any operation on a file, such as copying or deleting it, it's a good idea to make certain the file exists. For example, if the user doesn't click the Source button to select a file but instead types the name and path of a file into the text box, the user could type an invalid or nonexistent filename. Attempting to manipulate a nonexistent file could result in an exceptionwhich you don't want to happen. Because you're going to work with the source file selected by the user in many routines, you're going to create a central function that can be called to determine whether the source file exists. The function uses the Exists() method of the System.IO.File object to determine whether the file exists. Add the following method to your form class: bool SourceFileExists() { if (!System.IO.File.Exists(txtSource.Text)) { MessageBox.Show("The source file does not exist!"); return false; } else return true; }The SourceFileExists() method uses the value in the text box txtSource. If the filename specified in the text box exists, SourceFileExists() returns TRue; otherwise, it returns false. Copying a FileCopying files is a common task. For example, you might want to create an application that backs up important data files by copying them to another location. For the most part, copying is pretty safeas long as you use a destination filename that doesn't already exist. Copying files is accomplished using the Copy() method of the System.IO.File class. You're now going to add a button to your form. When the user clicks this button, the file specified in the source text box will be copied to a new file with the name given in the destination text box. Follow these steps to create the Copy functionality:
The Copy() method has two arguments. The first is the file that you want to copy, and the second is the name and path of the new copy of the file. In this example, you're using the filenames selected in the two text boxes. Press F5 to run the project and test your copy code now by following these steps:
After you get the message box telling you the file was copied, you can use Explorer to locate the new file and open it. Stop the project and save your work before continuing. Moving a FileWhen you move a file, it's taken out of its current directory and placed in a new one. You can specify a new name for the file or use its original name. Moving a file is accomplished with the Move() method of the System.IO.File object. Follow these steps to create a button on your form that moves the file selected as the source to the path and the filename selected as the destination: Did you Know? I recommend that you use Notepad to create a text file, and use this temporary text file when testing from this point forward. This code, as well as the rest of the examples presented in this hour, can permanently alter or destroy a file.
Go ahead and press F5 to test your project. Select a file to move (again, I recommend you create a dummy file in Notepad) and supply a destination filename. When you click Move, the file will be moved to the new location and given the new name. Remember, if you specify a name for the destination that isn't the same as that of the source, the file will be given the new name when it's moved. Renaming a FileWhen you rename a file, it remains in the same directory, and nothing materially happens to the contents of the filethe name is just changed to something else. Because the original file isn't altered, renaming a file isn't as risky as performing an action such as deleting the file. Nevertheless, it's frustrating trying to determine what happened to a file when it was mistakenly renamed. To rename a file, use the Move() method of System.IO.File, specifying a new filename but keeping the same path. Deleting a FileDeleting a file can be a risky proposition. The Delete() method of System.IO.File deletes a file permanentlyit doesn't send the file to the Recycle Bin. For this reason, take great care when deleting files. First and foremost, this means testing your code. When you write a routine to delete a file, be sure to test it under many conditions. For example, if you reference the wrong text box in this code, you would inadvertently delete the wrong file! Users aren't forgiving of such mistakes. Follow these steps to add a button to your project that deletes the source file when clicked. Remember: Be careful when testing this code.
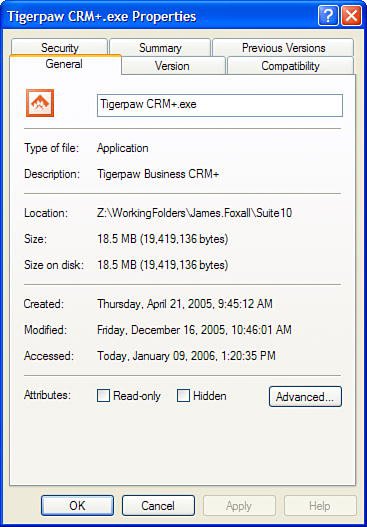
Notice that you've included a message box to confirm the user's intentions. It's a good idea to do this whenever you're about to perform a serious action that can't be undone. In fact, the more information you can give the user, the better. For example, I suggest that if this was production code (code meant for end users), you should include the name of the file in the message box so that the user would know without a doubt what the program intends to do. If you're feeling brave, press F5 to run the project and then select a file and delete it. Retrieving a File's PropertiesAlthough many people don't realize it, files have a number of propertiessuch as the date the file was last modified. The easiest way to see these properties is to use Explorer. View the attributes of a file now by starting Explorer, right-clicking any file displayed in Explorer, and choosing Properties. Explorer shows the File Properties window with information about the file (see Figure 19.4). Figure 19.4. Visual C# provides a means to easily obtain most file properties. The System.IO.File object provides ways to get at most of the data displayed on the General tab of the File Properties dialog box shown in Figure 19.4. Some of this data is available directly from the File object, whereas other data is accessed using a FileAttributes object. Getting Date and Time Information About a FileGetting the date created, the last date accessed, and the last date modified of a file is easy; the System.IO.File object supports a method for each of these dates. Table 19.1 lists the applicable properties and what they return.
Getting the Attributes of a FileThe attributes of a file (refer to the bottom of the dialog box shown in Figure 19.4) aren't available as properties of the System.IO.File object. How you determine an attribute is complicated. The GetAttributes() method of System.IO.File returns a FileAttributes enumeration. This enumeration acts as a set of flags for the various attributes. The first step in determining the attributes is to get the FileAttributes containing the flags for the attributes of the file. To do this, you would create a FileAttributes variable and call GetAttributes(), like this: System.IO.FileAttributes objfileAttributes ; objFileAttributes = System.IO.File.GetAttributes(txtSource.Text); Once you retrieve the file attributes into the variable objFileAttributes, you can use one of the members of the FileAttributes enumeration shown in Table 19.2 to determine whether a particular attribute is set.
Writing Code to Retrieve a File's PropertiesNow that you know how to retrieve the properties of an object, you're going to modify your Picture Viewer project so that the user can view file properties of a picture file they have displayed. Start by opening the Picture Viewer project you last modified in Hour 15, "Debugging Your Code," and then follow these steps to add the file attributes functionality:
The first thing this procedure does is see whether the user is viewing a file. We look at the File Open Dialog control for thisbecause that is where we got the filename from the user. If the Open File Dialog control has no filename, the user hasn't viewed a file yet. All the various properties of the file are appended to the StringBuilder variable stbProperties. The "\r\n" denotes a carriage return and a linefeed, and appending this into the string ensures that each property appears on its own line. The first statement declares an empty StringBuilder variable called stbProperties. The StringBuilder object was designed for optimizing string concatenation and essentially just used to add strings together. You're using the append method of the StringBuilder class to create the file properties text (each append adds new text to the existing string). The second set of statements call the GetCreateTime(), GetLastAccessTime(), and GetLastWriteTime() methods to get the values of the date-related properties. These methods are self-explanatory. Next, the attributes are retrieved using the GetAttributes() method and the FileAttributes enumeration. The Convert.ToBoolean() method is used when concatenating each attribute in the final result string so that the words True and False appear. Press F5 to run the project, open a picture file to display it, and then click the Get File Attributes button on the toolbar. If you entered the code exactly as shown, the attributes of the image file should appear in the text box as they do in Figure 19.5. Figure 19.5. The System.IO.File object enables you to look at the properties of a file. |

EAN: 2147483647
Pages: 248
- Chapter II Information Search on the Internet: A Causal Model
- Chapter VI Web Site Quality and Usability in E-Commerce
- Chapter VIII Personalization Systems and Their Deployment as Web Site Interface Design Decisions
- Chapter XIII Shopping Agent Web Sites: A Comparative Shopping Environment
- Chapter XVI Turning Web Surfers into Loyal Customers: Cognitive Lock-In Through Interface Design and Web Site Usability