Understanding Classes
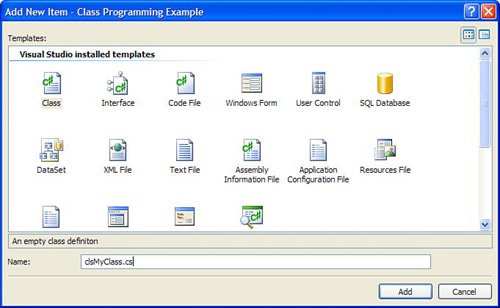
| Classes enable you to develop applications using object-oriented programming (OOP) techniques (recall that I discussed OOP briefly in Hour 3). Classes are templates that define objects. Although you might not have known it, you've been programming with classes throughout this book. When you create a new form in a Visual C# project, you're actually creating a class that defines a form; forms instantiated at runtime are derived from the class. Using objects derived from predefined classes (such as a Visual C# Form class), is just the start of enjoying the benefits of object-oriented programmingto truly realize the benefits of OOP, you must create your own classes. The philosophy of programming with classes is considerably different from that of traditional programming. Proper class-programming techniques can make your programs better, both in structure and in reliability. Class programming forces you to consider the logistics of your code and data more thoroughly, causing you to create more reusable and extendable object-based code. Encapsulating Data and Code Using ClassesAn object derived from a class is an encapsulation of data and code; that is, the object comprises its code and all the data it uses. For example, suppose that you need to keep track of employees in an organization and that you must store many pieces of information for each employee, such as name, date hired, and title. In addition, suppose that you need methods for adding and removing employees, and you want all this information and functionality available to many functions within your application. You could use standard modules to manipulate the data, but doing so would most likely require many variable arrays as well as code to manage those arrays. A better approach is to encapsulate all the employee data and functionality (adding and deleting routines and so forth) into a single, reusable object. Encapsulation is the process of integrating data and code into one entity: an object. Your application, as well as external applications, could then work with the employee data through a consistent interfacethe Employee object's interface. (An interface is a set of exposed functionalityessentially, code routines that define methods, properties, and events.) By the Way Creating objects for use outside your application is beyond the scope of this book. The techniques you'll learn in this hour, however, are directly applicable to creating externally creatable objects. The encapsulation of data and code is the key idea of classes. By encapsulating the data and the routines to manipulate the data into a single object by way of a class, you free up application code that needs to manipulate the data from the intricacies of data maintenance. For example, suppose that company policy has changed so that when a new employee is added to the system, a special tax record must be generated, and a form must be printed. If the data and code routines weren't encapsulated in a common object but instead were written in various places throughout your code, you would have to modify each and every module that contained code to create a new employee record. By using a class to create an object, you need to change the code in only one location: within the object. As long as you don't modify the interface of the object (discussed shortly), all the routines that use the object to create a new employee will instantly have the policy change in effect. Comparing Instance Members with Static MembersYou learned in Hour 10, "Creating and Calling Methods," that Visual C# does not support global methods, but supports only class methods. By creating static methods, you create methods that can be accessed from anywhere in the project through the class itselfwithout needing to instantiate an object from the class. Instance methods are similar to static methods in how they appear in the Visual C# design environment and in the way in which you write code within them. However, the behavior of classes at runtime differs greatly from that of static members. With static members, all static data is shared by all members of the class. In addition, there are never multiple instances of the static class data. With instance member classes, objects are instantiated from a class and each object receives its own set of data. Static methods are accessed through the class, whereas nonstatic methods (also called instance methods) are accessed through instances of the class. Instance methods differ from static methods in more ways than just how their data behaves. When you define a static method, it is instantly available to other classes within your application. However, instant member classes aren't immediately available in code. Classes are templates for objects. At runtime, your code doesn't interact with the code in the class per se, but it instantiates objects derived from the class. Each object acts as its own class "module" and thus it has its own set of data. When classes are exposed externally to other applications, the application containing the class's code is called the server. Applications that create and use instances of objects are called clients. When you use instances of classes in the application that contains those classes, the application itself acts as both a client and a server. In this hour, I'll refer to the code instantiating an object derived from a class as client code. Begin by creating a new Windows Application titled Class Programming Example, and then follow these steps to create your project:
Understanding Constructors and DestructorsAs you open your new class file, you'll notice that Visual C# added the public class declaration class clsMyClass. All code, including methods, variables, and property procedures goes between the opening and closing braces of the class declaration. By the Way Objects consume system resources. The .NET Framework (discussed in Hour 24, "The 10,000-Foot View") has a built-in mechanism to free resources used by objects. This mechanism is called the garbage collector (and it is discussed in Hour 24 as well). Essentially, the garbage collector determines when an object is no longer being used and then destroys the object. When the garbage collector destroys an object, it calls the object's destructor method. If you aren't careful about how you implement a destructor method, you can cause problems. Creating an Object InterfaceFor an object to be created from a class, the class must expose an interface. As I mentioned earlier, an interface is a set of exposed functionality (properties, methods, and events). An interface is the means by which client code communicates with the object derived from the class. Some classes expose a limited interface, whereas some expose complex interfaces. The content and quantity of your class's interface is entirely up to you. The interface of a class consists of one or more of the following members:
For example, assume that you're creating an Employee object (that is, a class used to derive employee objects). You must first decide how you want client code to interact with your object. You'll want to consider both the data contained within the object and the functions that the object can perform. You might want client code to be able to retrieve the name of an employee and other information such as sex, age, and the date of hire. For client code to get these values from the object, the object must expose an interface member for each of these items. You'll recall from Hour 3 that values exposed by an object are called properties. Therefore, each piece of data discussed here would have to be exposed as a property of the Employee object. In addition to properties, you can expose functionssuch as a Delete() or AddNew() function. These functions may be simple in nature or complex. The Delete function of the Employee object, for example, might be quite complex. It would need to perform all the actions necessary to delete an employee, including such things as removing the employee from an assigned department, notifying the accounting department to remove the employee from the payroll, notifying the security area to revoke the employee's security access, and so on. Publicly exposed functions of an object, as you should again remember from Hour 3, are called methods. Properties and methods are the most commonly used interface members. Although designing properties and methods might be new to you, by now using them isn'tyou've been using properties and methods in almost every hour so far. Here, you're going to learn the techniques for creating properties and methods for your own objects. For even more interaction between the client and the object, you can expose custom events. Custom object events are similar to the events of a form or a text box. However, with custom events you have complete control over the following:
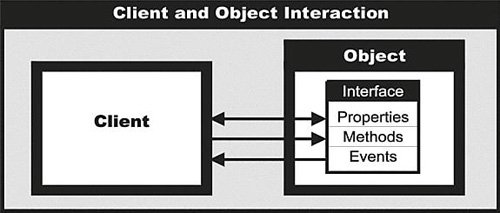
By the Way Creating custom events is complicated, and I'll cover only custom properties and methods in this hour. Properties, methods, and events together make up an object's interface. This interface acts as a contract between the client application and the object. Any and all communication between the client and the object must transpire through this interface (see Figure 16.2). Figure 16.2. Clients interact with an object via the object's interface. The technical details of the interaction between the client and the object by way of the interface are, mercifully, handled for you by Visual C#. Your responsibility is to define the properties, methods, and events of an object so that its interface is logical, consistent, and exposes all the functionality a client must have available to use the object productively. Exposing Object Attributes as PropertiesProperties are the attributes of objects. Properties can be read-only, or they can allow both reading and writing of their values. For example, you might want to let a client retrieve the value of a property containing the path of the component but not let the client change it because the path of a running component can't be changed. You can add properties to a class in two ways. The first is to declare public variables. Any variable declared as public instantly becomes a property of the class (actually, it acts like a property but it isn't technically a property). For example, suppose that you have the following statement in the Declarations section of a class: public int Quantity; Clients could read from and write to the "property" (actually, public variables act like a property but they are called fields) using code like the following objMyObject.Quantity = 139; This works, but significant limitations exist that make this approach less than desirable:
It's simply not possible to work around these issues using a public variable (field). Instead of exposing public variables, you should create class properties using property procedures. Property procedures enable you to execute code when a property is changed, to validate property values, and to dictate whether a property is read-only, write-only, or both readable and writable. Declaring a property procedure is similar to declaring a standard method procedure but with some important differences. The basic structure of a property procedure looks like this: private int privatevalue; public int propertyname { get { return privatevalue; // Code to return the property's value. } set { privatevalue = value; // Code that accepts a new value. } } The first word in the property declaration simply designates the scope of the property (usually public or private). Properties declared with public are available to code outside the class (they can be accessed by client code). If the application exposes its objects to other applications, public procedures will be visible outside of the application. Properties declared as private are available only to code within the class. Immediately following the scope identifier is the data type of property value. Next comes the property name. Type the following two statements into your class (between the two braces that define class clsMyClass: private int m_intHeight; public int Height { get { } set { } }After entering the statements, press Enter to commit them (see Figure 16.3). Figure 16.3. Property procedures have a unique format.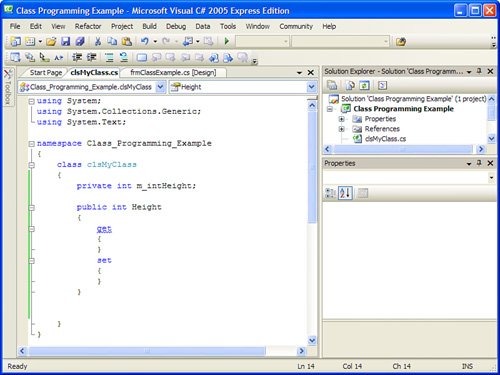 You might be wondering why you just created a module-level variable along with the property procedure. After all, I just finished preaching about the problems of using a module-level variable as a property. The reason is that a property has to get its value from somewhere, and a module-level variable is usually the best place to store it. The property procedure will act as a wrapper for this variable. Notice that the variable is declared as private rather than as public. This means that no code outside the class can view or modify the contents of this variable; as far as client code is concerned, this variable doesn't exist. Between the property declaration's opening and ending braces are two constructs: the get construct and a set construct. Each of these constructs is discussed in its own section. Creating Readable Properties Using the get ConstructThink of the get construct as a function (a method that returns a value); whatever you return as the result of the function becomes the property value. Add the following statement between the get brackets: return m_intHeight; All this statement does is return the value of the variable m_intHeight when client code requests the value of the Height property. Creating Writable Properties Using the set ConstructThe set construct is where you place code that accepts a new property value from client code. Add the following statement between the braces of the set portion of the property: m_intHeight = value; The set clause uses a special variable called value, which is provided automatically by Visual C# and always contains the value being passed to the property by the client code. The statement you just entered assigns the new value to the module-level variable. As you can see, the property procedure is a wrapper around the module-level variable. When the client code sets the property, the set construct stores the new value in the variable. When the client retrieves the value of the property, the get construct returns the value in the module-level variable. So far, the property procedure, with its get and set constructs, doesn't do anything differently from what it would do if you were to simply declare a public variable (only the property procedure requires more code). However, look at this variation of the same set construct: set { if (value >=10) m_intHeight = value; }This set construct restricts the client to setting the Height property to a value greater than or equal to 10. If a value less than 10 is passed to the property, the property procedure terminates without setting m_intHeight. You're not limited to just performing data validation; you can pretty much add whatever code you want and even call other procedures. Go ahead and add the verification statement to your procedure so that the set construct looks like this one. Your code should now look like the procedure shown in Figure 16.4. Figure 16.4. This is a property procedure, complete with data validation.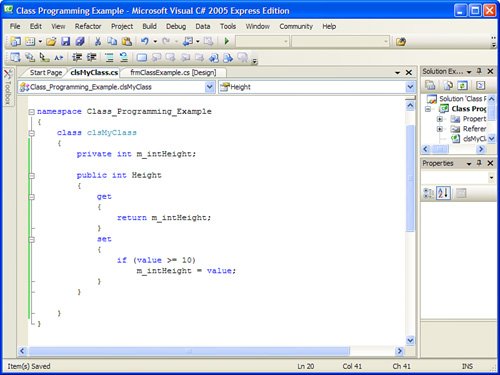 Creating Read-Only or Write-Only PropertiesThere will be times that you will want to create properties that can be read but not changed. Such properties are called read only properties. In the fictitious Dog object from Hour 3, I talked about creating a property called NumberOfLegs. With such an object, you might want to expose the property as read onlycode can get the number of legs, but cannot change it. To create a read only property, you simply leave out the set construct (the set statement and its braces) For example, if you wanted the property procedure you just created to define a read only procedure, you might declare it like this: public int Height { get { return m_intHeight; } }Did you Know? Although far more rare, it is possible to create a write only propertywhere the property can be set, but not read. To do so, you would specify a set construct but omit a get construct. Exposing Functions as MethodsUnlike a property that acts as an object attribute, a method is a function exposed by an object (you learned how to create methods in Hour 10). Create the following method in your class now. Enter this code on the line right below the class the variable declaration for m_intHeight: public long AddTwoNumbers(int intNumber1, int intNumber2) { return intNumber1 + intNumber2; }Recall that methods defined with a data type return values, whereas methods defined with void don't. To make a method private to the class and therefore invisible to client code, declare the method as private rather than public. |
EAN: 2147483647
Pages: 248