Defining and Writing Methods
| After you've created the classes in which to store your code (in this case, we're using an existing class), you can begin writing methods. A method is a discrete set of code that can be called from other code. Methods are much like events, but rather than being executed by a user interacting with a form or control, methods are executed when called by a code statement. There are two types of procedures in Visual C#:
There are many reasons to create a method that returns a value. For example, a method can return true or false depending on whether it was successful in completing its task. You could also write a method that accepts certain parameters (data passed to the method, in contrast to data returned by the method) and returns a value based on those parameters. For instance, you could write a method that enables you to pass it a sentence, and in return it passes back the number of spaces within the sentence. The possibilities are limited only by your imagination. Just keep in mind that a method doesn't have to return a value. Declaring Methods That Don't Return ValuesTo create a method, you first declare it within a class. In your new class, position the cursor to where the arrow appears in Figure 10.1 (position it right next to the brace, on the right side), press Enter to create a new line, and then enter the following three code statements: private void OpenPicture() { }You've just created a new method (see Figure 10.2). Figure 10.2. The curly braces denote the beginning and ending of the method's code.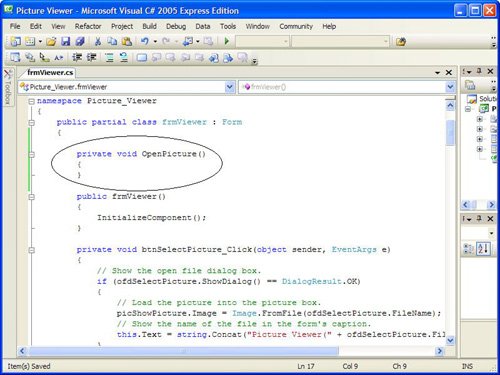 The declaration of a method (the statement used to define a method) has a number of parts. The first word, private, is a keyword (that is, a word with a special meaning in Visual C#). The keyword private defines the scope of this method (scope is discussed in detail in Hour 11, "Using Constants, Data Types, Variables, and Arrays"), designating that the method can be called from code contained in the current class only. You can use the keyword public in place of private to allow access to the method by code that resides in other classes. Because we're going to be calling this code from the Picture Viewer form only, we make the procedure private. The word void is another Visual C# keyword. The void keyword is used to declare a method that doesn't return a value. Later in this hour, you will learn how to create methods that return values. The third word, OpenPicture, is the name of the method and can be just about any string of text you want it to be. Note, however, that you can't assign a name that's a keyword, nor can you use spaces within a name. In the example you're building, the procedure performs the same function as the Open Picture menu item and the Open Picture Toolstrip button, hence the name. You should always give procedures strong names that reflect their purpose. You can have two procedures with the same name only if they have different scope (again, scope is discussed in Hour 11). Did you Know? Some programmers prefer the readability of spaces in names, but in many instances, such as when naming methods, spaces can't be used. A common technique is to use an underscore (_) in place of a space, such as in Open_Picture, but I recommend that you just use mixed case, as you have in this example. Immediately following the name of the method is a set of parentheses. Within these parentheses you can define parametersdata to be passed to the method by the calling program. In this example, there is no need to pass any data to the method, so you've left the parenthesis empty. As you will see later on, you can create methods that accept data passed to them, in addition to being able to return a result. By the Way You have to supply parentheses, regardless of whether or not a method accepts any parameters. Add the following code to your OpenPicture() method: // Show the open file dialog box. if (ofdSelectPicture.ShowDialog() == DialogResult.OK) { // Load the picture into the picture box. picShowPicture.Image = Image.FromFile(ofdSelectPicture.FileName); // Show the name of the file in the form's caption. this.Text = string.Concat("Picture Viewer(" + ofdSelectPicture.FileName + ")"); // Show the name of the file in the status bar. sbrMyStatusStrip.Items[0].Text = ofdSelectPicture.FileName; }Notice that this code is identical to the code you entered in the Open Picture button, menu item, and Toolstrip button from previous hours. You've already entered this code (or a variation of it) in three places, why another? Earlier, I alluded to the idea that having duplicate code isn't optimal and that we'd be addressing it. Whenever you find yourself duplicating code, you should immediately realize that the duplicated code should be placed in a procedure. Then, rather than have the code duplicated, you can just call the procedure as needed. This has a number of advantages, including
If you are paying close attention, you might have noticed that I snuck an additional statement in the OpenPicture() method (the last statement in the listing). As promised in Hour 9, this statement displays the file name of the opened picture in the status bar. You're now going to create a procedure to draw the border around the picture box. Position your cursor after the ending curly brace for the OpenPicture() method (see Figure 10.3), press Enter, and then enter the following code: private void DrawBorder(PictureBox objPicturebox) { Graphics objGraphics = null; objGraphics = this.CreateGraphics(); objGraphics.Clear(SystemColors.Control); objGraphics.DrawRectangle(Pens.Blue, objPicturebox.Left - 1, objPicturebox.Top - 1, objPicturebox.Width + 1, objPicturebox.Height + 1); objGraphics.Dispose(); }Figure 10.3. Start your new procedure where the arrow is pointing.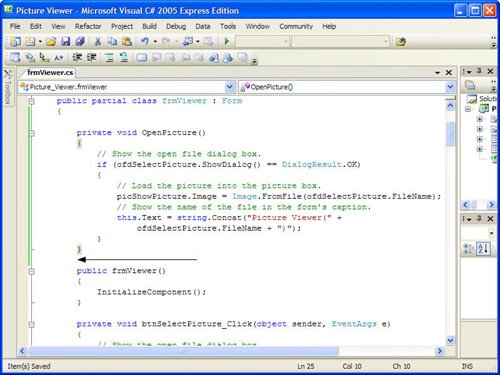 A few things introduced in this procedure may look new to you. The first is that there is text within the parentheses of the procedure declaration. I mentioned earlier that this is where you can define parameters. Parameters are data passed into the procedure, as opposed to a value returned by the procedure. Parameters are defined much like variables (I'll cover the specifics in Hour 11), but for now I just want you to get the following concept: Code that calls this method will pass into it a reference to a picture box object. The method will then be able to work with the referenced picture box just as though it were manipulating the picture box directly. Since this method exists in the form, it's not really necessary to pass a reference to the picture box, but I want you to see how this works. The objPicturebox parameter is used throughout the procedure in place of a hard-coded reference to the picture box object on your form. Because this new procedure accepts a reference to a picture box by way of a parameter, the procedure can work with any picture box on the formthe calling code simply has to pass a reference to the picture box in question, and the border will be drawn around it. Your form class should now look like Figure 10.4. Figure 10.4. Each method exists as a single entity, just like event procedures.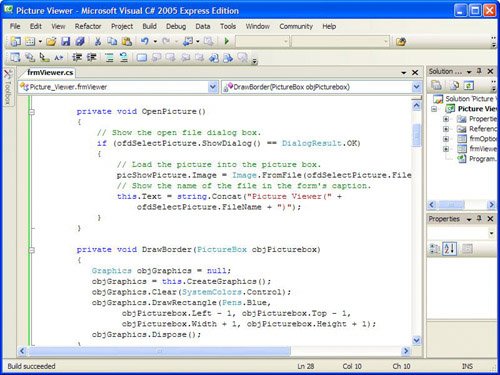 Declaring Procedures That Return ValuesThe procedure you've just created doesn't return a value. You're now going to declare a method that returns a value. Here's the general syntax of a method that returns a value declaration: scope datatype functionname(parameters) You'll notice one key difference between declaring a method that doesn't return a value and declaring one that does, and that is that you specify a data type instead of using the keyword void. Data types are discussed in detail in Hour 11, so it's not important that you understand them now. It is important, however, that you understand what's happening. The data type entered after the scope identifier denotes the type of data returned by the method. You're not going to create a method in your project at this time, but consider the following example: private int ComputeLength(string strText) { return strText.Length; }There are two things to note here:
Methods that return values are defined much like methods that don't return values, with the exceptions that you specify a return data type instead of void, and you use a return statement to pass back a value as the result of the method call. By remembering these key differences, you should have little trouble creating one over the other as circumstances dictate. |
EAN: 2147483647
Pages: 248