Building Menus
Building Menus
When I said that C# makes building menus easier than ever, I wasn't kidding. Building menus is now an immediately gratifying process. I can't stress enough how important it is to have good menus, and now that it's so easy to do, there is no excuse for not putting menus in an application.
| | When running an application for the first time, users often scan the menus before opening a manual. (Most users never open the manual!) When you provide comprehensive menus, you make your program easier to learn and use. |
Adding Menu Items
Adding menus to a form is accomplished by way of a control: the Main Menu control. The Main Menu control is a bit odd in that it's the only control I know of that sits at the bottom of the form in the space reserved for controls without an interface (like a Timer control), yet actually has a visible interface on the form. Start by creating a new Windows Application project named Menus and More.
-
Change the name of the default form to fclsMenusAndMore, set its Text to Menus and More, and change the Main entry point of the project to reference fclsMenusAndMore instead of Form1.
-
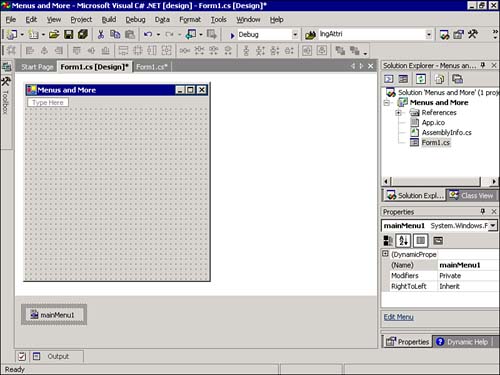
Next , add a new Main Menu control to your form by double-clicking the MainMenu item in the toolbox. As you can see, the control is added to the pane at the bottom of the form designer. Take a look at the top of the formyou'll see the text Type Here (see Figure 9.1).
Figure 9.1. A menu has no items when first added to a form.
-
Click this text and type &File. As you begin typing, C# displays two new boxes that say Type Here (see Figure 9.2).
Figure 9.2. Creating a menu item automatically prepares the control for more items.
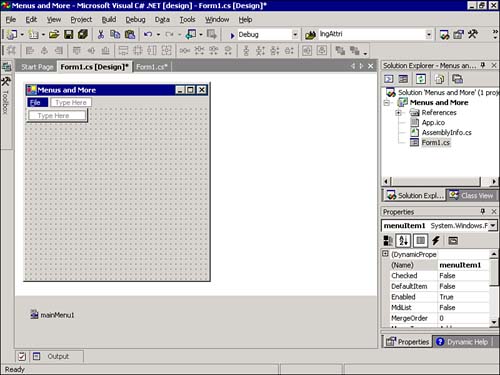
Notice the Properties window (if it's not visible, press F4 to show it). The text you just entered created a new menu item. Each menu item is an object; therefore, the item has properties. (You may have to press Tab to commit your entry and then click the text you typed once more to see its properties.)MenuItem1 isn't very descriptive, so change the name of the item to mnuFileMenu.

You may have been wondering why I had you enter the ampersand (&) in front of the word File. Take a look at your menu now, and you'll see that C# doesn't display the ampersand; instead, it displays the text with the F underlined , as in File. The ampersand, when used in the Text property of a menu item, tells C# to underline the character immediately following it. For top-level menu items, such as the File item you just created, this underlined character is known as an accelerator key. Pressing Alt+ an accelerator key opens the menu as if the user had clicked it. You should avoid assigning the same accelerator key to more than one top-level menu item on a given menu. When the menu item appears on a drop-down menu, in contrast to being a top-level item, the underlined character is called a hotkey. When a menu is visible (open), the user can press a hotkey to trigger the corresponding menu item the same as if it was clicked. Again, don't use the same hotkey for more than one item on the same menu. -
Click the Type Here text that appears to the immediate right of the File item and enter the text &Help. C# gives you two more Type Here items, the same as when you entered the File item. Adding new menu items is a matter of clicking a Type Here box and entering the text for an item.
-
Press Tab to commit your entry and then click the text you typed once more to select it. Change the name of your new menu item in the Properties window to mnuHelpMenu.

If you click a Type Here box below an existing menu item, you'll add a new item to the same menu as the item above the box. If you click the Type Here box to the right of a menu item, you'll create a submenu using the menu to the left of the box as the entry point for the submenu. As you've already seen, clicking the Type Here box along the top of the menu bar creates a top-level menu.
-
Click once more on the File item to display a Type Here box below the item. Click this box and enter the text &Quit.
-
Press Tab to commit your entry and then click the new item once more to select it. Change the name of the new item to mnuQuit. Now is a good time to save your work, so click Save All on the toolbar.
Moving and Deleting Menu Items
Deleting and moving menu items are even easier processes than adding new items. To delete a menu item, right-click it and choose Delete from the context menu that appears. To move an item, drag it from its current location and drop it in the location in which you want it placed.
Creating Checked Menu Items
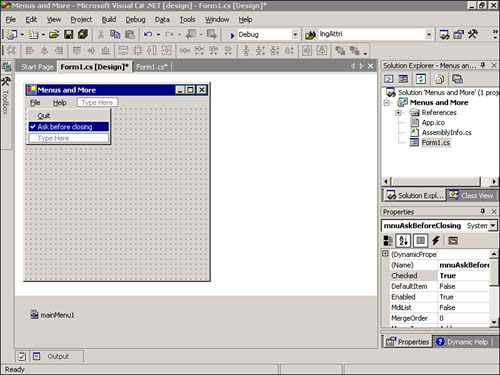
A menu item that isn't used to open a submenu can display a check mark next to its text. Check marks are used to create menu items that have statethe item is either selected or it is not selected. You're now going to create a checked menu item. Click the Type Here box below the Quit menu item and enter Ask before closing and then change the name of this new item (remember to press Tab to commit your entry and then click the item again to select it) to mnuAskBeforeClosing. Next, change the Checked property of the new item to true. Notice that the menu item now has a check mark next to it (see Figure 9.3).
Figure 9.3. Menu items can be used to indicate state.
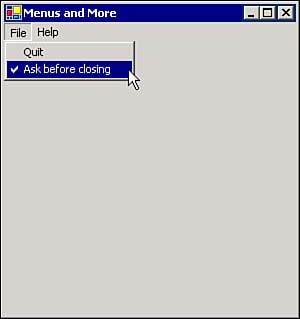
Press F5 to run the project. The menu will appear on your form, just as you designed it (see Figure 9.4). Click the File menu to open it and then click Quit; nothing happens. In the next section, I'll show you how to add code to menu items to make them actually do something. Stop the project before continuing.
Figure 9.4. What you see (at design time) is what you get (at runtime).
| Top |
EAN: 2147483647
Pages: 253