Creating Hierarchical Lists with the Tree View
The Tree View control is used to present hierarchical data. Perhaps the most commonly used Tree View control is found in Explorer, where you can use the Tree View to navigate the folders and drives on your computer. The Tree View is perfect for displaying hierarchical data, such as a departmental display of employees . In this section, I'll teach you the basics of the Tree View control so that you can use this great interface element in your applications.
The Tree View's items are contained in a Nodes collection. To add items to the tree, you append them to the Nodes collection. As you can probably see by now, after you understand the basics of objects and collections, you can apply that knowledge to almost everything in C#. For instance, the skills you learned in working with the Items collection of the List View control are similar to the skills needed for working with the Nodes collection of the Tree View control.
Add a Tree View control to your form now by double-clicking the TreeView item in the toolbox. Set the Tree View control's properties as follows :
| Property | Value |
|---|---|
| Name | tvwLanguages |
| ImageList | imgMyImages |
| Location | 8,128 |
| Size | 272,97 |
Adding Nodes to a Tree View
To add a node, call the Add method of the Nodes collection. Add a new button to your form and set its properties as follows:
| Property | Value |
|---|---|
| Name | btnAddNode |
| Location | 8,240 |
| Size | 75,23 |
| Text | Add Node |
Double-click the button to access its Click event and enter the following code:
tvwLanguages.Nodes.Add("Sam Chun"); tvwLanguages.Nodes.Add("C#"); Press F5 to run the project, and then click the button. Two nodes will appear in the tree, one for each Add method call (see Figure 8.8).
Figure 8.8. Nodes are the items that appear in a tree.
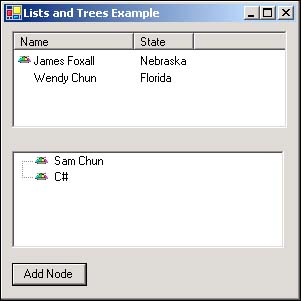
Notice how both nodes appear at the same level in the hierarchy; neither node is a parent or child of the other. If all your nodes are going to be at the same level in the hierarchy, you should consider using a List View instead, because what you're creating is simply a list.
Stop the project and return to the button's Click event. Any given node can be both a parent to other nodes and a child of a single node. For this to work, each node has its own Nodes collection. This can get confusing, but if you realize that children nodes belong to the parent node, it starts to make sense (but it still gets confusing in practice). You're now going to create a new button that adds the same two nodes as before but makes the second node a child of the first. Create a new button and set its properties as shown:
| Property | Value |
|---|---|
| Name | btnCreateChild |
| Location | 96,240 |
| Size | 80,23 |
| Text | Create Child |
Double-click the new button to access its Click event and add the following code:
TreeNode objNode; objNode = tvwLanguages.Nodes.Add("Wendy Chun"); objNode.Nodes.Add("C#"); This code is similar to what you created in the List View example. The Add method of the Nodes collection returns a reference to the newly created node. Thus, this code creates a variable of type TreeNode ( variables are discussed in detail in Hour 12), creates a new node whose reference is placed in the variable, and then adds a new node to the Nodes collection of the first node. To see the effect that this has, press F5 to run the project and click the new button. You'll see a single item in the list, with a plus sign to the left of it. This plus sign indicates that child nodes exist. Click the plus sign, and the node is expanded to show its children (see Figure 8.9).
Figure 8.9. You can create as deep a hierarchy as you need.
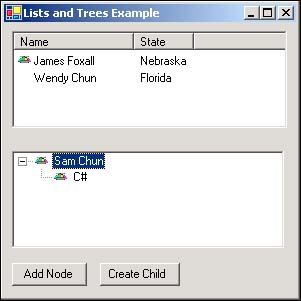
This example is a simple one ”a single parent node having a single child node. However, the principles used here are the same as those used to build complex trees with dozens or hundreds of nodes.
Removing Nodes
Removing a node is simply a matter of calling the Remove method of the Nodes collection. The Remove method accepts and expects a valid node, so you must know which node to remove. Again, the Nodes collection works very much like the Items collection in the List View control, so the same ideas apply. For example, the currently selected node is returned in the SelectedNode property of the Tree View. So, to remove the currently selected node, you could use this statement:
tvwLanguages.Nodes.Remove(tvwLanguages.SelectedNode);
If this statement is called when no node is selected, an error would occur. In Hour 12, you'll learn all about data types and equalities, but here's a preview: If an object variable doesn't reference an object, it is equivalent to the C# keyword null. Knowing this, you could validate whether an item is selected with a little bit of logic, like this:
if (!(tvwLanguages.SelectedNode == null)) tvwLanguages.Nodes.Remove(tvwLanguages.SelectedNode);
 | Removing a parent node causes all its children to be removed as well. |
Clearing All Nodes
To clear all nodes in a Tree View, invoke the Clear method of the Nodes collection, like this:
tvwLanguages.Nodes.Clear();
As with the List View, I've only scratched the surface of the Tree View. Spend some time becoming familiar with the basics of the Tree View, as I've shown here, and then dig a bit deeper to discover the not-so-obvious power and flexibility of this control.
| Top |
EAN: 2147483647
Pages: 253