Creating Buttons
Creating Buttons
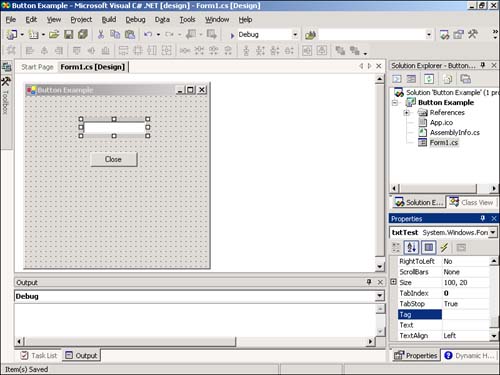
Every dialog box that Windows displays has at least one button on it. Buttons enable a user to invoke a function with a click of the mouse. Create a new project named Button Example, change the name of the default form to fclsButtonExample, set the form's Text property to Button Example, and update the entry point Main() to reference fclsButtonExample instead of Form1. Next , add a new button to the form by double-clicking the Button item in the toolbox. Set the button's properties as follows :
| Property | Value |
|---|---|
| Name | btnClose |
| Location | 104,90 |
| Text | Close |
Add a new text box to the form and set its properties as follows:
| Property | Value |
|---|---|
| Name | txtTest |
| Location | 92,40 |
| TabIndex | |
| Text | (make blank) |
You're probably starting to see a pattern here. Whenever you add a new control to a form, the first thing you should do is give the control a descriptive name. If the control has a Text property, you should also change that to something meaningful. Your form should now look like Figure 7.8.
Figure 7.8. Users click buttons, such as the Close button, to make things happen.
There's no point in having a button that doesn't do anything, so double-click the button now to access its Click event, and then add the following statement:
this.Close();
Recall from Hour 5, "Building FormsPart I," that this statement closes the current form. Because you'll have only one form in the project, this has the effect of terminating the application. Press F5 to run the project. The cursor appears in the text box, which means that the text box has the focus (it has the lowest TabIndex property). Press Enter and note that nothing happens (this will make sense shortly). Next, click the button and the form will close.
Accept and Cancel Buttons
When creating dialog boxes, it's common to assign one button as the default button (called the Accept button). If a form has an Accept button, that button's Click event is fired when the user presses Enter, regardless of which control has the focus. This is great for dialog boxes in which the user enters some text and presses Enter to commit the data and close the form. To designate a button as an Accept button, use the following steps:
-
Select the AcceptButton property of the form.
-
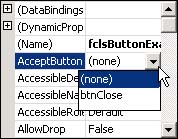
Look at the AcceptButton property of your form nowit reads (none). Click the property to select it and a drop-down arrow appears.
-
Click the down arrow and you'll get a list of the buttons on the form (see Figure 7.9). Choose btnClose to make it the Accept button. Notice how the button now appears with a dark border, indicating that it is the Accept button.
Figure 7.9. You can designate only one button as a form's Accept button.
-
Press F5 to run the project. Again, the text box has the focus. Press Enter, and you'll find that the form closes. Again, pressing Enter on a form that has a designated Accept button causes that button's Click event to fire the same as if the user clicked it with the mouse, regardless of which control has the focus.
The Accept button is a useful concept, and you should take advantage of this functionality when possible. Keep in mind that when you do create an Accept button for a form, you should also create a Cancel button. A Cancel button is a button that fires its Click event when the user presses the Esc key, regardless of which control has the focus. Generally, you place code in a Cancel button to shut down the form without committing any changes made by the user. To designate a button as a Cancel button, choose it as the CancelButton property of the form.
Adding a Picture to a Button
Although it's not standard practice, and you shouldn't overuse the technique because doing so causes clutter and can reduce the usefulness of your interface, it's possible to add a picture to a button. The two primary methods of doing this are to add the picture to the button at design time by loading a picture into the Image property of the control using the Properties window, or to bind the button to an image list. I'll discuss loading a picture using the Properties window here and the Image List control in the next hour. (Note: You can load an image at runtime using the technique discussed for the Picture Viewer program in Hour 1, "A C# Programming Tour.")
 | To perform this operation, you'll need a small bitmap. I've provided one at www.samspublishing.com called Close.bmp. |
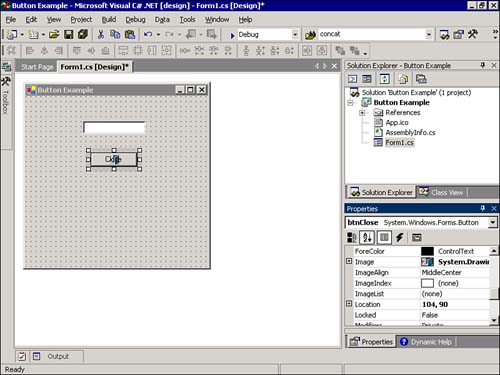
Select the button and display its properties in the Properties window. Click the Image property to select it, and then click the button with the three dots. The Open File dialog box is displayed, allowing you to find and select a bitmap. Use this dialog box to locate and select the Close.bmp bitmap or another small bitmap of your choosing. Click Open to load the image into the button's Image property, and the picture will appear on your button (see Figure 7.10).
Figure 7.10. The picture loaded into the Image property of a button appears on the button.
| | Many controls have an Image property, and for the most part, they all work the same way as the Image property of the Button control. |
Notice that there is a problem with how the picture appears on the buttonthe image overlays the text. This problem is easily corrected.
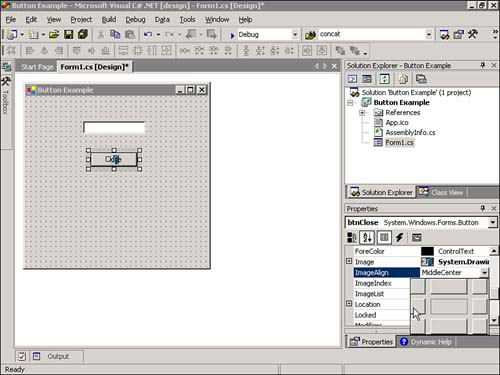
Although a picture is displayed in the center of a button by default, you can specify the placement using the ImageAlign property. Click the ImageAlign property to display a drop-down arrow, and then click the arrow. The drop-down list contains a special interface for specifying the alignment of the picture (see Figure 7.11). Each rectangle in the drop-down list corresponds to an alignment (center-left, center-center, center-right, and so on) Click the center-left rectangle now and the image will be moved to the left of the text. So much for problem one
Figure 7.11. Click a rectangle to move the picture to the corresponding alignment.
| Top |
EAN: 2147483647
Pages: 253
- Integration Strategies and Tactics for Information Technology Governance
- An Emerging Strategy for E-Business IT Governance
- Linking the IT Balanced Scorecard to the Business Objectives at a Major Canadian Financial Group
- Measuring and Managing E-Business Initiatives Through the Balanced Scorecard
- Governance Structures for IT in the Health Care Industry