Creating a Custom Setup Program
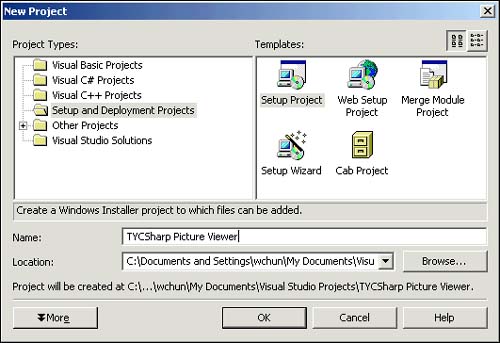
A custom setup program (the program the user runs to install a program) is the result of building a special type of project in C#. Throughout most of this book, you've created projects of the type Windows Application. To create a custom setup program, you start with a different type of project. Start Visual Studio and choose to create a new project now. On the New Project dialog box, click the Setup and Deployment Projects item to display its contents, and then click Setup Project (see Figure 22.1). This is the project type to use when you distribute Windows Applications; use the Web Setup Project item when distributing Web projects. Enter the name TYCSharp Picture Viewer and click OK to create the project.
Figure 22.1. Create a Setup Project to distribute Windows Applications.
 | The name you give your Setup Project is the name that will appear in the setup wizard when the user installs your program. Unfortunately, the name you use for this project can't be the same as the one you used for the project whose output you are distributing (for reasons you'll learn shortly). This is why I had you put TYCSharp (for Teach Yourself C#) in the project name. |
The interface for a Setup Project consists primarily of two panes. The pane on the left side represents the file system of the target machine (the computer on which the software is being installed).
The pane on the right shows the contents of the selected item in the left pane (see Figure 22.2). You really can do a lot when creating custom setup programs, but as you'll see, accessing the features to modify your setup program isn't all that intuitive.
Figure 22.2. The interface for creating a setup program isn't intuitive.

Adding the Output of a Project
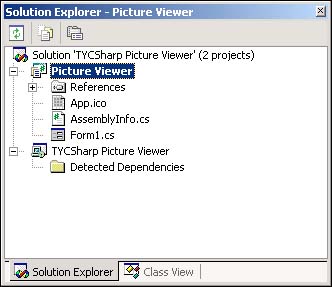
At this point, the setup program doesn't install anything; you need to add the output of another project. For the purposes of creating a setup program, the final file (EXE, DLL, and so on) produced in building a C# project is called the output of the project. The setup program is used to install the output of a project on the user's computer. The first step to including a project's output is to add the project to the setup program project. Because you're creating a setup program for the Picture Viewer you created in Hour 1, you need to add the Picture Viewer project to the current solution.
Add the project to the solution now by right-clicking the solution name in the Solution Explorer window and then choosing Existing Project from the Add menu. Use the Add Existing Project dialog box to locate your Picture Viewer project and add it to the current solution. The Picture Viewer project should now appear in the Solution Explorer (see Figure 22.3).
Figure 22.3. To distribute the output of a project, the project must be part of the solution.
Now that the Picture Viewer project is part of the solution, you have to tell the setup program to install the output of the Picture Viewer project. This is where things get a bit odd because the Project menu changes according to what project you have selected in the Project Explorer. What you're going to do next is have the Setup Project install the final executable of your Picture Viewer project.
-
Click the TYCSharp Picture Viewer project in the Solution Explorer before continuing. If you don't do this, you won't find the appropriate menu items when you open the Project menu.
-
Open the Project menu and then open the Add submenu.
-
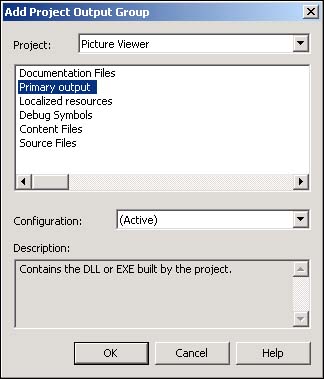
Choose Project Output to display the Add Project Output Group dialog box that appears in Figure 22.4. Make sure that the project selected is Picture Viewer and that Primary Output is selected as well.
Figure 22.4. Choosing Primary Output ensures that the distributable file of the project is installed on the user's machine.
-
Click OK to commit your selections.
-
Next, click the Application Folder in the left pane to view its contents. Notice that it now contains the primary output from the Picture Viewer project. This means that the EXE built by the Picture Viewer project will be installed in whatever folder the user designates as the application folder.
Changing the Installation Location of a File
You have complete control over where on the user's computer a file is installed. Most program files (such as the output of the Picture Viewer project) are installed in an application folder. The Application Folder has the following path by default:
[ProgramFilesFolder][\Manufacturer][\ProductName]
Users can change this when they run your setup program. However, you might want to change the default folder as well, which is what you'll do next.
Right-click the Application Folder in the left pane and choose Properties Window from its Context menu. In the Properties Window, notice that the DefaultLocation property contains the information that defines the default installation location. The items in brackets are tokens that get replaced when the user is running the setup program. The Manufacturer token pulls its value from the company name you entered when you installed C#. Go ahead and change the DefaultLocation property to the following:
[ProgramFilesFolder]\[ProductName]
This new property value eliminates one folder in the final path.
Specifying the Build Options of a Project's Output
At this point, the setup program installs the final output of the Picture Viewer program, which is an EXE. However, you have more control over the output of a project than just the file type. For example, you can specify the icon assigned to the EXE file. Right-click the Picture Viewer project in the Solution Explorer and choose Properties from its context menu to display the Picture Viewer Property Pages dialog box. Next, click General in the list on the left to display the General options for the project (see Figure 22.5).
Figure 22.5. Use this dialog box to tailor the output of a project.
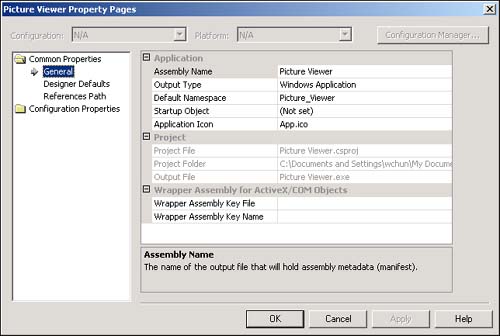
The icon specified appears wherever a shortcut is created for your program. The default icon assigned to executables isn't all that attractive (and even less meaningful), so I recommend that you assign a custom icon. Go ahead and click the Application Icon item to select it, and then click the Build button ( ... ) that appears to the right of the Application Icon. Select the same icon that you used for the Picture Viewer's form.
Adding a File to the Install
You aren't limited to installing the output of a project; you can install any file that you choose. For example, you might want to include sample data or support files with your program. You're now going to install a bitmap with your application so that the user has something to view. Again, select the TYCSharp Picture Viewer project in the Solution Explorer or you won't have the appropriate items on the Project menu. Next, add a file by opening the Project menu and then choosing File from the submenu. Locate a BMP or JPG on your system, click it to select it, and then click Open to add the file to the install project.
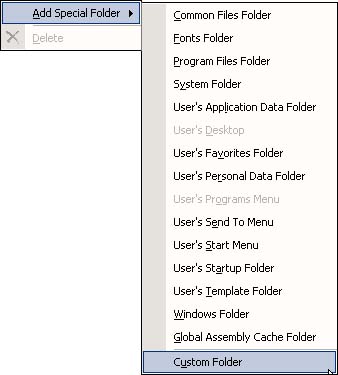
Adding a Custom Folder to the Install
The pane on the left lists folders that correspond to folders on the user's computer. You can add other folders to this list. These folders may already exist on the user's computer (such as the user's Favorites folder) or may be a brand-new folder that your install creates. Add a new folder to the install now by right-clicking the File System on Target Machine item in the left pane (the first item) and choosing Add Special Folder from its context menu. As you can see, you can select from a number of folders that already exist on the user's computer. Now, however, you're going to create a custom folder:
-
Choose Custom Folder (see Figure 22.6). The new folder is added to the left pane.
Figure 22.6. It's easy to select existing folders or create new ones.
-
Change the name of the new folder to Pictures.
-
Click Application Folder again. Notice that the BMP file you selected for installation appears in the Application Folder.
-
Drag the bitmap to the Pictures folder you just created. Now, when the picture is installed, it will be installed in the Pictures folder.
Creating a Shortcut on the Start Menu
The Setup Project doesn't automatically create shortcuts for your applicationyou have to create these yourself. Most applications create a shortcut in the Programs folder on the Start menu (or in a subfolder of the Project folder). You're going to create a shortcut for the Picture Viewer program. This shortcut will be placed in the Programs folder on the Start menu.
Click the Application Folder to view its contents. Right-click the Primary Output from Picture Viewer item and choose Create Shortcut to Primary Output from Picture Viewer. C# creates the shortcut item and places it in the Application Folder. Drag the shortcut to the User's Programs Menu item in the left pane. Now, when the user installs your program, a shortcut will be placed in the Programs folder on the user's Start menu.
| | Apparently, an issue with .NET prohibits the user from moving the shortcuts for .NET applications after they're installed. Hopefully, Microsoft will eventually correct this. As it stands, however, if the user moves the shortcuts, Windows will move them back. For this reason alone, you should pick a good name for your folder. |
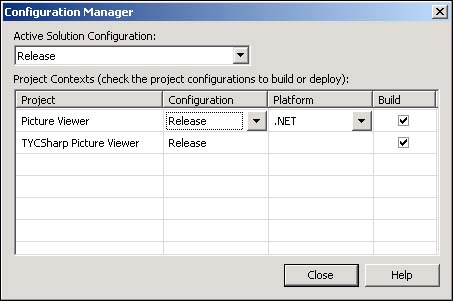
Defining the Build Configuration for the Setup Program
When you create a setup program, you can choose to include debug information. This information allows you to perform advanced debugging using techniques beyond the scope of this book. When distributing to other machines, you may want to leave out this debugging information and instead create a Release build. Release builds are smaller and faster than Debug builds. Change your installation to a Release build by choosing Configuration Manager from the Build menu and selecting Release from the drop-down list (see Figure 22.7). Click Close to save your changes.
Figure 22.7. Release builds are smaller and faster than Debug builds.
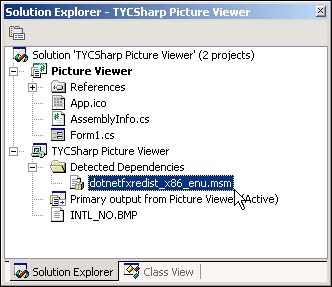
Installing the Common Language Runtime (CLR)
The Common Language Runtime (discussed in detail in Hour 24, "The 10,000-Foot View") allows any Visual Studio .NET language (C#, Visual Basic .NET, and so on) to run on a computer. For a user to run your C# application, the Common Language Runtime (CLR) must exist on the user's computer. By default, your new setup program contains the CLR; therefore, the CLR will be installed when your application is installed (if the current version of the CLR isn't already installed on the user's computer). If you know for a fact that your end user already has the CLR installed (such as when distributing an update to your application), you can omit the CLR from your installationcreating a much smaller installation file (14MB smaller in my tests). The CLR is listed in your Solution Explorer as dotnetfxredist_x86_enu.msm (see Figure 22.8). To remove the CLR from your installation, right-click the item and choose Exclude from its context menu.
Figure 22.8. The CLR looks like this in the Solution Explorer.
Building the Setup Program
That's it, you're done! All you have left is to actually build the program. Choose Build Solution from the Build menu to create the distributable file. As Visual Studio is building the file, a small animation appears in the status bar. This is because it can take some time to build a file, especially for large solutions compiling on slower machines with minimum RAM. When Visual Studio is done building the setup program, the status bar will read Build Succeeded. The setup program can be found in the Release subfolder of the TYCSharp Picture Viewer project folder. The file has the extension of MSI, which indicates that the file is a Windows Installer Package.
| Top |
EAN: 2147483647
Pages: 253