Creating Custom Dialog Boxes
Most of the time, the MessageBox.Show() method should be a sufficient means to display messages to a user . At times, however, the MessageBox.Show() method is too limited for a given purpose. For example, suppose you wanted to display a lot of text and therefore wanted a message box that was sizable by the user.
Custom dialog boxes are nothing more than standard modal forms with one notable exception: one or more buttons are designated to return a dialog result, the same as the buttons on a message box shown with the MessageBox.Show() method.
You're now going to create a custom dialog box. Create a new Windows Application titled Custom Dialog Example. Change the name of the default form to fclsMain, set its Text property to Custom Dialog Box Example, and set the Main() entry point of the project to reference fclsMain rather than Form1. Add a new button to the form and set its properties as follows :
| Property | Value |
|---|---|
| Name | btnShowCustomDialogBox |
| Location | 72,180 |
| Size | 152,23 |
| Text | Show Custom Dialog Box |
Next, you're going to create the custom dialog box. Add a new form to the project by choosing Add Windows Form from the Project menu. Save the new form with the name fclsCustomDialogBox.cs. Change the Text property of the new form to This is a custom dialog box. Add a new text box to the form and set its properties as follows:
| Property | Value |
|---|---|
| Name | txtCustomMessage |
| Location | 8,8 |
| Locked | true |
| Multiline | true |
| Size | 276,224 |
| Text | Custom message goes here |
For a custom dialog box to return a result like a standard message box does, it must have buttons that are designated to return a dialog result. This is accomplished by setting the DialogResult property of a button (see Figure 18.6).
Figure 18.6. The DialogResult property determines the return value of the button.

Add a new button to the form and set its properties as shown in the following table. This button will act as the custom dialog box's Cancel button.
| Property | Value |
|---|---|
| Name | btnCancel |
| DialogResult | Cancel |
| Location | 128,240 |
| Size | 75,23 |
| Text | Cancel |
Last, you need to create an OK button for the custom dialog box. Create another button and set its properties as shown in the following table:
| Property | Value |
|---|---|
| Name | btnOK |
| DialogResult | OK |
| Location | 208,240 |
| Size | 75,23 |
| Text | OK |
Specifying a dialog result for one or more buttons is the first step in making a form a custom dialog box. The second part of the process is in how the form is shown. As you learned in Hour 5, "Building Forms ”Part I," forms are displayed by calling the Show method of the form or setting its visible property to true. However, to show a form as a custom dialog box, you call the ShowDialog method instead. When a form is displayed using ShowDialog, the following occurs:
-
The form is shown modally.
-
If the user clicks a button that has its DialogResult property set to return a value, the form is immediately closed and that value is returned as the result of the ShowDialog method call.
Notice how you don't have to write code to close the form; clicking a button with a dialog result closes the form automatically. This simplifies the process of creating custom dialog boxes. Return to the first form in the form designer by clicking the Form1.cs [Design] tab.
Double-click the button you created and add the following code:
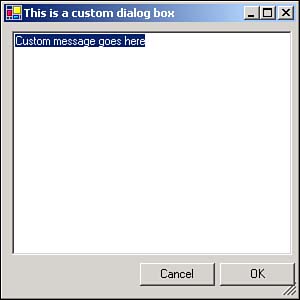
fclsCustomDialogBox objCustomDialogBox = new fclsCustomDialogBox(); if (objCustomDialogBox.ShowDialog() == DialogResult.OK) MessageBox.Show("You clicked OK."); else MessageBox.Show("You clicked Cancel."); objCustomDialogBox = null; Press F5 to run the project, click the button to display your custom dialog box (see Figure 18.7), and then click one of the available dialog box buttons. When you're satisfied the project is working correctly, stop the project and save your work.
Figure 18.7. The ShowDialog method enables you to create custom message boxes.
 | If you click the Close (X) button in the upper-right corner of the form, the form is closed and the code behaves as if you've clicked Cancel; the else code occurs. |
The capability to create custom dialog boxes is a powerful feature. Usually, a call to MessageBox.Show() will suffice, but when you need more control over the appearance and contents of a message box, creating a custom dialog box is the way to go.
| Top |
EAN: 2147483647
Pages: 253
- The Second Wave ERP Market: An Australian Viewpoint
- Distributed Data Warehouse for Geo-spatial Services
- A Hybrid Clustering Technique to Improve Patient Data Quality
- Relevance and Micro-Relevance for the Professional as Determinants of IT-Diffusion and IT-Use in Healthcare
- Development of Interactive Web Sites to Enhance Police/Community Relations