Section 10.3. Configuring Windows and MOM for SNMP
10.3. Configuring Windows and MOM for SNMPTo get SNMP data into and out of MOM, you have to touch the OS, MOM, and the SNMP devices that you want to receive traps from. If you are going to translate alerts into traps, then you need to configure the SNMP service on the management server to send traps to your other SNMP management system. SNMP management systems and agents are related to each other by an SNMP community name, which is a simple text string and can be anything you want. Be careful though, because text strings are case-sensitive. If you have worked with SNMP, then you will have heard of the private and public SNMP communities. Many SNMP products come preconfigured to work with these two community names . In the example for this chapter, the community name Homelab is used. All SNMP agents need to be told which community they are members of and SNMP management consoles will only manage SNMP agents that are in their community (although they can receive traps from any SNMP agent if so configured). So, your first two steps in configuring SNMP are to pick a community name and a computer to which all traps will be sent. Figure 10-1 shows the top-tier management server, homemomserver3, at 10.0.0.64. With those two decisions out of the way, most of the work in preparing for SNMP is in the OS. The first step is to install the SNMP service and the WMI SNMP provider's Windows OS components. To do this, open the Add or Remove Programs utility and select the Add/Remove Windows Components. This opens the Windows Components page (see Figure 10-2). Figure 10-2. The top-level Windows Components page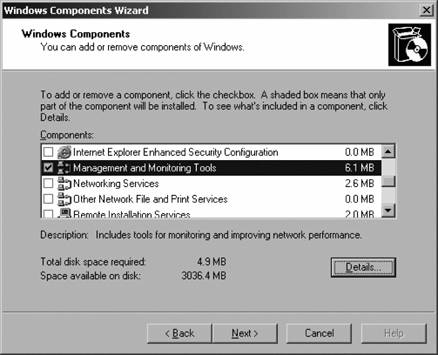 Here you select the Management and Monitoring Tools option and click the Details button. This brings up all the tools that are under the Management and Monitoring Tools heading (see Figure 10-3). Here you select the Simple Network Management Protocol and the WMI SNMP Provider. Click OK to close the Details dialog, and click Next on the Components page to finish the component install wizard. If the install directory (i386) is not available to the local machine via network share or on the hard drive, you will be prompted to supply the OS source media. Now you need to configure the SNMP service and the SNMP Trap service. On the management server, open the Computer Management tool Figure 10-3. Select the SNMP components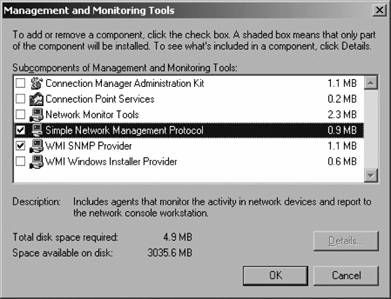 Figure 10-4. The Agent configuration tab of the SNMP service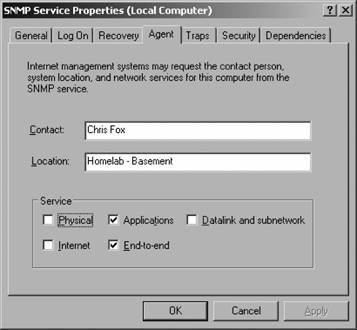 The Contact and Location data are optional, but in a widely distributed network with a lot of devices, it is easy to forget the physical location of a given computer. The rest of the properties in the Service box on this tab apply to the role that this SNMP agent plays in your overall SNMP configuration:
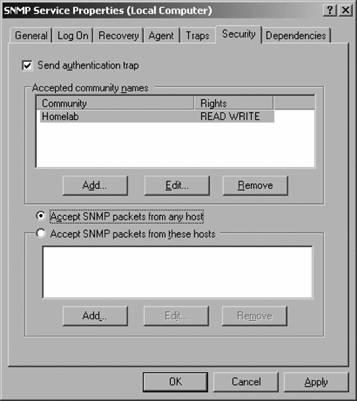
The settings on this tab cover the reception of traps. Remember that SNMP is not secure by default. There is no Kerberos authentication between agents and management servers, there is no encryption of packets on the wire, and all communications are sent in plain text. The private and public community names are well known, so using those provides no security. However, there are some minimal steps that you can take to improve security:
10.3.1. Compiling MIBs into Windows with SMI2SMIRFor MOM to be able to interpret the data sent in the SNMP traps, the data mappings of the OIDs in the MIB must be translated into the WMI namespace, where a device-specific sub-namespace is created for SNMP and SNMP devices. The WMI namespace, like the MIB namespace, is arranged in a hierarchy with the \root namespace at the top. If you have ever done any scripting against WMI, you are probably familiar with the \root\cimv2 namespace. The common information model version 2 (cimv2) contains local configuration information that can be can queried. The SNMP namespace is \root\snmp\localhost. Every vendor that sells an SNMP-enabled device must provide an MIB file to go with it. These MIB files are compiled and written into WMI by the SMI2SMIR.exe (pronounced smee-to-smear) command-line tool. This tool is installed when you install the SNMP and WMI SNMP Provider Windows components. It is in the %SystemRoot%\system32\wbem\snmp directory. SMI2SMIR has quite a few flags and not all are that well documented, but you are only interested in the /l, /a, and /t options. For example, on the homemomserver3 server the MIB file of a Linksys device needs to be compiled to receive traps: C:\Windows\system32\wbem\snmp\smi2smir.exe /a /t linksys.mib The /a flag checks the syntax of the MIB file and the /t flag generates the notification classes or extended notification classes respectively. Either way, you will probably see some errors from SMI2SMIR; however, don't worry as long as the errors are labeled warning and at the end of the compilation the tool returns "smi2smir : Loaded "<mibfilename>.mib" successfully into the SMIR." To check that the MIB file has been successfully loaded, run the SMI2SMIR command with the /l option, which lists all of the MIB files that have been compiled and loaded. In addition to the ones you load yourself, you should see RFC1213_MIB. This is a generic MIB file. 10.3.2. Confirming SNMP Traps with SNMPUTILWhen configured for SNMP, MOM is being used strictly as a trap reader. It cannot query (unless you write some code to do so) an SNMP-enabled device for its OID values. There are tools that provide extensive parameter read, write, create, and trap analysis capabilities. These full-featured tools usually come with hundreds of pre-compiled MIBs and are meant for managing very large SNMP implementations; Castle Rock SNMPc Network Manager and OidView are good examples of SNMP management tools. These two products offer full-featured trial versions that are fairly straightforward to use. Microsoft provides a very simple SNMP monitoring tool called SNMPUTIL. It is a command-line tool that you can use to query an SNMP device and to listen for all incoming traps on a server that is configured for SNMP. This tool provides a quick, no-nonsense way to confirm that a server is receiving and interpreting SNMP traps and that any device that needs to be monitored via SNMP is listening and will respond to queries from the server. SNMPUTIL functions in two modes. The first is query mode, where you specify the get, getnext, or walk options; the SNMP device to query; the community name; and the OID that you want to query. usage: snmputil [get|getnext|walk] agent community oid [oid ...] snmputil trap
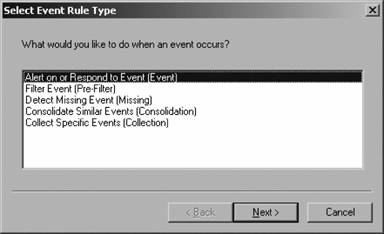
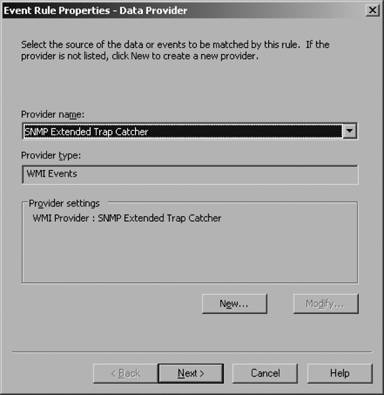
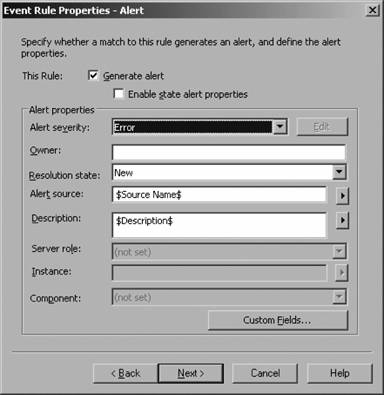
Using get from homemomserver3, SNMP returns the name of a network device listed in OID 3955.1.1.0: C:\SNMPMIB>snmputil get 10.0.0.23 Homelab .iso.org.dod.internet.private.enterprises .3955.1.1.0 Variable = .iso.org.dod.internet.private.enterprises.3955.1.1.0 Value = String Linksys BEFSR81v3 By using walk and stopping the OID definition at enterprises, SNMPUTIL returns all of the OID values for the Linksys BEFSR81 v3. Invoking SNMPUTIL with the TRap flag starts the utility in listening mode. Here is an example of the traps generated by a Cisco 675 router when the device is rebooted: C:\Documents and Settings\Administrator.HOMELAB>snmputil trap snmputil: listening for traps... Incoming Trap: generic = 0 specific = 0 enterprise = .iso.org.dod.internet.private.enterprises.9.10.1.1 agent = 10.0.0.1 source IP = 10.0.0.1 community = Homelab By using SNMPUTIL with the trap flag, you can confirm that the server can successfully receive and translate these traps. 10.3.3. Testing SNMP into WMI with WBEMTESTThe WMI Tester tool is a graphical interface that is used to interact with objects in the WMI namespace. Its use here is to confirm that SNMP traps are making it through the SNMP service layer and into the WMI namespace. Once there, the MOM SNMP Extended Trap Catcher provider will make it available to the MOM agent on homemomserver3. To start the WMI Tester tool from the command line, enter WBEMTEST. This brings up the tool shown in Figure 10-7. Figure 10-7. The WBEMTEST tool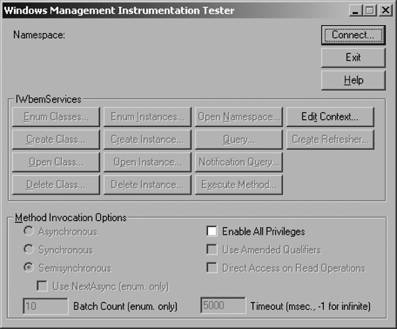 To confirm that traps are making it to the WMI SNMP namespace, you must first connect to SNMP. Click on the Connect button and enter root\snmp\localhost as shown in Figure 10-8. Figure 10-8. Configuring the WMI namespace to connect to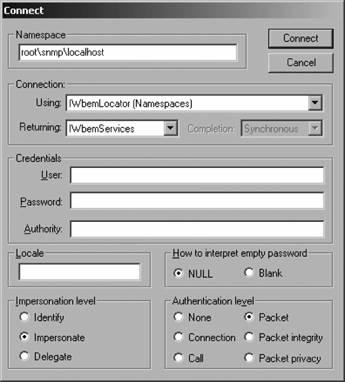 Click Connect again to return to the main page, which will now show the WMI namespace that the tool is connected to, as shown in Figure 10-9. The WMI Tester tool can monitor the SNMP namespace in real time, notifying you when traps come through. Click on the Notification Query button to open the Query page (Figure 10-10). Enter the query SELECT * FROM SnmpExtendedNotification. Click Apply and the tool will monitor the namespace for all traps that come through. To test this, the Cisco 675 is rebooted to generate a cold boot trap, as shown in Figure 10-11. The traps are sitting in the WMI SNMP namespace and are waiting to be picked up by MOM. 10.3.4. MOM ConfigurationConverting the traps into MOM alerts is now a matter of creating a rule that will monitor the MOM SNMP provider and generate alerts from the traps. You can create this rule in an existing rule group or in its own rule group. Since converting traps to alerts is a new ability, create a new rule group with new rules, then create a new computer group with the MOM SNMP Trap Catcher server (in this example, homemomserver3) as the only member. Once that computer group and rule group are associated, the traps will start flowing into MOM. Using one of the existing computer groups that has broad membership is not a best practice because then the SNMP rule would be applied to machines that cannot make use of it. Figure 10-9. Successfully connected to the SNMP namespace on the localhost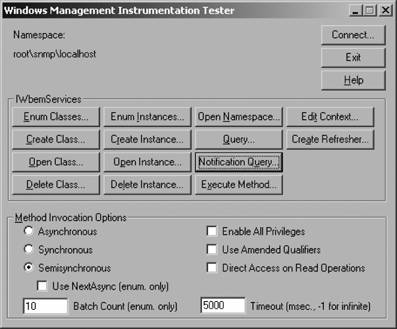 Figure 10-10. Configuring a query in the WMI Tester tool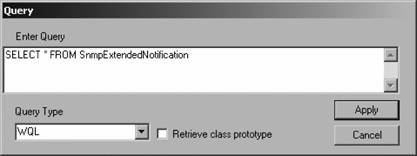 Figure 10-11. SNMP trap passing through the WMI SNMP namespace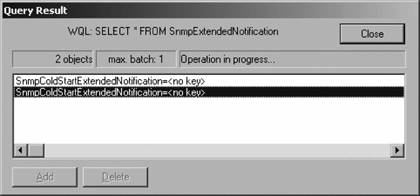 The first step is to create a new rule group in the Administrator console. Do this by bringing up the context menu for the Rule Groups folder and select the "Create Rule group" option. Give the rule group a name, such as SNMP, and a description. Click Next and then click Finish. Open the event rules object in the newly created SNMP rule group and create a new event rule as follows:
10.3.5. Making Use of Alerts from TrapsNow you are collecting all this wonderful information from your SNMP-enabled devices, but what can you get from it and what can you do with it? Traps merely indicate that an event happened. In this sense, they are much like an event in the Windows event log and only remotely like an alert. Inferring the current state of an SNMP-enabled device from a single trap is possible. However, if you are looking for a larger health-state-oriented understanding of the state of a device or a group of devices, you are going to have to rely on your own knowledge and experience with your devices. Traps are just bits of evidence that when considered together will let the experienced administrator draw some conclusions. In this case, the experienced administrator is much like the doctor from Chapter 1 who considered her patient's symptoms (high fever, aching muscles, fatigue, and headache) as bits of evidence and concluded that the patient had the flu. Figure 10-17 shows an alert that was generated by a trap, with some interesting landmarks pointed out. The alert contains a good deal of information that has been made more readable by the presence of an MIB on the management server (see Figure 10-17): Figure 10-15. Selecting to suppress on Alert Description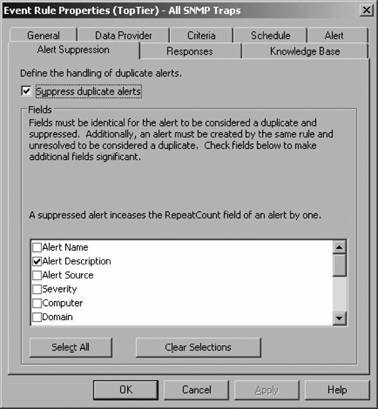
Figure 10-16. Giving the event rule a name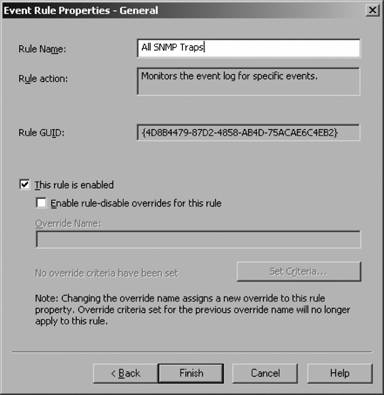 Figure 10-17. An alert generated from a trap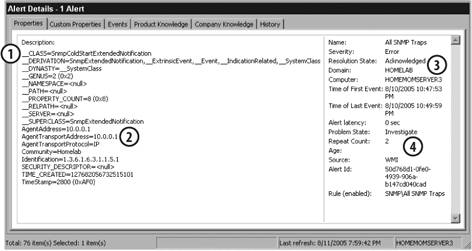 |
 Services and Applications
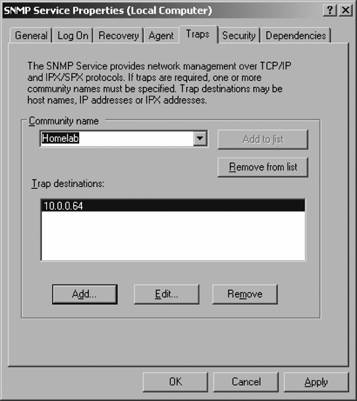
EAN: 2147483647
Pages: 107