A Real-World Example
| The C# example presented in this section generates an image of a bar code for use within a Web page when given a series of parameters. It is not the job of this assembly to manage the existence of the files it creates (.png files). That task is better left to the consuming application (ColdFusion). Only a few steps are needed to have a .NET component ready to be consumed directly from ColdFusion. First, the code must be written. Second, the assembly must be signed with a strong name and compiled. We generate a strong name key and associate it with the assembly by using the command-line utility sn.exe. After compiling, we add our assembly to the Global Assembly Cache (GAC), where it is cached and ready to be called by a COM client. As a final point, in order to be visible to COM clients, the assembly must be registered as a COM component. The .NET utility regasm.exe is employed to fulfill this task. Let's start by taking a look at the C# source code. The following code displays the namespaces required for the assembly, along with specifying our own BarCodeInterop namespace. The namespace we use has significance in determining the common name by which we'll refer to the component. In keeping with the binary interface concepts of COM, it is required that we define a public interface for the method that we will be implementing for our functionality.
We must also specify a class interface type of None, in that our class can only provide access through a late bound interface exposed by IDispatch. This attribute provides direction to the compiler for the type of COM interface we want to implement. Notice that our class implements the interface IBarCodeGenerator that we defined earlier. [ClassInterface(ClassInterfaceType.None)] public class BarCodeGenerator : IBarCodeGenerator { public BarCodeGenerator() { } The code then contains the implementation of the required interface method CreateBarCodeImage. The method creates an image file through a specified file path, code, width, height, and font size.
Before compiling the assembly, it must be signed with a strong name key. This is done by executing Microsoft's sn.exe to generate the key (Figure 25.13). The sn.exe is located in the SDK (<drive>\Program Files\Microsoft Visual Studio .NET 2003\SDK\v1.1\Bin). Figure 25.13. sn command-line example.
Once a strong name key is created, the file must be placed in the root of the project and associated with the assembly by editing the AssemblyInfo.cs source file. AssemblyInfo.cs contains attributes that allow for specification of component information such as company, version, and so on. There are also three attributes that are involved in signing an assembly. We specify our strong name key file by editing the AssemblyKeyFile. [assembly: AssemblyDelaySign(false)] [assembly: AssemblyKeyFile("..\\..\\BarCodeGenerator.snk")] [assembly: AssemblyKeyName("BarCodeGenerator")] GAC and regasm.exeAfter signing the assembly and compiling it, the assembly is ready to be added to the General Assembly Cache. The .NET framework installs a .NET administrative tool located under Control Panel > Administrative Tools > Microsoft .NET Framework 1.1 Configuration, which allows for the addition and configuration of assemblies to the GAC. The GAC was created by Microsoft to hold assemblies specifically built for multithreaded or multiple application call processes (Figure 25.14). Figure 25.14. Assembly Cache Admin Window.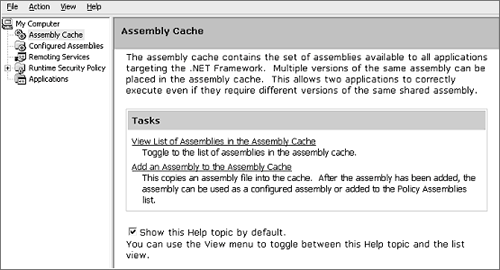 In the Assembly Cache window, click the Add an Assembly to the Assembly Cache link to browse to the assembly location and complete the step of adding the assembly to the GAC. The final step needed to expose our assembly to COM is registering it as a COM component in the system Registry. This task is accomplished using the command-line utility regasm.exe (Figure 25.15). A typical registration would be regasm C:\BarCodeInterop.dll. Figure 25.15. regasm command-line example.
Exercising with ColdFusionTo reiterate briefly, the assembly is accessed by ColdFusion's longstanding COM support facilities <cfobject>, or createObject in <cfscript>. In our example in Listing 25.9, we used the <cfobject> tag. Listing 25.9. BarCode.cfm <cfsetting enablecfoutputonly="yes"> <!--- Check to see if the bcg key exists in application struct. ---> <cfset barcodegen_is_initialized = StructKeyExists(application, "bcg")> <cfif not barcodegen_is_initialized> <!--- Create the object one time for the life of the application. ---> <cftry> <cfobject type="com" action="create" name="application.bcg" server="\\localhost"> <cfset barcodegen_is_initialized = 1> <cfcatch> <cfoutput>Error: Error accessing COM.</cfoutput> </cfcatch> </cftry> </cfif> <cftry> <cfscript> //Check to see that the reference to the object was created on the first run after app. restart. if (barcodegen_is_initialized){ sCode = getTickCount(); sFilePath = 'c:\inetpub\wwwroot\WebServices1\output\' & sCode & '.png'; iWidth = 290; iHeight = 100; fFontSize = 20; //Call the CreateBarCodeImage method to create the bardcode. retval = application.bcg.CreateBarCodeImage(sFilePath, sCode, iWidth, iHeight, fFontSize); } </cfscript> <!--- Dump the application struct. ---> <cfdump var="#application#"> <!--- Output the generated barcode image. ---> <cfif retval> <cfoutput></br> <img src="/books/2/449/1/html/2/#sFilePath#" alt="barcode" border="0" /> </cfoutput> </cfif> <cfcatch> <cfoutput>Error: Error accessing CreateBarCodeImage method.</cfoutput> </cfcatch> </cftry> <cfsetting enablecfoutputonly="no"> Notice the class that is called and the name we assign to the object. Once the object is successfully created, the CreateBarCodeImage method is accessed and the appropriate required parameters are passed to the component. The resulting page output is seen in Figure 25.16. The application structure is dumped, displaying the contents of the applicationname key and bcg (barcodgen) key. Observe how the object information and available related methods are displayed. CreateBarCodeImage is the method used to generate the barcode image seen in the output. Figure 25.16. Barcode.cfm output.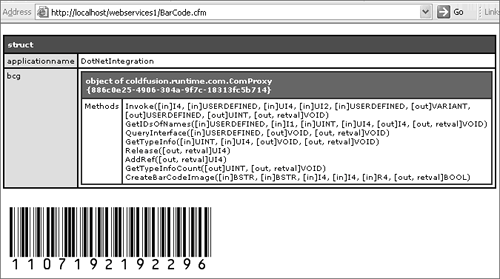 When testing the ColdFusion file you can debug the assembly by attaching to the JRun/ColdFusion process in the Visual Studio .NET IDE. This is done by clicking on Debug, selecting Processes, and then attaching to the JRun process that ColdFusion is running in (Figure 25.17). Figure 25.17. Processes screen. |


EAN: 2147483647
Pages: 240