Code Editing
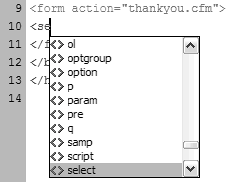
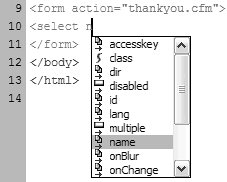
| Dreamweaver is built so that developers can usually accomplish tasks in several ways. Having so many options can be intimidating or confusing at first, but you will soon find the method that is most comfortable for you. That is the beauty of Dreamweaver: You can work however you like. Some people prefer pure Code view, others prefer to avoid manually editing code by using dialog boxes and panels, and the rest fall somewhere in between the two extremes. Whatever your preference is in terms of code editing, Dreamweaver can help you get the job done. Code Hints and Tag CompletionTo most developers, the thought of typing in every bit of code manually isn't very appealing. The more you have to type yourself, the greater the chances you'll make a typo or forget to close a tag. Code hints and tag completion make the job of hand coding so much easier. TIP You can control Code Hints and tag completion settings from the Code Hints category of Edit > Preferences. For more information, see the "Preferences" section later in this chapter. Here's how Code Hints and Tag Completion work in Code view:
NOTE Dreamweaver will only add a closing HTML tag if it's optional or required. In other words, Dreamweaver won't attempt to add closing HTML tags to "empty tags" such as <br>, <meta>, <hr>, and so forth. TIP Select Edit > Tag Libraries to create your own tag libraries, or import existing onessuch as the JSP tag libraryusing Dreamweaver's Tag Library Editor. The Tag Library Editor also offers a multitude of options that determine how Dreamweaver formats code. Custom tags and attributes that you add to the Tag Library Editor are available as Code Hints. For more information about tag libraries and how to import them or create your own, click the Help button on the Tag Library Editor dialog.
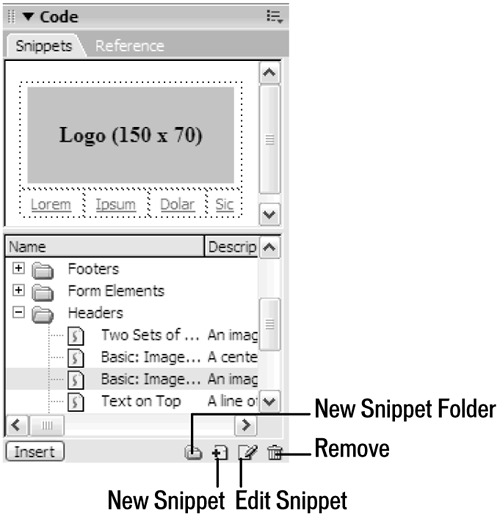
The Code Panel GroupBundled within the Code panel group is one of the most useful panels that deal strictly with using code, the Snippets panel. The Reference panel offers context-sensitive information that is much easier to search through than a huge stack of books. The Snippets PanelOften you will find that you can easily reuse some pieces of code if you don't have to go out of your way to find them. Many developers store their reusable code in plain text files, but spend too much time hunting through the files for the piece they need. The Snippets panel makes storing and reusing code pieces a breeze (Figure 2.24). The kinds of code you can store as a snippet are limitless: HTML, CFML, JavaScript, CSS, or any other type you fancy. You can even drag and drop the snippets and folders within the Snippets panel to reorganize them. To display the Snippets panel, select Window > Snippets or press Shift-F9. Figure 2.24. The Snippets panel stores pieces of reusable code that you can insert into the document whenever you need them.
To create a new folder:
To add a new snippet:
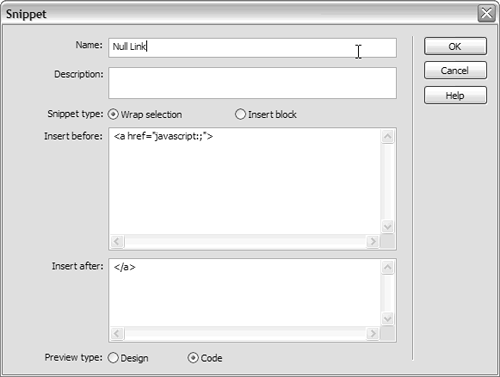
Name. Use this field to assign a descriptive title to the snippet that will appear in the panel. Description. This field provides a place for you to enter a description or other notations pertinent to the snippet code. Snippet Type. If Wrap Selection is chosen, Dreamweaver will place the code listed in the Insert Before field prior to the selection in the document, and the code listed in the Insert After field following the current selection. Choose Insert Block if the piece of code should be inserted where your cursor is positioned. Insert Before. This field is shown when the Wrap Selection option is chosen. The code in this field will be inserted prior to the cursor position or selected code. Insert After. This field is shown when the Wrap Selection option is chosen. The code in this field will be inserted following the cursor position or selected code. Insert Code. This field is shown when the Insert Block option is chosen. The contents of this field are inserted prior to the cursor position or selected code. Preview Type. The choice of displaying the snippet either as code or as a preview of the design in the top portion of the Snippets panel is given as Code and Design, respectively. If Dreamweaver is unable to render a design for the snippet, the code is displayed instead. TIP Hundreds of snippets of virtually all types are available for download at the Snippets Exchange located at www.dwfaq.com/Snippets/. To edit a snippet:
To insert a snippet:
TIP When inserting a snippet, it's best to do so in Code viewor at least with Code and Design view both openso that you're certain the code will be placed in the proper location. Using snippets in Code view is especially important if you're attempting to insert a snippet that wraps the selection. To delete a snippet or folder:
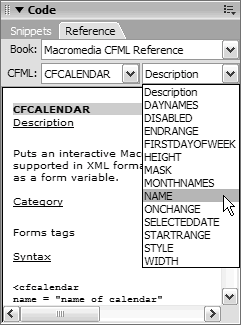
NOTE The snippets created in Dreamweaver aren't compatible with other Macromedia programs that also use snippets. If you have snippets in HomeSite or ColdFusion Studio that you would like to make available in Dreamweaver, use the Snippets Converter extension by Massimo Foti, available for download at www.dwfaq.com/Snippets/converter.asp. The Reference PanelTo help you with your coding, Macromedia provides several helpful reference books within the Reference panel (Figure 2.26). To display the Reference panel, select Window > Reference or press Shift-F1. Figure 2.26. Shown here is the Macromedia ColdFusion Reference.
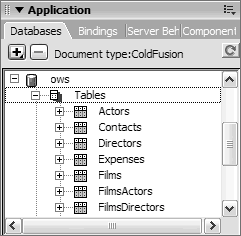
TIP The Reference panel is context sensitive. If your cursor is positioned in a recognized element, press F1 and it will open to the pertinent information. The basic premise for each reference book is the same. To use the Macromedia CFML Reference, select it from the list of Books. Choose the CFML tag from the list on the left to view a description of the tag. Choose the attribute in the Description list menu, if available, to display information regarding the attribute for the specific tag. You can change the font size used in this panel by choosing a large, medium, or small font from the Options menu. The Application Panel GroupWithin the Application panel group, you will find four of the most useful panels for ColdFusion application development. The panels help you connect to your database to retrieve records, allow you to format the data on the page, and more. You can add code to the page manually through Code view, or use Design view to get the job done using the dialogs provided. However you choose to work, these panels are truly indispensable and can save you loads of time. The Databases panelDreamweaver's Databases panel functions as the window to your database (Figure 2.27). To display the Databases panel, choose Window > Databases or press Control-Shift-F10 (Command-Shift-F10). Figure 2.27. Dreamweaver displays known data sources in the Databases panel.
All available data sources are displayed in this panel. Your options for using this panel vary depending on whether or not you have the ColdFusion MX7 (CFMX7) Extensions installed. Without the CFMX7 Extensions installed, if you need to establish the data source, click the Modify Data Sources button. This will launch your browser and take you to the Data Sources page in ColdFusion Administrator (after logging in), where you can set up a new connection to a data source or modify an existing listing. Click the Refresh button to update the Databases panel. With the CFMX7 Extensions installed (as shown in Figure 2.27), you will no longer have the Modify Data Sources button. Instead, you will have an Add (+) button that lists for you several data source connection choices. You can select a data source and then click the Remove (-) button to delete the data source. (For more information on creating data sources, See Chapter 6, "Introducing SQL.") Clicking the + orsymbol (Windows) or the disclosure triangles (Macintosh) to the left of the icons in the list of defined data sources will expand or contract the database and tables to reveal or hide the contents. You can drag and drop any listed item into Code view for hand coding. For example, if you were to click and drag the ows database listed in the Databases panel onto your page, Dreamweaver would insert the following code: <CFQUERY NAME="" DATASOURCE="ows"></CFQUERY> TIP When a query is added to your page from the Databases panel, the code is inserted in capital letters as shown. You can choose Commands > Apply Source Formatting to change the casing according to your preferences in the Code Format category of Edit > Preferences. Drag and drop a listed table or field into place in Code view to insert its name. This is especially handy if you prefer to hand code, but have difficulty remembering the names of tables and fields, or you wish to avoid introducing errors. Dragging and dropping any listed database, table, or field into Design view will initiate the Recordset dialog box. See the Bindings panel section for more information. The Bindings panelUsing the Bindings panel, you can define and call recordsets and stored procedures without writing a single line of SQL (Figure 2.28).The Bindings panel helps you to automate the process of inserting and calling variables in your code, such as CGI, URL, form, and session variables and so on. When you create a record set, Dreamweaver inserts the <cfquery> tag that connects to your database to pull specified records. This panel makes it easy to insert a Stored Procedure or a <cfparam> tag. To display the Databases panel, select Window > Databases or press Control-F10 (Command-F10). Figure 2.28. Use the Bindings panel to call, insert, and format data sources.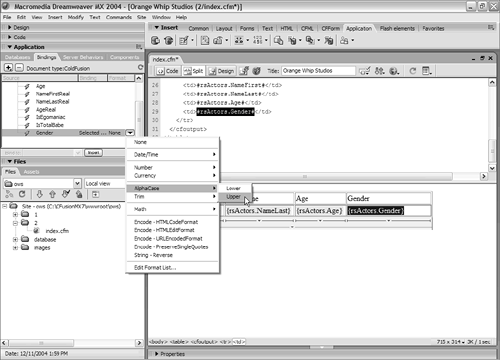
You can drag and drop a data source into Code or Design view or first select it and then choose the Insert button. The Bindings panel displays three columns, though you can't see the second two without scrolling unless you widen the panel or adjust the column widths:
The Server Behaviors panelDreamweaver's server behaviors add dynamic functionality to your Web pages. The server behaviors that ship with Dreamweaver can fulfill many of the most common needs of a dynamic page. The Server Behaviors panel even allows you to create your own server behaviors easily with the Server Behavior Builder. To display the Server Behaviors panel, select Window > Server Behaviors or press Control-F9 (Command-F9). The Repeat Region server behavior will insert the necessary <cfoutput> tag pair into the document (Figure 2.29) needed to repeat its contents according to the specifications made in the dialog. After you've used the Repeat Region server behavior, you may find yourself needing to move through many returned records. The Recordset Paging server behavior allows you to create a link to the first, next, previous, or last record. Figure 2.29. To help you recognize where server side code appears in the document while in Design view, Dreamweaver uses a tab with the appropriate label. In this case, a Repeat Region is shown.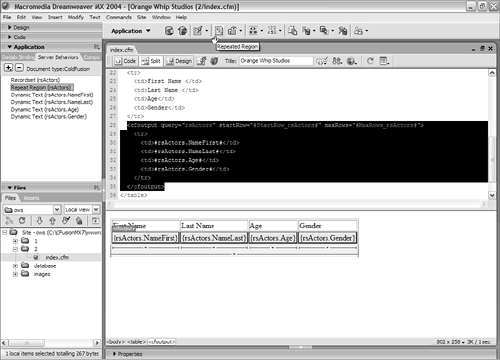 Show Region implements the <cfif> tag and creates a conditional region. This versatile tag lets you choose to show any selection based on a recordset. Within the list of available server behaviors, you will find Insert Record, Update Record, and Delete Record. Insert Record creates a form on the page that, when viewed online, allows you to insert new records into the database. Update Record allows you to modify existing records with a similar form. Delete Record allows you to remove a record from the database. Use the Dynamic Text option to initiate the Dynamic Text dialog, where you can select a record from the tree menu, then choose a format to apply to that record. Dynamic Form Elements specify specific records that will appear within the form element as its value, as the factor for which a checkbox or radio button is selected, and more. As long as you have a recordset established, you can choose one of the options in the submenu for the Show Region server behavior. Select whatever code you wish to show based on the criteria of whether the record is empty, first, or last, and choose the respective Show Region server behavior. If you are using Design view, a tab labeled <cfif> will appear in the upper left of a rectangular area that surrounds the conditional region. The Components panelThe Components panel lists all ColdFusion Components (CFCs) and Web Services detected on the testing server (Figure 2.30). For more information about ColdFusion Components, see Chapter 23, "Building Reusable Components." Figure 2.30. Installed ColdFusion Components are readily available in the Components panel.
Dreamweaver automatically finds any CFCs on your server (using the server information provided when you created your site). You can right-click any listed components to learn more about them, and you can drag them into your code to instantiate them. To use a component, expand the first two levels of the tree to reveal the CF Component icon(s), then click the Insert code to invoke a function button. If you prefer, you can drag and drop the component into Code view. Double-click a listed component to have Dreamweaver open it for editing in the Document window. Alternatively, you can select the Options menu in the panel group and choose Edit the code from the list. To create a new ColdFusion Component using the Create Component dialog box, click the Add (+) button or select Create new CFC from the Options menu. If details are available about your selection in the Components panel, the Get details icon is enabled. Choose the icon, or select Get details from the Options menu. An alert message will appear with any available details about your selection. Also available in the Options menu is the Get description option, which will open a browser window to the detailed information page for the selected component within ColdFusion Administrator. As always, you must be logged in to view the page. You can also use this panel to introspect and use Web Services. The drop-down list box at the top allows you to toggle between components and Web Services. When displaying Web Services, click the + button to add a new service (specifying its WSDL URL), and Dreamweaver will display its methods for you to use. |
EAN: N/A
Pages: 282
 Custom tags are discussed in Chapter 23, "Building Reusable Components," and are ideal for adding to your tag library.