Working with the Registry
The registry is a specialized database that Windows XP Professional uses to store many configuration settings. The registry operates as one logical database but is actually made up of a number of files. These files reside in %System-Root%\System32\Config and include:
-
DEFAULT
-
SAM
-
SECURITY
-
SOFTWARE
-
SYSTEM
-
Userdiff
| Note | %SystemRoot% is an example of an environment variable and is used to specify the location of Windows XP Professional's files. By default, this is C:\Windows. The advantage of using %SystemRoot% in place of a hard-coded value is that administrators can use this variable to find the Windows XP Professional system files when their location is not known. For example, an administrator might not know the location of the Windows XP system file if the person who installed Windows XP Professional decided to change the folder's name. |
In addition, registry data relating to user profile information is stored in each user's folder located within the Documents and Settings folder.
Overview
The registry is organized into a collection of five hives or root keys, as shown in Table 12.1.
| Key | Short Name | Description |
|---|---|---|
| | ||
| HKEY_LOCAL_MACHINE | HKLM | Contains information that affects the computer and all its users |
| HKEY_USERS | - | Contains information about every user of the computer |
| HKEY_CURRENT_CONFIG | - | Contains information about the computer's current configuration |
| HKEY_CLASSES_ROOT | HKCR | Stores information about Windows file associations |
| HKEY_CURRENT_USER | HKCU | Contains information about the current user |
Each registry hive contains a collection of keys. Keys may contain any number of other keys. They may also contain values. Keys function much like folders do on a file system, providing a way to logically group values. A value is an actual setting to which data is then assigned. The Windows XP registry supports a number of different types of values, including:
-
String. A text string value
-
Binary. A binary value
-
DWORD. A hexadecimal DWORD value
-
Expandable String Value. A string value that can be expanded
-
Multi-String Value. A multiple string value
The health and stability of the Windows XP Professional registry is essential to the proper operation of the computer. The registry is created during the installation of the operating system and is constantly updated during the normal operation of the computer. For example, every time a new user account is defined on the local computer or a hardware device is added or removed, the registry is modified.
The registry can be manually edited using a utility known as the Registry Editor or Regedit, as shown in Figure 12.1.
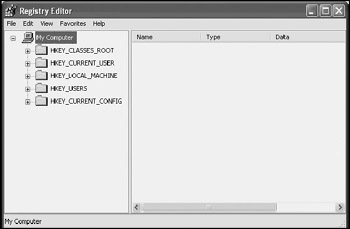
Figure 12.1: The Regedit utility lets administrators view and manipulate registry keys and values
| Note | Take great care when using Regedit to manually make changes in the Windows XP registry. An incorrect setting or an accidentally deleted key or value can have a great impact on the operation of a computer or its applications and could potentially prevent Windows XP from starting. Administrators should only make changes to the registry when they fully understand the effects of the change. As a safety precaution, always make sure a recent backup of the computer is available, just in case something goes wrong. |
The following procedure outlines the steps involved in starting Regedit and beginning a registry edit session.
-
Click on Start and then Run. The Run dialog appears.
-
Type Regedit in the Open field and click on OK. The Registry Editor appears.
-
By default, the local computer's registry is displayed. To edit the registry belonging to another Windows XP professional network computer, click on File and select Connect Network Registry. The Select Computer dialog appears.
-
Type the name of the target computer in the Enter the object name to select field and click on OK, as shown in Figure 12.2. The registry for that computer is displayed.
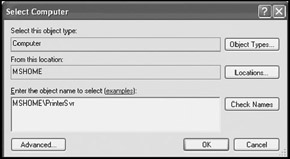
Figure 12.2: Specifying the name of a network computer
As Figure 12.1 shows, the registry is organized into a treelike structure. At the top of the tree is the computer whose registry is being edited. Beneath this are the five registry hives. Each hive can be expanded to see the keys and values underneath it by clicking on the + sign to the left of each hive, as demonstrated in Figure 12.3.
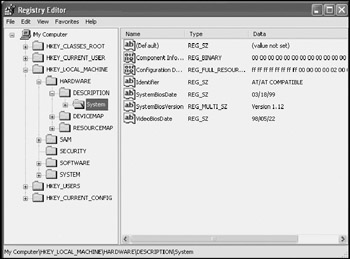
Figure 12.3: Examining the keys and values stored under the HKEY_LOCAL_MACHINE hive
Modifying the Registry through the Control Panel
Users and administrators indirectly modify the registry all the time. For example, many applications record registration information in the registry during their setup process. In addition, most of the utilities found on the Windows XP Professional Control Panel make registry changes.
The Windows XP Control Panel utilities function, therefore, as an intermediary user-friendly interface for viewing and changing registry values. For example, the Screen Saver property sheet on the Display Properties dialog, shown in Figure 12.4, controls various screen saver settings.
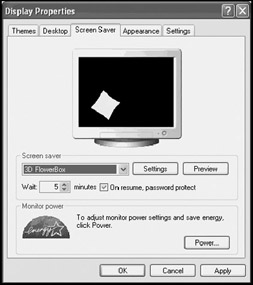
Figure 12.4: Using the Display Properties dialog to configure screen saver registry settings
Screen saver settings are associated with individual users and are therefore stored in the HKTY_CURRENT_USER registry hive. There are two ways to change screen saver settings. One is to make changes using the Screen Saver property sheet. The other is to use the Regedit utility and make the changes by editing the following registry settings, as shown in Figure 12.5.
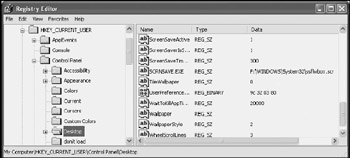
Figure 12.5: Viewing the screen saver settings stored in the Windows XP registry
-
HKCU\Control Panel\Desktop\ScreenSaveActive. When set equal to 1, this value enables the Windows screen saver.
-
HKCU\Control Panel\Desktop\ScreenSaverIsSecure. When set equal to 1, this value enables screen saver password protection.
-
HKCU\Control Panel\Desktop\ScreenSaveTimeOut. This value specifies the amount of time that must pass without any user activity before the screen saver starts running.
-
HKCU\Control Panel\Desktop\SCRNSAVE.EXE. This value specifies the name of a Window XP screen saver.
The advantage of modifying the registry through a Control Panel utility is that the utility provides some built-in intelligence by only allowing valid changes to be made. This helps prevent administrators from accidentally doing something that may hamper the performance of the computer or even prevent it from restarting. As a rule of thumb, administrators should never manually edit the registry when an alternative tool, such as a Control Panel utility, exists.
Taking Precautions before Making Registry Changes
Administrators should use the Regedit utility to edit the registry only when absolutely necessary. Unlike many Windows utilities and applications, Regedit does not have an undo function and does not display a warning to alert when a dangerous action is about to be performed.
However, there are times when administrators must manually make changes to the registry. For example, an application or hardware vendor may provide an application fix or driver update that requires the addition, removal, or modification of one or more registry keys and values. There are a number of precautions that administrators can take before making registry modifications. These include:
-
Writing down the original registry keys and their values before making changes so that they can be put back to their previous state if necessary
-
Making a copy of the registry using a backup utility
-
Exporting the key that stores the values to be modified before making any changes so that they can be imported back into the registry should something go wrong
A mistake made while editing the registry can result in anything from a simple application error to a total system failure. In the event that a catastrophic failure occurs, administrators can attempt to restart the computer using the Last Known Good Configuration option, which is covered later in this chapter.
Working with Regedit
Windows XP Professional ships with Regedit version 5.1. This utility allows administrators to perform any of the following activities:
-
Browse the registry using its Explorer-like interface
-
Search for keys, values, and data
-
Modify or delete existing registry keys and values
-
Add new keys and values
If the location of a registry key or value is known, the registry tree can easily be navigated to find it. The following procedure outlines the steps involved in manually navigating the Windows XP Professional registry.
-
Open Regedit and load the registry for the local computer or a network computer.
-
Double-click on a hive's icon where the key or value resides or single-click on the + sign to the left of the hive's icon to expand the hive and see all its keys.
-
Double-click on a key's icon or single-click on the + sign to the left of the key to expand it and see any keys and values that reside under it.
-
To see the values stored within a key, select it. A list of values appears in the right-hand pane of the Regedit interface.
If the exact location of a key or value is not known, it can be searched for. Regedit provides both Find and Find Next commands on the Edit menu that can search the registry based on matching key, value, or data text. The following procedure outlines the steps involved in searching the Windows XP Professional registry.
-
Open Regedit and load the registry for the local computer or a network computer.
-
Select a location within the registry from which you wish to begin the search (for example, the computer, a hive, or a key).
-
Select the Find option on the Edit menu. The Find dialog appears, as shown in Figure 12.6.

Figure 12.6: Searching the Windows XP Professional registry -
Type the name of the key, value, or data that is being searched for and select any of the following options:
-
Keys
-
Values
-
Data
Optionally, select the Match whole string only option.
-
-
Click on Find Next.
Any key or value in the registry can be modified or deleted. The following procedure outlines the steps involved in manually modifying or deleting a key or value from the Windows XP Professional registry.
-
Open Regedit and load the registry for the local computer or a network computer.
-
Navigate the registry or perform a search to find the key or value that is to be modified or deleted.
-
To delete a key or value, right-click on it, select Delete, and then click on Yes when prompted to confirm the deletion.
-
To rename a key or value, right-click on it and select Rename. Type a new name for the key or value and press Enter.
-
To modify a value, select the key that contains it and then right-click on the value and select Modify. A dialog appears, as demonstrated in Figure 12.7, allowing new data to be specified.
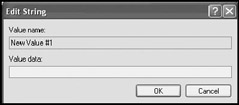
Figure 12.7: Modifying a registry value -
Enter the value's new data and click on OK.
| Note | Consider renaming a key or value rather than deleting it. This way it will be easy to restore it in the event that a problem occurs by changing its name back. |
New keys and values can be added to any key in the registry. The following procedure outlines the steps involved in manually adding a key or value to the Windows XP Professional registry.
-
Open Regedit and load the registry for the local computer or a network computer.
-
Navigate the registry or perform a search to find the key where the new key or value will be added.
-
To add a new key, right-click on the parent key, select New, and then click on Key. A new key appears in the registry tree as a child key of the parent key. Type a name for the key and press Enter.
-
To add a new value, right-click on the parent key, select New, and then select one of the following options to specify the type of value being added:
-
String Value
-
Binary Value
-
DWORD Value
-
Multi-String Value
-
Expandable String Value
-
-
The new value appears in the right pane as a child value of the currently selected key. Type its name and press the Enter key. Right-click on the new value and select Modify to assign data to the value.
Importing and Exporting Registry Keys and Values
Before making a change to the registry, it is a good idea to make a backup copy of it so that the key or value can be restored to its previous value if a problem occurs as a result of the modification. One way to do this is by exporting the parent key. When a key is exported, a text-based version of the key is copied to a file with a .reg file extension. The contents of the key can then be viewed using a standard text editor, such as Windows XP's Notepad. The key can even be edited. Later, if necessary, the file can be imported back to restore or replace all the keys and values that it contains.
| Note | If a key or value is added or modified in the .REG file and the .REG file is imported back into the registry, the new key or value will take effect. However, if a key or value is deleted in the .REG file and the .REG file is imported back into the registry, the deleted key or value is not deleted from the registry. |
The following procedure outlines the steps involved in exporting and later importing a registry key.
-
Open Regedit and load the registry for the local computer or a network computer.
-
Locate the key that is to be exported.
-
Right-click on the key and select Export. The Export Registry File dialog appears, as shown in Figure 12.8. Specify the name of the export file and its destination and click on Save.
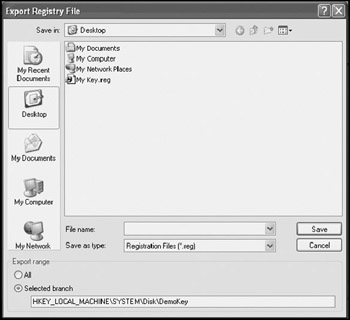
Figure 12.8: Saving the exported registry key -
To later import a .REG file into the registry, open Regedit and select the Import option on the File menu. The Import Registry File dialog appears. Locate the .REG file and click on Open. The keys and values stored in the .REG file are imported back into the registry.
Figure 12.9 shows how the exported key's .REG file looks when edited by Notepad. In this example, the exported key is called MyKey and contains a single value called TestValue, which has a data assignment of This key was created on 7/15/02.
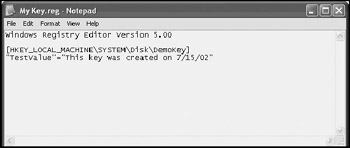
Figure 12.9: Viewing an exported registry key
| Note | The entire registry can be exported by right-clicking on the computer icon in the root of the registry key and selecting Export. Depending on the size of the registry, the .REG file could be as large as 30MB to 40MB. |
Using the Last Known Good Configuration Option to Restore the Registry
Windows XP Professional automatically stores a copy of the registry's HKLM\System\CurrentControlSet key after every successful startup of the operating system. The CurrentControlSet key stores a collection of configuration data used by Windows XP when starting.
In the event that a configuration change is made that prevents Windows XP Professional from starting, one way to try and recover is to boot the computer using the Last Known Good Configuration option. For example, installing the wrong device driver can sometimes prevent computer startup. When this option is used during startup, the configuration in HKLM\System\CurrentControlSet key from the last successful startup is used to start the computer. All other registry keys and values are left unchanged.
The following procedure outlines the steps in using the Last Known Good Configuration option to restore the registry's HKLM\System\CurrentControlSet key.
-
Click on Start and then Turn off computer. The Turn off computer dialog appears.
-
Select Restart. The computer shuts down and begins to restart. During restart, the following message appears:
Please select the operating system to start, Press F8
-
Use the arrow keys to select the Last Known Good Configuration option and then press the Enter key.
-
The computer starts and restores HKLM\System\CurrentControlSet key.
EAN: 2147483647
Pages: 358
- Using SQL Data Definition Language (DDL) to Create Data Tables and Other Database Objects
- Using SQL Data Manipulation Language (DML) to Insert and Manipulate Data Within SQL Tables
- Understanding SQL Subqueries
- Understanding Transaction Isolation Levels and Concurrent Processing
- Working with Data BLOBs and Text