Windows XP s Printer Support
Windows XP's Printer Support
In most cases, Windows XP will have no problem automatically discovering and installing a locally attached print device. Since Windows XP is equipped with hundreds of printer software drivers, chances are good that the entire process will occur silently. Its completion can be verified by looking at the Printers and Faxes folder for an icon representing the print device. If Windows XP does not have a suitable printer driver, it will prompt for one.
| Note | After installing a new printer, as outlined later in this chapter, the administrator may want to check the printer software driver that Windows XP installed to make sure that it is current, especially if Windows XP automatically installed the printer. If Windows XP installs an incorrect or older version of a driver, or a generic driver, the printer may not always function properly. To view and change a printer device driver, open the Printer's properties dialog, select the Advanced property sheet and click on New Driver. |
Terminology within the IT field can often be confusing. The following list outlines the terminology used by Microsoft and this book to refer to various components that make up the Windows XP print process.
-
Print device. A device that creates printed output
-
Local print device. A print device that is connected to a computer's serial, parallel, or USB port
-
Network print device. A print device that is shared over a network and is accessible by other computers on the network
-
Print queue. A temporary folder where print jobs are stored until printed
-
Spool. The process of copying a print job to the print queue where it then waits its turn to be printed
Windows XP provides a device-independent print architecture, meaning that any print job can be submitted to any print device and it will print properly. Users can submit print jobs to any installed printer, local or network, and Windows XP ensures that it prints correctly. An understanding of the steps involved in printing a print job is fundamental knowledge for any administrator and will help facilitate print management and problem resolution. The basic steps involved in the Windows XP Professional print process are outlined below.
-
The user selects the option to print from any Windows application and chooses a print device.
-
Windows XP determines the location of the print device. If it is a local print device, the print job is spooled to the local hard drive. If the print device is a network print device, the print job is sent out over the network to the print server that is responsible for managing that print device, where the print job is then spooled.
-
The print job remains in the print queue until its turn to print.
-
Windows begins sending the print job to the print device a page at a time until the entire print job has been printed.
-
Once the entire print job has been printed, the copy of the print job in the print queue is deleted.
As long as a print job remains in the print queue it can be managed by its owner or an administrator. Management tasks include placing jobs on hold, releasing held print jobs, restarting print jobs from the beginning, and deleting print jobs.
| Note | Windows XP Professional stores print jobs submitted to local printers in the \Windows\System32\spool\printers folder. All print jobs are stored here regardless of the number of local print devices that may be installed or the print devices to which print jobs have been submitted. To view the print jobs on a per-print-device basis, open each device's print queue by double-clicking on that print device's icon in the Printers and Faxes folder. |
Printer Installation
The first step involved in installing a local print device is to physically connect it to the computer. The following procedure outlines the steps that are involved in this process.
-
Prepare the print device for operation according to the manufacturer's instructions.
-
Depending on the type of print device, connect it to the computer using a parallel, serial, or USB cable.
-
Connect the print device's power supply and power the print device on.
What happens next depends on the print device. If the computer is not running, turn it on. Under normal conditions Plug and Play should automatically detect the printer, either when first attached or when the computer is started, and install it. If Windows XP Professional has a printer driver for the printer, it will silently complete its installation. Otherwise it will pause and prompt for the location of the print device's software driver.
Although serial and USB printers are available, most printers connect to the computer using a parallel print port connection. To detect and install a parallel printer, the print device must be bidirectional, meaning that in addition to accepting print output from the computer, the print device must be able to communicate back to the computer. In addition, an IEEE 1284 printer cable must be used to connect the print device to the computer's parallel port. This cable allows bidirectional data flow between the computer and the print device. Without it, Plug and Play will not work.
If the print device is an older model, Plug and Play may not be able to automatically detect it. In this case, the administrator or power user must tell Windows to look for the printer and initiate a Plug and Play installation. If this does not work, then a manual installation must be performed.
Initiating an Automatic Printer Installation
In the event that Plug and Play does not automatically detect and install a printer that has just been connected to a computer, administrators and power users can tell Windows XP to look for it as outlined in the following procedure.
-
Click on Start/Control Panel and then Printers and Other Hardware. The Printers and Other Hardware folder appears.
-
Click on the Add a printer link. This starts the Add Printer Wizard. Click on Next.
-
The Add Printer Wizard presents the following two options, as shown in Figure 5.17:
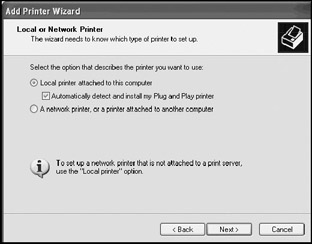
Figure 5.17: Initiating a Plug and Play printer installation-
Local printer attached to this computer
-
A network printer, or a printer attached to another computer
Select the Local printer attached to this computer option. This enables the Automatically detect and install my Plug and Play printer option. Click on Next.
-
-
If the print device is detected, the Found New Hardware Wizard starts, as shown in Figure 5.18. Leave the default option of Install the software automatically selected and click on Next.
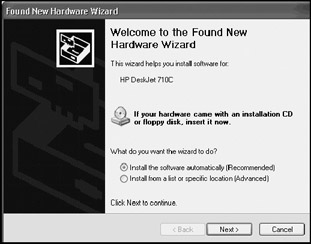
Figure 5.18: The wizard announces that it has detected a new printer -
The Found New Hardware Wizard looks for a software driver for the print device. If one is found, the dialog shown in Figure 5.19 is displayed. The wizard may also find more than one software driver for the printer. Select the appropriate driver and click on Next.
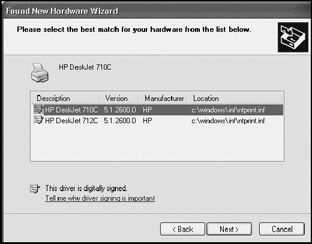
Figure 5.19: Select the appropriate software driver -
The software driver is used to complete the setup of the printer. Click on Finish when prompted to close the Found New Hardware Wizard.
-
Next, the Add Printer Wizard asks if it should print a text page to verify the operability of the print device. Select Yes and click on Next.
-
A summary of the information collected by the wizard is displayed. Verify its accuracy and click on Finish.
-
The test page should begin printing on the print device. Windows XP displays a prompt asking whether the text page printed correctly. Wait for the test page to finish printing. Click on OK if the page prints successfully. Otherwise click on Troubleshoot and the Help and Support Center will open and display the Printing Troubleshooter.
An icon for the print device should now be visible in the Printers and Faxes dialog.
Manual Printer Installation
In the event that Plug and Play fails to detect when a new printer is installed, or an older non-Plug and Play compatible printer is installed, Windows XP Professional allows for the manual installation of a local print device. This process is outlined in the following procedure.
-
Click on Start/Control Panel and then Printers and Other Hardware. The Printers and Other Hardware folder appears.
-
Click on the Add a printer link. This starts the Add Printer Wizard. Click on Next.
-
The Add Printer Wizard presents the following two options.
-
Local printer attached to this computer
-
A network printer, or a printer attached to another computer
Select the Local printer attached to this computer option and make sure that the Automatically detect and install my Plug and Play printer option is not selected. Click on Next.
-
-
The next step is to specify the port where the print device has been connected. Typically, this is LPT1, as demonstrated in Figure 5.20. Select the appropriate port and click on Next.
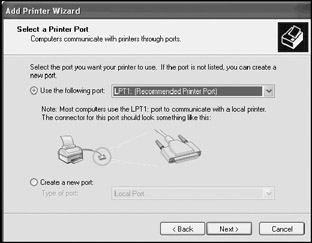
Figure 5.20: Specify the port where the print device has been connected -
The next information collected by the Add Printer Wizard is the manufacturer and model of the print device being installed, as shown in Figure 5.21.
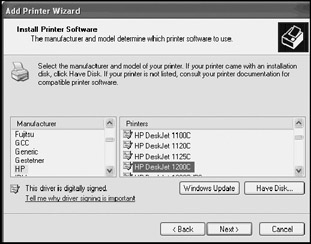
Figure 5.21: Tell the wizard the manufacturer of the printer and its modelSelect the manufacturer of the print device. A list of print devices made by that manufacturer is then displayed. Select the appropriate print device and click on Next.
-
Next, the wizard asks for a printer name. This name can be up to 31 characters and should provide a meaningful identification of the print device. If other print devices have been set up on the computer, the wizard will ask whether this print device should be made the default printer. Click on Next.
-
If the computer is connected to a network, the wizard next asks whether the printer should be shared over the network, as shown in Figure 5.22. The available options are:
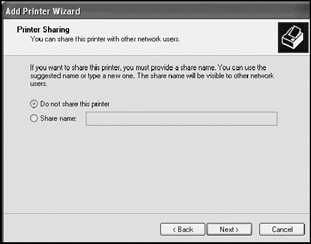
Figure 5.22: If the computer is connected to a network, the Add Printer Wizard can set it up as a shared network resource-
Do not share this printer
-
Share name
Selecting the Share name option enables the Share name text field. The name typed into this field is used to identify the print device on the network. Select one of these options and click on Next.
-
-
If the option to share the printer was selected then the wizard provides the opportunity to specify additional information including the print device's location and a detailed description as demonstrated in Figure 5.23. Otherwise skip to step 9. The information supplied here will be visible to other network users. Provide the requested information and click on Next.
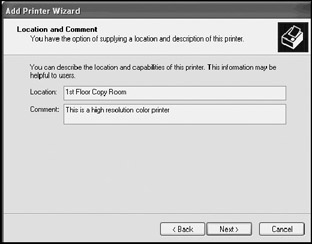
Figure 5.23: Providing as much information as possible about the shared printer will assist other network users in identifying the print device -
Next, the wizard asks if it should print a test page to validate that setup has been properly performed. Click on Yes.
-
A summary of all the information that the wizard has collected is displayed. Verify the accuracy of all the information and click on Finish
-
The test page should begin printing on the print device, and Windows XP displays a prompt asking whether the text page printed correctly. Wait for the test page to finish printing. Click on OK if the page prints successfully. Otherwise click on Troubleshoot and the Help and Support Center will open and display the Printing Troubleshooter.
An icon for the print device should now be visible in the Printers and Faxes dialog.
Selecting a Default Printer
The first print device that is installed is automatically set up as the default. Each time an additional print device is installed, the Add Printer Wizard will ask if the new print device should be made the default. The default print device is configured on a user-by-user basis, meaning that if multiple users share the same computer, each may have a different default printer.
Each print device has an icon representing it in the Printers and Faxes folder. The default print device is identified by the presence of a small black circle with a checkmark in it at the top of the icon, as demonstrated in Figure 5.24. The default printer can be changed at any time using the following procedure.

Figure 5.24: Windows applications automatically suggest sending all print output to the default print device
-
Click on Start/Control Panel/Printers and Other Hardware, and then click on View installed printers or fax printers. The Printers and Faxes folder appears.
-
Right-click on the icon representing the print device that is to become the new default print device.
-
Select Set as Default printer. The print device's icon will change to reflect its new status.
Uninstalling a Printer
Windows XP Professional should automatically detect the physical removal of a local print device. It will then uninstall its device driver and delete its icon from the Printers and Faxes dialog. In the event that Windows XP fails to detect the removal of the print device it can manually be uninstalled using the following procedure.
-
Click on Start/Control Panel/Printers and Other Hardware, and then click on View installed printers or fax printers. The Printers and Faxes folder appears.
-
Right-click on the printer that is to be uninstalled and select the Delete option.
-
Click on Yes when asked to confirm the print device's removal.
| Note | Make sure that the print device has been disconnected from the computer. Otherwise Plug and Play may redetect it and reinstall it. |
Printer Configuration
Printer configuration is performed from the Printers and Faxes folder by right-clicking on a printer icon and selecting Properties. This displays the print device's Properties dialog. Printer configuration settings are organized by property sheet. The number and types of property sheets that are displayed varies among print devices, depending on their features and capabilities. However, the following four property sheets are always present.
-
General. Configures basic property settings including the name, location, and a description of the print device
-
Sharing. Provides the ability to enable or disable the sharing of the print device over a network
-
Ports. Configures printer ports and printer pools
-
Advanced. Configures print device availability, priority, and its software driver, as well as spooling and other advance settings
The following sections will explain the major configuration settings found on each of these property sheets.
The General Property Sheet
The General property sheet, shown in Figure 5.25, provides the ability to change the print device's name, location, and comment information. The property sheet also displays the information about the model of the print device and its features. None of this information can be changed.
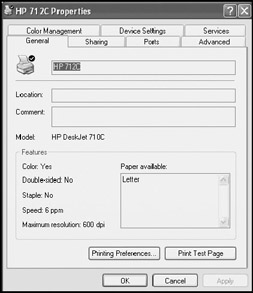
Figure 5.25: The General property sheet displays information about basic printer features and provides the ability to change the print device's name, location, and comment information
At the bottom of the General property sheet are two buttons that provide the ability to configure printing preferences and print a test page. Clicking on Printing Preference opens the Printing Preferences dialog. What appears here varies from print device to print device but in general includes the ability to change layout features and paper quality settings. Clicking on the Print Test Page button causes a test page to be submitted to the print device. In addition, a prompt appears requesting confirmation of the success or failure of the test page. Clicking on OK closes the prompt. Clicking on Troubleshoot opens the Help and Support Center, which then displays the Printing Troubleshooter.
The Sharing Property Sheet
The Sharing property sheet, shown in Figure 5.26, provides the ability to share a local print device with other computers on a local area network. This property sheet also provides the ability to load software drivers for other operating systems so that the computer can automatically download them to any computer that sets up a network connection to the shared printer. This makes print connections a lot easier to set up on other network computers by allowing each computer to automatically retrieve and install its own software driver.
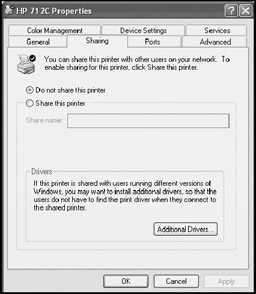
Figure 5.26: The Sharing property sheet determines whether or not the printer is shared with other computers on a local area network
A computer that is set up to share a local print device over a network acts just like any other print server. As soon as it is configured to share a printer, Windows XP Professional starts accepting and spooling print jobs sent to it from over the network. The following procedure outlines the steps involved in sharing a local printer.
| Note | Allowing other network computers to set up connections to a shared print device places additional processing workload on the computer where the print device is connected. Depending on the number of print jobs regularly received from over the network, the user of the computer may detect a slowdown in performance. This is because the computer must dedicate a portion of its disk storage and memory to storing and processing each print job, thus denying these resources to the local user. |
-
Right-click on a print device's icon in the Printers and Faxes folder and select Properties.
-
Select the Sharing property sheet.
-
Select the Share name option and type a name for the print device in the Share name text field. This name will be used by other network computers to connect to and use the print device.
-
To load software drivers for computers that run other operating systems on the local area network, click on Additional drivers. The Additional Drivers dialog will appear as shown in Figure 5.27.
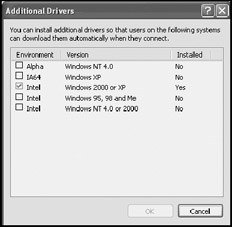
Figure 5.27: By loading drivers for other operating systems, administrators make the setup of network printer connections easier -
Select each type of operating system for which software drivers are to be loaded and click on OK.
-
A dialog will appear for each selected group of operating systems asking for the location of the print driver for that particular set of operating systems. Specify the proper location and click on OK.
-
Another dialog will appear displaying a list of printer drivers that have been found for the print device. Select the appropriate driver and click on OK. This step will repeat for each of the operating systems for which software drivers are being loaded.
-
Click on OK when returned to the General property sheet.
The Ports Property Sheet
The Ports property sheet, shown in Figure 5.28, allows for the configuration of printer ports. Windows XP supports a number of different types of ports, including:
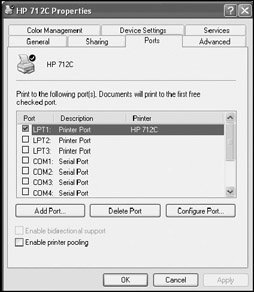
Figure 5.28: Each printer connection requires a unique port assignment
-
Parallel. Includes ports LPT1-LPT3 and is used to communicate with parallel devices.
-
Serial. Includes ports COM1-COM4 and is used to communicate with serial devices.
-
Share. These port names are expressed as \\sharename\printer and are automatically set up when a connection is made to a shared network printer.
-
USB. USB ports only appear when a USB print device is connected to the computer.
-
IEEE 1394. IEEE 1394 (FireWire) ports only appear when an IEEE 1394 print device is connected to the computer.
To change a print device's current port assignment, select a different port from the Port list. The following port management options are also available on this property sheet.
-
Add Port. This option is used to set up vendor specific ports such as network print server appliance ports or port monitors.
-
Delete Port. This option removes a port from the list of available ports.
-
Configure Port. This option is used to configure port settings.
At the bottom of the Ports property sheet are two additional configuration options. Enable bidirectional support is a feature used with higher-end print devices that enables Windows XP to receive detailed information back from the printer regarding the status of print jobs. The Enable printer pooling option is designed to allow administrators to configure two or more print devices that use the exact same printer software driver to act as a single logical print device. When two or more print devices are grouped into a printer pool, print jobs are routed to the first available printer in the pool.
A printer pool provides an effective means of evenly spreading print job workload between two shared print devices that belong to the same computer. By establishing a printer pool, administrators do not have to worry about users sending too many print jobs to one print device while another remains idle. The following procedure outlines the steps involved in setting up a printer pool with two shared network print devices.
-
Install two or more local printers that use the same printer software driver.
-
Share both print devices.
-
From the Printers and Faxes folder, right-click on the icon representing one of the print devices and select Properties.
-
Select the Ports property sheet.
-
Select the Enable printer pooling option.
-
Select the ports used by both print devices from the Port list and click on OK.
The Advanced Property Sheet
The Advanced property sheet, shown in Figure 5.29, allows for the configuration of a number of printer settings. The property sheet is divided into three sections. The first section sets printer availability and priority settings. It also provides the ability to change a print device's software driver.

Figure 5.29: The Advanced property sheets allows administrators to configure print device availability and priority settings
Controlling Print Device Availability
By default, all print devices are configured for 24-hour access. By setting a print device's availability schedule, administrators can control when users' print jobs are printed. Windows XP also allows multiple logical instances of the same print device to be installed. By installing multiple instances of the same print device, different print priorities can be assigned to each instance. By restricting which printer certain groups of network users can connect to, administrators can then control when each group can print. For example, administrators might set a ban on printing every night for 30 minutes while printer maintenance is performed.
The following procedure outlines the steps involved in restricting the availability of one logical instance of a print device.
-
Install the same print device two times, assigning a different name to each instance.
-
Share both instances of the print device.
-
To restrict the availability of one of the instances, right-click on it and select Properties.
-
Select the Advanced property sheet.
-
Select the Available from option and then specify the start and end times that the print device should be available.
-
Click on OK.
| Note | Restricting the availability schedule of a print device does not prevent Windows XP from accepting and spooling new print jobs. It only prevents the print jobs from being submitted to the print device outside its available hours of operation. |
Assigning Printer Priorities
Administrators can exercise control over which user's print jobs are printed first on shared printers by assigning different priorities to multiple logical instances of the same physical print device. This provides the ability to ensure that certain groups of users, such as administrators or management, are given preference over other users. Priority settings range from 1 to 99, with 1 being the lowest and 99 the highest. Print jobs submitted to the instance with the higher priority setting will be given preference over jobs submitted to an instance with a lower priority. The following procedure outlines the steps involved in setting up printer priorities.
-
Install the same print device two times, assigning a different name to each instance.
-
Share both instances of the print device.
-
To change the priority assigned to one of the instances, right-click on it and select Properties.
-
Select the Advanced property sheet.
-
Change the value of the number displayed in the priority field.
-
Click on OK.
Updating Print Device Software Drivers
Print device manufacturers are constantly improving their products. This includes making new software printer drivers available on their Web sites. These software drivers may includes fixes, performance enhancements, or even provide new features. The following procedure outlines the steps involved in upgrading a print device's software driver.
-
Open the Printers and Faxes folder, right-click on a print device's icon, and select Properties.
-
Select the Advanced property sheet.
-
Click on the Down Arrow in the Driver drop-down list to see if Windows XP already lists the new driver. If it does, select the driver and click on OK. Otherwise, continue to step 4.
-
Click on New Driver. The Add Printer Driver Wizard appears.
-
Click on Next.
-
Select the manufacturer of the print device. A list of print devices made by that manufacturer is then displayed. Select the appropriate print device and click on Next.
-
The wizard displays a summary of the information that it has connected. Make sure that the correct manufacturer and printer model is displayed and click on Finish.
-
If Windows XP already has the appropriate software driver, it will install it. Otherwise, it will display a prompt asking for the location of the new software driver.
Other Advanced Printer Configuration Settings
The middle section of the Advanced property sheet contains configuration options that control how print jobs are spooled. The default settings are Spool print documents so program finishes faster and Start printing immediately.
Unless directed to change these settings by the printer manufacturer's documentation of an application, there is usually no need to make changes to any of these settings.
The third section on the Advanced property sheet provides the following options:
-
Hold mismatched documents. Prevents documents from printing whose print setup does not match the print device's setup
-
Print spooled documents first. Gives preference to print jobs that have already spooled over those that are currently spooling
-
Keep printed documents. Prevents the automatic deletion of print jobs from the print queue (\Windows\System32\spool\printers) after being printed, leaving the administrator responsible for regularly reviewing and deleting them
-
Enable advanced printing features. Enables printer-specific advanced features such as controlling the order in which pages print or the number of pages that can print per sheet.
At the bottom of the third section on the Advanced property sheet are three more options, as listed below.
-
Printing Defaults. Displays and changes default document properties that affect all users of the computer, including such things as default document orientation, page print order, and print quality settings.
-
Print Processor. Displays a list of print processors. Print processor settings should only be changed if required to support a specific application.
-
Separator Page. Allows administrators to specify a separator page that will automatically be printed at the start of each print job in order to separate and help identify user print jobs from one another.
Print Job Management
Individual users can manage their own print jobs but are unable to affect other users' print jobs. Administrators can manage any print job regardless of who submitted it. Administrators charged with managing print devices and print jobs need to be able to stop print processing in a controlled fashion to perform maintenance tasks such as ink and toner replacement, clearing out paper jams, and even basic hardware repair. Once maintenance is complete, administrators need to know how to allow printing to resume without loss of output.
Print jobs can be managed individually or globally. Individual print job management involves opening a printer's print queue, selecting a print job, and then performing an action on the print job. Global print job management involves taking actions that affect all of the print jobs currently in the print queue.
The following list outlines various print job management tasks supported by Windows XP Professional.
-
Pausing individual print jobs or all the print jobs in the print queue
-
Canceling (deleting) individual print jobs or all the print jobs in the print queue
-
Resuming an individual print job from the point where it was paused
-
Restarting an individual print job that has been paused from the beginning
Managing Individual Print Jobs
Individual users are limited to managing their own print jobs. Administrators can manage any print job regardless of who submitted it. The following procedure outlines the steps involved in managing individual print jobs.
-
Click on Start/Control Panel/Printers and Other Hardware, and then click on View installed printers or fax printers. The Printers and Faxes folder appears.
-
Double-click on the icon representing the print device to which the print job was submitted. The print device's print queue is displayed.
-
Select the print job and then click on one of the commands located in the Documents menu. These commands include:
-
Pause. Pauses the print job
-
Resume. Restarts a paused print job from where it was when the print job was paused
-
Restart. Restarts a paused print job from the beginning, producing a complete reprint
-
Cancel. Deletes the print job
-
Properties. Displays print job properties, which includes information such as the print job's owner and its size
Figure 5.30 shows a typical Windows XP print queue. It contains five print jobs. The first two print jobs have been paused, the third job is currently printing, and the remaining jobs are waiting to be printed.
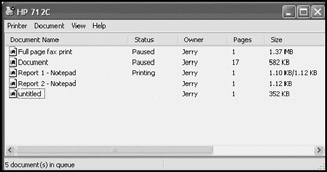
Figure 5.30: Administrators can manage any job in the print queue regardless of who submitted it
The print queue displays a number of pieces of information about each print job, including:
-
Document Name. The name of the document that is being printed
-
Status. The print job's status, which includes any of the following: Printing, Spooling, Paused
-
Owner. The username assigned to the person who submitted the print job
-
Pages. The number of pages printed and the total page count of the print job
-
Size. The file size of the print job in kilobytes
-
Submitted. The date and time the print job was submitted
-
Port. The port that is being used to process the print job
Managing the Entire Print Queue
Sometimes it may be necessary to manage all the print jobs in the print queue at the same time. Commands that have this capability are located on the print queue's Printer menu. These commands include:
-
Set as Default Printer. Establishes the default printer.
-
Printing Preferences. Sets print settings such as paper orientation and print quality.
-
Pause Printing. Pauses all print jobs in the print queue. Selecting this command a second time unpauses all print jobs.
-
Cancel All Documents. Deletes all print jobs in the print queue.
-
Sharing. Allows administrators to share or to stop sharing the printer device over a network.
-
Use Printer Offline. Allows Windows XP to locally spool print jobs destined for a network printer when the computer is not connected to the network, and to submit them when the network connection is reestablished.
-
Properties. Displays the printer's Properties dialog.
Changing the Print Order of Print Jobs
Windows XP automatically prints all print jobs in FIFO (first in, first out) order. The order in which print jobs are processed can be seen by opening the print device's printer queue. Print jobs listed at the top of the print queue are processed before print jobs at the bottom of the queue. Using the following procedure, administrators can alter the order in which a print job is printed.
-
Click on Start/Control Panel/Printers and Other Hardware and then View installed printers or faxes.
-
Double-click on the print device's icon to display its print queue.
-
Select a print job, click on the Document menu, and then select the Properties option.
-
The Document's properties dialog appears, as demonstrated in Figure 5.31.
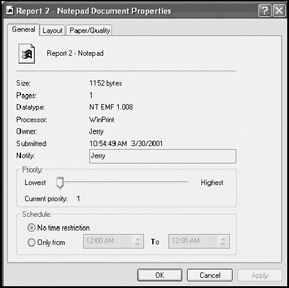
Figure 5.31: Changing the order in which print jobs are processed -
Change the default priority of 1 to a higher priority by moving the slider bar in the Priority section to the right. The higher the priority, the greater the preference that the print job will receive.
Working with Network Printers
Windows XP Professional works with network print devices as easily as it works with locally attached print devices. Network print servers manage network print devices. Sometimes print servers are just computers that have been set up to share a locally attached print device. On many networks, network printers are connected to and managed by dedicated stand-alone print appliances, and in other cases, high-end network printers come equipped with built-in network servers.
Automatic Installation on Small Networks
Setting up a computer running Windows XP Professional to connect to and use a network print device is not very different from setting up a local print device. On small peer-to-peer networks, Windows XP should automatically detect shared network print devices and configure them as network printers, totally automating the setup process. Windows XP Professional accomplishes this task using Universal Plug and Play, which is a specification that allows Windows to autodetect and set itself up to work with network devices such as printers, scanners, and Internet gateways. On a small peer-to-peer network, double-click on the Printers and Faxes folder to see if Windows XP has automatically set up a connection with a network printer before attempting to install it. In most cases, a connection to the network print device will automatically be set up within a few minutes from the time it was made available to the network.
As Figure 5.32 shows, the icon representing network print devices that are automatically discovered and configured by a Windows XP computer looks different than other printer icons. The name that is automatically assigned has the word Auto in it.
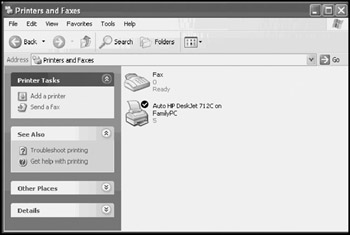
Figure 5.32: On small networks and local subnets, Windows XP Professional automatically detects and sets up a connection with most network print devices
Setting Up a Connection to a Shared Print Device
Connecting to network print devices on larger networks requires that administrators establish the connection. The following procedure outlines the steps involved in performing this process. This same procedure can be used on peer-to-peer networks to connect to a network printer that has not been automatically detected and set up.
-
Click on Start/Control Panel and then Printers and Other Hardware. The Printers and Other Hardware folder appears.
-
Click on the Add a printer link. This starts the Add Printer Wizard. Click on Next.
-
The Add Printer Wizard presents the following two options.
-
Local printer attached to this computer
-
A network printer, or a printer attached to another computer
Select the A network printer, or a printer attached to another computer option and click on Next.
-
-
The next dialog, shown in Figure 5.33, collects the location of the network print device. Any of the following options can be used to supply this information:
-
Browse for a printer. Use this option to search for the print device by browsing the network.
-
Connect to this printer. Use this to specify the print device's location using its UNC (Universal Naming Convention) name in the format \\printservername\sharename.
-
Connect to a printer on the Internet or on a home or office network. Use this option to specify an Internet printer's URL in the format http://printservername/Printers/sharename/.printer.
Select one of these options and specify the location of the next print device and then click on Next.
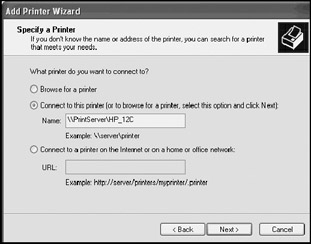
Figure 5.33: Tell the Add Printer Wizard the location of the network print device -
-
Click on Yes or No if prompted to make this connection the default printer and then click on Next.
-
A summary of information that has been collected by the Add Printer Wizard is displayed. Verify that everything is accurate and click on Finish.
EAN: 2147483647
Pages: 358