The .NET Model of Web Service Consumption
In .NET, the process of consuming a Web service is deliberately made very simple. To consume a Web service, you must accomplish the following tasks:
-
Discover the Web service.
-
Create a proxy class for the Web service.
-
Include a namespace in the client’s code so the proxy class can be referenced by the client.
-
Create an instance of the proxy class in the client.
-
Access the Web methods via the proxy class in the client so that the client can use the Web service.
We’ll reference this model as we build our clients. Despite the varying types of clients, they all use this basic model.
Finding and Consuming a Web Service
If you can’t find a Web service, you cannot consume it, so this first step is fundamental. The process that the service provider and the consumer must go through to consume a Web service can be summed up in three words—publish, find, and bind. The service provider publishes details about the service in the service registry and provides information to the consumer about how to bind to the service after finding it.
| Tip | IBM has proposed adding a repository of Web service ratings and recommendations to this process. There are currently no facilities for choosing between Web services that appear to offer the same function. The idea is to add some sort of “review” process whereby Web services can be compared and consumers can make more informed choices. This repository would be freely browsable by consumers and would be linked back to the service registry. IBM’s proposal can be found in a document on the company’s Web site:http://www-106.ibm.com/developerworks/webservices/library/ws-qual/?dwzone=webservices. |
This model isn’t the only way to consume Web services, but it is the most common. However, it is also common for the consumer to know exactly where the Web service is and bypass the service registry entirely. Next we’ll discuss the most popular ways to discover services.
Discovering a Web Service
If a consumer already has the URL of a service, all he has to do is supply it. In Microsoft Visual Studio .NET, if you add a Web reference to your project and then supply the URL, this is enough for consumers to “discover” your service. For example, in the previous chapter we used http://localhost/wscr/07/RecordStore/Service1.asmx. We can simply add a reference to it, as shown in Figure 8-1.

Figure 8-1: Visual Studio .NET’s Add Web Reference dialog box
This rather haphazard method certainly works, but if your company is looking to expose Web services and charge for their use, you won’t want to rely on this fairly arbitrary method of discovery. Given that the WS-Inspection standard is some ways away from being fully implemented, you will probably use one of the two most popular methods, UDDI and Microsoft Discovery (DISCO).
UDDI
An implementation of Universal Description, Discovery, and Integration (UDDI) is held on a Microsoft server at http://uddi.microsoft.com. It is by no means the only registry, but it is perhaps the most visible portal for searching for Web services. It was started by Microsoft and IBM and is supported by Visual Studio .NET, Microsoft Office XP and later, and Microsoft Windows Server 2003 Enterprise Edition (in which UDDI services have become an integral part of the operating system). The UDDI registry provides a directory of business services and also a set of test Web services that developers can use as they develop their applications.
UDDI has two aims—to provide a method of describing a Web service, making the description meaningful enough to be useful during searches, and to provide a facility to make the descriptions useful enough that you can interact with a service while not knowing much about it.
Microsoft anticipates that most developers will use UDDI in two ways:
-
Developer reuse The UDDI services provide all the necessary information when a developer wants to repeatedly use some programmatic resources within an application.
-
Dynamic configuration Applications can connect to a UDDI service at run time for various configuration information about the services they use.
When you go to add a Web reference to your projects in Visual Studio .NET, you can follow one of two links straight to the UDDI registry. From the registry you can search by service name, by provider name, or by one of the following categorization schemes:
-
ntis-gov:sic:1987 Standard Industrial Classification
-
unspsc-org:unspsc:3-1 United Nations Standard Products and Services Code System
-
unspsc-org:unspsc Universal Standard Products and Services Classification
-
uddi-org:iso-ch:3166:1999 Geographic Taxonomy
-
microsoft-com:geoweb:2000 Geographic Taxonomy
-
ntis-gov:naics:1997 North American Industry Classification System
-
VS Web Service Search Categorization Visual Studio .NET’s own categorization scheme
Once you locate a Web service URL from a scheme, you just add the Web reference to include it. Not a lot of services are in the registry yet, so don’t be surprised if your search for a particular type of service doesn’t turn up anything or if the WSDL interface hasn’t been made available.
You can also search for services directly from one of four tabs on the Microsoft UDDI site. Once you obtain the service you’re looking for, you can go back to Visual Studio .NET and add the URL as a Web reference to the project. We looked at UDDI in detail in Chapter 4, so we won’t examine it further here.
DISCO
The other option is to use DISCO. DISCO is a Microsoft protocol for enabling a client to discover all Web services available on a particular machine and obtain information about a particular Web service. When you create a Web service in Visual Studio .NET, the IDE and the .NET Framework can create a set of XML files that hold information about the Web service. Those files have the following filename extensions:
-
.disco Contains information such as the link to the actual Web service, the location of the Web service’s WSDL document, a link to the Web service’s documentation, and a link to an XSD file that describes the Web service (not used in version 1.1 of the .NET Framework). An .asmx Web service creates this file automatically when you browse the URL of the Web service with the ?disco query string. The ?disco query string is used in static discovery when you know the location of the Web service but want to know more details about the service.
-
.vsdisco Contains information for dynamic discovery when you don’t know the URL of a particular Web service but you do know the endpoint of the Web service provider. Dynamic discovery must be specifically enabled; you can instruct ASP.NET to navigate through particular folders looking for Web services. When you create a new project, a .vsdisco file is automatically created for you.
-
.map Created by the client when you add a Web reference to a project. The .map file contains links to Web service resources such as the WSDL and DISCO files. It is regenerated every time you update the Web reference. It is mainly used to help you find copies of original files.
From the client’s point of view, the .vsdisco file is the one that has real bearing on the discovery of a service. If you want to consume a Web service, you need to know the location of it.
If you supply a .vsdisco filename when you add a Web reference, you’ll get a list of available Web services. By default, dynamic discovery is disabled in Visual Studio .NET and the .NET Framework 1.1, so if you want to use dynamic discovery, you must enable it by making a change in the machine.config file. To enable dynamic discovery, uncomment the applicable line under <httphandlers>. Another factor that prevents clients from finding Web services is that, in the .NET Framework 1.1, the HTTP-GET protocol is also no longer enabled by default.
For a client to discover a Web service, then, you must provide the URL of the .vsdisco file, dynamic discovery must be specifically enabled on that machine, and the HTTP-GET protocol must be enabled as well.
Finding the Schema and WSDL for the Service
It isn’t enough to have the URL of the Web service—you also need the location of the schema and the WSDL of the service. Whenever a Web service is exposed for consumption, a WSDL document is generated. This document is either pregenerated or generated on demand if you add the suffix ?wsdl to the URL for the .asmx file. The WSDL document acts as a contract between a provider and a consumer for how a Web service is exposed and how it is to be consumed.
We covered WSDL in detail in Chapter 3. The WSDL file is simply an XML file that indicates the schema, the method(s) to call, and the data type(s) returned. However, you must supply the WSDL file to be able to generate a proxy client class.
The Proxy Client
We mentioned proxy classes in earlier chapters, but now we need to look more closely at them because they form the critical bridge between the Web service and Web client. The proxy classes abstract the dirty work of making a SOAP call (and the like) via various .NET types. Proxy classes allow developers to integrate the Web service logic into different applications without having to build the code from the ground up.
When a client application calls a method in a Web service, the proxy is involved as follows:
-
The application calls a function in the proxy class, passing any relevant parameters.
-
The proxy class creates the request that will be sent to the Web service using the parameters supplied.
-
The proxy sends the function call to the Web service whether the service is on a local machine, an intranet, or the Web.
-
The Web service executes the function and returns a result in XML.
-
The proxy class receives the results and parses the XML returned by the Web service retrieving the data.
-
The proxy passes the data to your application.
The role of the proxy class is really to imitate the interface of the Web service. All of the methods that a Web service exposes must be exposed by the proxy class. The proxy class takes care of all the data marshaling, so the developer has to worry only about how to use the data received from the Web service.
You can build a proxy client class three ways. The first two approaches generate it for you automatically (as you saw in Chapter 1).
-
Use the wsdl.exe tool to build it.
-
Use Visual Studio .NET’s Add Web Reference dialog box to point to the WSDL document generated from the .asmx file.
-
Build it manually.
Most people opt to generate the proxy because it is easier and commonly offers all of the functionality you need anyway. The proxy client basically sits beside the client and handles any interaction with the properties and methods of the Web service. The Web service client has no concept of dealing with a remote service because the client’s method calls are really calls to the local proxy that are relayed by the proxy to the Web service. For each Web method, three methods are generated in the corresponding proxy class.
If you used wsdl.exe to generate the proxy client for the RecordStore Web service created in Chapter 7, you’ll find that the portion of the proxy file that relates to the GetBio Web method looks like this:
public RecordStoreWebService() { this.Url = "http://localhost/wscr/07/RecordStore/Service1.asmx"; } /// <remarks/> [System.Web.Services.Protocols.SoapRpcMethodAttribute( "http://www.notashop.com/wscr/GetBio", RequestNamespace="http://www.notashop.com/wscr", ResponseNamespace="http://www.notashop.com/wscr")] public string GetBio(string Id) { object[] results = this.Invoke("GetBio", new object[] { Id}); return ((string)(results[0])); } /// <remarks/> public System.IAsyncResult BeginGetBio(string Id, System.AsyncCallback callback, object asyncState) { return this.BeginInvoke("GetBio", new object[] { Id}, callback, asyncState); } /// <remarks/> public string EndGetBio(System.IAsyncResult asyncResult) { object[] results = this.EndInvoke(asyncResult); return ((string)(results[0])); } This code contains a definition that holds the URL of the service, followed by three method definitions. These method definitions all contain calls to the same GetBio Web method. One is the GetBio method, which can be used to synchronously call our Web service, and the other two are BeginGetBio and EndGetBio, which you won’t use unless you asynchronously call the Web service. We’ll deal with asynchronous calls later in the chapter. This proxy client just takes the calls from the clients, relays them to the service, and returns any data to the client from the service.
Now let’s shift our focus to how to build a client to consume the Web service.
Building a Client
We mentioned earlier that just about any type of client can consume a Web service. The first question you might ask is, “When do I use a particular type of client?” The answer depends partly on the application that’s using the Web service and partly on the way the Web service is made available. For example, our Media Player application (discussed in Chapter 7) would be an unsuitable Web Forms client because you wouldn’t want a Web page to have access to your CD drive. On the other hand, if you were developing a Web Forms application that required users to enter their address, you wouldn’t want to have them download a separate .exe file to find the postal code—you would expect the postal code logic to dovetail seamlessly within your Web Forms.
We’ll look at a variety of scenarios that require different kinds of clients. We’ll start with a basic Web Forms application.
A Basic Web Forms Client
For this example, we’ll use an existing Web service from the UDDI registry. The Web service we’ll use is a weather forecasting Web service from WebserviceX.NET (http://www.webservicex.net), which returns the current weather for a locality when supplied with a ZIP Code. Our example application will simply ask the user to supply a ZIP Code, submit it to the Web service, and then process the XML response that the Web service returns and display it in a readable format.
In Visual Studio .NET, we start by creating a new solution and building an ASP.NET Web application. We add the following URL as a Web reference: http://www.webservicex.net/usweather.asmx. We then rename this reference WeatherFetcher in Visual Studio .NET, as shown in Figure 8-2, for easier reference in our code.
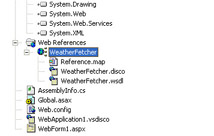
Figure 8-2: Newly added WeatherFetcher Web reference
Next we create a Web Form in Visual Studio .NET that takes one text box for the weather, one button to submit the details, and two labels—one to describe the contents of the text box and one for the output from the service (as shown in Figure 8-3).
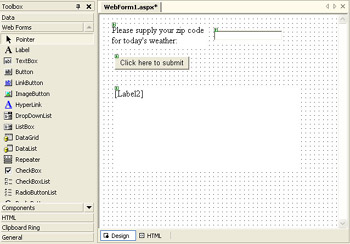
Figure 8-3: Building a form for the USWeather Web service client in Visual Studio .NET
This ASP.NET form produces something roughly resembling the following ASP.NET code:
<%@ Page language="c#" Codebehind="WebForm1.aspx.cs" AutoEventWireup="false" Inherits="WebApplication1. WebForm1" %> <!DOCTYPE HTML PUBLIC "-//W3C//DTD HTML 4.0 Transitional//EN" > <HTML> <HEAD> <title>WebForm1</title> <meta name="GENERATOR" Content="Microsoft Visual Studio 7.0"> <meta name="CODE_LANGUAGE" Content="C#"> <meta name="vs_defaultClientScript" content="JavaScript"> <meta name="vs_targetSchema" content="http://schemas.microsoft.com/intellisense/ie5"> </HEAD> <body MS_POSITIONING="GridLayout"> <form method="post" runat="server"> <asp:TextBox style="Z-INDEX: 101; LEFT: 209px; POSITION: absolute; TOP: 29px" runat="server" Width="125px" Height="18px"> </asp:TextBox> <asp:Label style="Z-INDEX: 102; LEFT: 23px; POSITION: absolute; TOP: 19px" runat="server" Width="170px" Height="39px"> Please supply your zip code for today's weather: </asp:Label> <asp:Button style="Z-INDEX: 103; LEFT: 28px; POSITION: absolute; TOP: 77px" runat="server" Width="136px" Text="Click here to submit"> </asp:Button> <asp:Label style="Z-INDEX: 104;LEFT: 28px; POSITION: absolute; TOP: 135px" runat="server" Width="333px" Height="147px"> </asp:Label> </form> </body> </HTML>
When you use third-party Web services, everything is done for you when you add the Web reference to the machine. It’s like having the object on your machine, with the proxy class already generated for you. So, the first three requirements of our .NET Web services consumption model have been satisfied. All we need to do is add the code that takes the content of the text box and supplies it to the Web service, and then returns the result from the service to the Web form.
If you supply the following code to the Web form button’s event handler and then compile and run it, the client will provide the weather conditions in detail for any ZIP Code in the United States that the user submits:
⋮ using System.Xml; ⋮ private void Button1_Click(object sender, System.EventArgs e) { WeatherFetcher.USWeather USW = new WeatherFetcher.USWeather(); XmlDocument doc = new XmlDocument(); doc.LoadXml(USW.GetWeatherReport(TextBox1.Text)); foreach (XmlNode node in doc) { XmlNodeReader noderead = new XmlNodeReader(node); while(noderead.Read()) { if(noderead.NodeType == XmlNodeType.Element) { string elementnode, nodecontents; nodecontents = noderead.ReadString(); if (nodecontents == "") { nodecontents = noderead.Value.ToString(); noderead.ReadOuterXml(); } elementnode = noderead.Name; Label2.Text += elementnode + " - " + nodecontents + "<br>"; } } } }
Only three lines of code are required to do the work:
FetchWeather.USWeather USW = new FetchWeather.USWeather(); XmlDocument doc = new XmlDocument(); doc.LoadXml(USW.GetWeatherReport(TextBox1.Text));
The first line generates an instance of the object, the second line creates an instance of an XmlDocument class, and the third line reads the result of the Web service request into the XmlDocument object. The rest of the code formats the answer the Web service returns—the Web service returns the answer as a single string, but this string is an XML document with the following format:
<Weather> <City></City> <State></State> <County></County> <Fahrenheit></Fahrenheit> <Celsius></Celsius> <Condition></Condition> <Humidity></Humidity> <Wind></Wind> <Sunrise></Sunrise> <Sunset></Sunset> <DailyReport> <Day></Day> <HighFahrenheit></HighFahrenheit> <HighCelsius></HighCelsius> <LowFahrenheit></LowFahrenheit> <LowCelsius></LowCelsius> </DailyReport> </Weather>
We have to process this XML document to display formatted output to the user, as shown in Figure 8-4—otherwise the information will appear all jumbled in one large string.
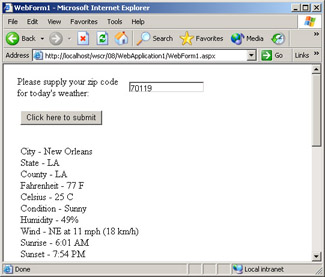
Figure 8-4: USWeather Web service client displaying formatted results
We use the XML Document Object Model (DOM) to iterate through each element, displaying the element name followed by the contents of that element. We do this by examining each node in the XML document and seeing if it is an element:
foreach (XmlNode node in doc) { XmlNodeReader noderead = new XmlNodeReader(node); while(noderead.Read()) { if(noderead.NodeType == XmlNodeType.Element) If it is an element, we read its name and contents into the corresponding string variables elementnode and nodecontents and display them in Label2.
You don’t have to take any special considerations into account with Web Form clients because the HTTP request and responses are handled in the normal way by .NET. Exceptions are also handled by the client.
A Basic Windows Forms Client
For our Windows Forms client, we’ll create a client to consume the two example Web methods that we created in the previous chapter. This is the final extension of our media player example. Our completed media player won’t actually play any CDs (although it wouldn’t be difficult to add a control enabling our application to play a CD). Instead, it will simply identify the CD placed in the drive and return information about the CD and the artist involved back to the user, from both the freedb.org database (which contains only album titles and track listings) and from our own database.
In the previous chapter, we discussed how to identify the CD. We used an .ocx file provided on the freedb.org site (http://www.freedb.org), which returns a unique identifier from the CD. This file also returns simple information, such as the artist’s name and the CD title, as properties. We extended the functionality of the .ocx file by creating two Web methods. The first allowed us to extract the extra biographical details about the artist, and the second allowed us to download a .jpg file from our own database via our Web methods.
| Important | We’re using a freeware .ocx file supplied by Jon F. Zahornacky and Peter Schmiedseder to access the freedb.org database; the file is located at http://www.freedb.org, in the Downloads section under Miscellaneous. The freedb.org site houses a database that contains the unique identifiers for millions of CDs, plus track listings for each CD. The .ocx component can generate the unique identifier for a CD when supplied with that CD and can match it to the details stored in the database. You must register the uFREEDB.ocx file on your machine before Visual Studio .NET can use it. |
The client code is quite lengthy in this case, but the basic five steps we outlined for the consumption of Web services at the start of the chapter still hold true. The rest of the code simply manipulates the data made available from the Web service and presents it in an easily digestible format for the user. To sum up how the application works: The user inserts a CD and starts the application. She clicks Search and the client retrieves the artist name, track list, and title information from the freedb.org database. The client then uses the unique identifier, employed as a primary key in our local database, to retrieve the biographical details for the artist. Also, the client uses the unique identifier to retrieve a picture from our local database.
For all of this to work, the client must be set up correctly. You must also have created the two Web methods in Chapter 7 and be running Microsoft SQL Server 7.0/2000 or Microsoft SQL Server Desktop Engine (MSDE) and have downloaded a copy of the RecordStore database from the Microsoft Press site.
To create the client, we create a new Windows Forms application and add four labels, one button, and one picture box to Form1. Add the picture box on the left side, between labels 1 and 2. You’ll need to add the Windows Media Player component to the project. To do this, right-click on the toolbox in the Forms Designer and select Add/ Remove Items from the shortcut menu. In the Customize Toolbox dialog box, click on the COM Components tab and select the Windows Media Player component, as shown in Figure 8-5.
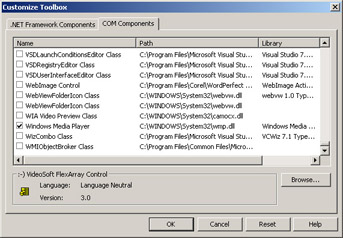
Figure 8-5: Using Visual Studio .NET’s Customize Toolbox dialog box to add the Windows Media Player component to a project
Now you can drag the Windows Media Player control from the Forms Designer toolbox into the form. Set the control’s Visible property to False because you don’t want it to appear on the box. Next, download uFREEDB 1.6.2 from the Downloads area of http://www.freedb.org, extract the file uFREEDB.ocx, add it to the toolbox (in the same way you added the Windows Media Player control), and drag the uFREEDB control onto the form. Finally, clear the label controls of any text and change the button’s label so the button text is Search. Before the label controls are cleared, the form will look something like that shown in Figure 8-6.
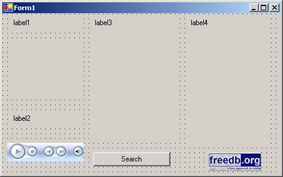
Figure 8-6: Forms Designer view of the main form of the Windows Forms Web service client
We then add references to the following namespaces at the beginning of the forms code:
using System.IO; using System.Drawing.Imaging; using FREEDBControl;
Next we add a Web reference to the form pointing to our Web services and rename this Bio. We then click on the button handler and add the following code to connect with our Web service:
public void button1_Click(object sender, System.EventArgs e) { // Code required to make FreeDB Control work uCDDBMatchCode sts = new uCDDBMatchCode(); bool notallow = false; axuFREEDB1.set_AllowSubmission(ref notallow); string em = "your.email@goes.here.com"; axuFREEDB1.set_EmailAddress(ref em); // Code initializing values for control string artist; string title; string Id; sts = axuFREEDB1.LookupMediaByToc(axuFREEDB1.GetMediaTOC("D")); // Change above letter to whatever your CD drive is. artist = axuFREEDB1.GetArtistName; title = axuFREEDB1.GetAlbumName; Id = axuFREEDB1.GetMediaID; // Check to see what the artist name is if(axWindowsMediaPlayer1.cdromCollection.Item(0) .Playlist.getItemInfo(axWindowsMediaPlayer1 .cdromCollection.Item(0).Playlist.get_attributeName(1)) == "Unknown Artist") { //Unknown Artist MessageBox.Show("Item not in Windows Media Player db."); } else if (axWindowsMediaPlayer1.cdromCollection.Item(0) .Playlist.getItemInfo(axWindowsMediaPlayer1 .cdromCollection.Item(0).Playlist.get_attributeName(1)) == "No Disc in Drive") { MessageBox.Show("No CD in drive"); } else { // Known artist Bio.Service1 ws = new Bio.Service1(); label4.Text = ws.GetBio(Id); try { MemoryStream BLOBDataStream = new MemoryStream(ws.GetPic(Id)); pictureBox1.Image=Image.FromStream(BLOBDataStream); } catch(Exception ex) { MessageBox.Show(ex.Message); } label1.Text = artist; label2.Text = title; label3.Text = ""; int counter = axWindowsMediaPlayer1.cdromCollection .Item(0).Playlist.attributeCount; for(int i = 1; i <= axWindowsMediaPlayer1 .cdromCollection.Item(0).Playlist.count-1; i++) { label3.Text += axWindowsMediaPlayer1.cdromCollection.Item(0) .Playlist.get_Item(i).name + "\n"; } } } The code for the client is relatively straightforward, but we need to examine two aspects of the uFREEDB control because without them our code cannot work properly. First, you need to submit a functioning e-mail address before you can query the database. Without this code, you won’t get a response. The second issue is that the artist name and the title name are returned by the GetArtistName and GetTitleName properties, and these are supplied as parameters to our local Web methods.
We also use the Windows Media Player control and query the Playlist object of this control to determine whether a CD is in the drive. As mentioned in Chapter 7, Windows Media Player already provides the ability to extract biographical details and pictures from a Web service at a lower level, but the point of this example is to demonstrate how you can do this yourself and how you can use your own Web services to provide this information.
When you look at our client code, it should be evident that only after we have identified the CD and have determined that the artist is contained within the Freedb.org do we get a chance to query our Web method. The code underneath the // Known artist comment is where the Web service functionality begins. Going back to our five-step model for building a client, the form already inherits from the application namespace, so we don’t need to add anything extra. By adding a Web reference, we have “discovered” the Web methods and have also created a proxy client.
We can then query our Web service by querying the proxy client as follows:
Bio.Service1 ws = new Bio.Service1();
Then we can access the Web methods as “normal” methods:
label2.Text = ws.GetBio(Id);
The code calls our GetBio Web method and displays the results as text in the label control. The second Web method retrieves an image from the database. This is slightly more complex because it requires us to use a binary large object (BLOB) and read the image in from a data stream:
try { MemoryStream BLOBDataStream = new MemoryStream(ws.GetPic(Id)); pictureBox1.Image = Image.FromStream(BLOBDataStream); } catch(Exception ex) { MessageBox.Show(ex.Message); } We enclose the code to do this within a try/catch block because reading from a data stream can lead to unexpected exceptions (exceptions not caused by errors in our code). The client application reads the data that our Web service returns, which the Web service fetches from a database, into a MemoryStream object. The MemoryStream object is then used to create an Image object that is assigned to the Image property of the picture box on our client. The rest of the code following this simply uses the existing uFREEDB and Windows Media Player controls on the form to supply extra information about the CD.
For the example to fully work, the CD must be located in both the freedb.org database and our own database. If it isn’t in the latter, the biographical details and picture won’t be displayed.
To run the example and see it in action, you don’t have to find a CD contained in our CD database—you can use a “dummy entry” by changing the following lines in the client and putting any audio CD you have in the CD drive:
artist = axuFREEDB1.GetArtistName; title = axuFREEDB1.GetAlbumName; id = axuFREEDB1.GetMediaID;
to
artist = "Shane DeSeranno"; title = "Vacant and Happy"; Id = "r23q3t4h";
Figure 8-7 shows what the code displays:
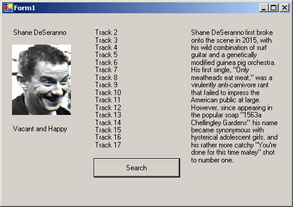
Figure 8-7: The famous Shane DeSeranno—vacant and happy
The picture from our GetPic Web method is inserted on the left and the biographical details from our GetBio Web method are displayed on the right. Despite the extra window-dressing to make our client richer, the actual communication with the Web service itself remains very straightforward. The client deals with the request/response nature of the service, just as it did within the Web Forms application, and it also allows the user to accommodate any exceptions that arise via normal structures such as a try/ catch block.
Other Scenarios
Windows Forms clients and Web Forms clients will account for the majority of consumers of Web services, but plenty of other scenarios are possible. We’ll provide a brief overview of some of them.
A Basic Interfaceless Client
We’ve assumed so far that our client has a user interface, but in fact it doesn’t have to. In other words, your Web client might be an automated service or a background process. The interfaceless client is an attractive option if the results of the Web service do not need to be displayed on screen. For instance, a Really Simple Syndication (RSS) aggregator (RSS being the XML format used to share news headlines and stories among sites) stores its subscribed feeds until the user actually needs them. In this case, the Web service’s client ultimately has a user interface, but you can imagine a client that runs unattended at given times, downloading the details to the aggregator.
Once again, this kind of service doesn’t need anything special on top—it deals with the service in the normal request/response way and can also handle any exceptions thrown.
Dealing with Multipart Messages
Another scenario is one in which the WSDL specifies how a message must be constructed if it has more than one element. For example, the message might involve a SOAP message and binary object. How can clients deal with this and the attachments?
Here you can use the new Web Services Enhancements (WSE) extensions. The WS-Attachments specification and the Direct Internet Message Encapsulation (DIME) format enable you to attach documents outside of the SOAP envelope instead of having to serialize them and transfer them as part of the SOAP body, as we did in our Windows Forms client example. DIME lets you encapsulate items such as .zip files, images, documents, or XML files as a series of records. You can send a series of records and then use your Web client at the other end to retrieve and manipulate them. This is a significant subject area—you’ll find more details about DIME in Chapter 12.
Solicit/Response Conversations
Request/response isn’t the only kind of two-way conversation. If the server initiates the conversation, it is known as solicit/response, in which case your client is acting as a listener. In a one-way case, the client is almost an event handler.
An example of this is a one-way alert. Microsoft recently introduced a facility for .NET alerts at http://alerts.microsoft.com/Alerts/Default.aspx whereby users can sign up to receive messages, such as reminders on a calendar or special offers from approved companies. These alerts are forwarded on to an instant messenger client, an e-mail client, or a mobile device, at times that are convenient for the user and via a method chosen by the user.
A Web service client in this case reacts to an event when one is generated by the server, downloads the appropriate information from the Web service, and displays it.
Non-Client/Server Setups
We’ve talked about fairly simple client/server setups over HTTP, but there are also situations in which the connection isn’t a simple server-to-client setup over a synchronous protocol (in other words, that doesn’t use HTTP). For example, consider the following two scenarios:
-
Scenario 1 The client is an intermediary point that forwards the message, possibly over another protocol. You deal with this scenario by using the HTTP SOAPAction and SOAP envelope headers. We covered this topic in Chapter 2.
-
Scenario 2 The client communicates asynchronously with the server using the asynchronous methods generated in the proxy class by wsdl.exe. These asynchronous calls can occur over Simple Mail Transfer Protocol (SMTP) or Microsoft Message Queue (MSMQ). The binding is specified in the WSDL.
In all of these situations, our five-point model for consuming a Web service applies. We haven’t yet considered asynchronous consumption in our clients—we’ll discuss that next.
One-Way Requests and Asynchronous Consumption
It is perfectly valid for a Web services client to make a request of a service without expecting a response. For instance, the client might want to make a request to a Web service and come back later to get a response, getting on with other work in the meantime. (You might find your application performing inefficiently if it waits for a response the whole time.)
Of course, not all Web services are suitable for asynchronous calls. For instance, any situation in which the client is likely to be waiting on a response from the Web service before it can continue is not a good candidate for asynchronous invocation. However, with long-running tasks you might consider calling the Web service asynchronously; the decision is made in the client, not in the Web service. To be able to call a Web service asynchronously, you must use a couple of methods exposed by the proxy class, which we’ll introduce next.
BeginInvoke and EndInvoke Methods
Within every automatically generated Web service proxy class are the BeginInvoke and EndInvoke methods, which enable asynchronous access. The BeginInvoke method is there to call a Web service, but it doesn’t wait for a response. The EndInvoke method allows you to return the response to get the results. These two methods are used in combination to provide asynchronous services, but in reality they are just separate asynchronous calls to your Web service.
The BeginInvoke method returns an object of type System.Web.Services.Protocols.WebClientAsyncResult. This object allows you to check the status of your Web service request and to handle multiple calls to the same Web service.
If we dig into the proxy class of our example, the GetBio Web method, we can see that the BeginInvoke method is sandwiched in a BeginGetBio method:
public System.IAsyncResult BeginGetBio(string Id, System.AsyncCallback callback, object asyncState) { return this.BeginInvoke("GetBio", new object[] {Id}, callback, asyncState); } Just as there are BeginGetBio and EndGetBio methods for the GetBio Web method in the proxy class, each Web method has a BeginWebMethod call and an EndWebMethod call within the proxy class. These can be called directly from within the client. In fact, any method can be called asynchronously when you use these methods.
You can actually use two approaches to call Web services asynchronously:
-
Call a Web method that initiates requests and returns a status based on whether the Web service has completed.
-
Call a Web method that initiates requests and uses callbacks to send results.
We’ll examine these approaches next.
Polling
The first way of calling a Web method asynchronously, by calling a corresponding Begin method in the proxy class and then checking occasionally to see if the service has completed, is known as polling. The BeginWebMethod and EndWebMethod classes provide the polling interface. Here’s how it all works: When called, the BeginWebMethod class returns an IAsyncState object. This object is used to decide when the method has completed. In the GetBio proxy class, the return type of the function is System.IAsyncResult. You can check the IAsyncState.IsComplete property to see whether it is true or false. If it is true, you can call the EndWebMethod class, supplying the IAsyncState object as a parameter.
| More Info | You can specify two extra parameters of the BeginWebMethod to provide a callback (described shortly). When using polling, however, you can leave these blank. |
One advantage of making asynchronous Web service calls is that you can call several methods at the same time. We mentioned earlier that the IAsyncResult object provides this functionality. This is because for each BeginWebMethod call, a different IAsyncResult object is generated, and to be able to invoke the EndWebMethod call, you have to provide the correct IAsyncResult object to the Web service.
WaitHandle Objects
You can use WaitHandle objects in conjunction with polling. WaitHandle objects wait for the response from the service to complete before allowing processing to continue. You can submit several requests and then decide to wait for one or more of them to return before you carry on processing. To implement the requests, you use the System.Threading.WaitHandle object to block one of the executing threads, by calling a delay. WaitHandle objects are useful when you want to make asynchronous calls and you want to do processing after the call but do not want the client to return before it has received all of the data from Web service.
An Example of an Asynchronous Web Service Call
Although there is no need to call our weather Web service asynchronously, to keep the code simple and to the point, we will do just that. We will call the service asynchronously by clicking one button and then get the client to pick up the result by clicking another. We can then go back and modify the code so we can call several methods simultaneously.
First we create a Web form with one text box and two buttons in Visual Studio .NET, as shown in Figure 8-8.
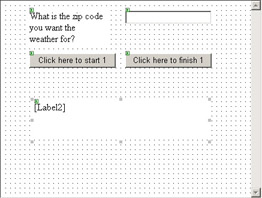
Figure 8-8: Designing a Web Forms application that calls a Web service asynchronously
We create a static variable to hold the IAsyncResult object and also add event handler code for the two buttons we’ve created:
static IAsyncResult tempHolder1; WeatherFetcher.USWeather USW = new WeatherFetcher.USWeather(); ⋮ private void Button1_Click(object sender, System.EventArgs e) { Button1.Enabled = false; tempHolder1 = USW.BeginGetWeatherReport(TextBox1.Text, null, null); } private void Button2_Click(object sender, System.EventArgs e) { if (tempHolder1.IsCompleted) { Label2.Text += USW.EndGetWeatherReport(tempHolder1) +"<br>"; Button1.Enabled=true; tempHolder1 = null; } else { Label2.Text += "1 is Still completing..."; } } Button 1’s event handler disables the button when it is clicked and then calls GetWeatherReport asynchronously and stores the IAsyncResult object in tempHolder1. Button 2’s event handler checks to see whether the tempHolder1 object’s IsCompleted property is true. If it is, the event handler displays the raw XML result in the Label2 control, enables the Button1 control, and sets tempHolder1 to null because further calls can cause exceptions.
If you run the program and type a ZIP Code and submit it, the answer isn’t returned, as shown in Figure 8-9. To get the answer, you must first click the Click Here To Finish button.
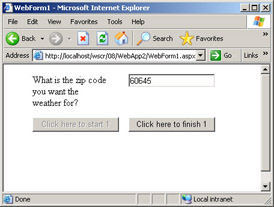
Figure 8-9: Asynchronous USWeather Web service client in action
Let’s ramp up the example a little and see how we can call the Web service asynchronously and return the results in a different order. We add another four buttons to the form so it looks like Figure 8-10.
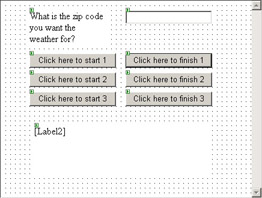
Figure 8-10: Designing a Web Forms application that calls a Web service asynchronously and that allows the calls to complete out of order
We add a couple more IAsyncResult definitions to our existing one:
static IAsyncResult tempHolder1; static IAsyncResult tempHolder2; static IAsyncResult tempHolder3;
Then we add the following code to these new button event handlers:
private void Button3_Click(object sender, System.EventArgs e) { Button3.Enabled = false; tempHolder2 = USW.BeginGetWeatherReport(TextBox1.Text, null, null); } private void Button5_Click(object sender, System.EventArgs e) { Button5.Enabled = false; tempHolder3 = USW.BeginGetWeatherReport(TextBox1.Text, null, null); } private void Button4_Click(object sender, System.EventArgs e) { if (tempHolder2.IsCompleted) { Label2.Text += USW.EndGetWeatherReport(tempHolder2) +"<br>"; Button3.Enabled=true; tempHolder2 = null; } else { Label2.Text += "2 is still completing..."; } } private void Button6_Click(object sender, System.EventArgs e) { if (tempHolder3.IsCompleted) { Label2.Text += USW.EndGetWeatherReport(tempHolder3) +"<br>"; Button5.Enabled=true; tempHolder3 = null; } else { Label2.Text += " 3 is still completing..."; } } We can now submit a different ZIP Code to the Web service with each of the buttons and then return the results in a different order by clicking the corresponding finish button. Figure 8-11 shows that we’ve submitted 60645 first, then 95472, and finally 98052 (the Redmond ZIP Code). We’ve received the return data in the opposite order, starting with the weather information for Redmond.
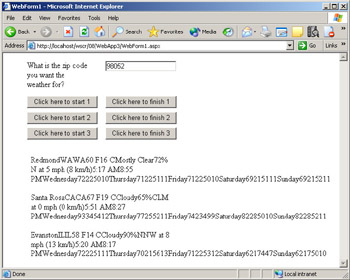
Figure 8-11: Calling a Web method several times with different data and then receiving the results out of order
This is still a rather primitive way of invoking asynchronous calls, however; instead of polling the service to see if it has completed, you might prefer to use the method described next.
Callbacks
An alternative to polling is callbacks. Callbacks wait for a response from the service and then process the response along with the Web service. Callbacks are used to notify your client that some event has occurred. The Web service has to respond to the client when a particular event has taken place. .NET uses delegates to handle communication between the Web service and client when you use callbacks. The callback holds information about a single method. The BeginInvoke and EndInvoke methods are used with callbacks. The BeginInvoke method commences the asynchronous call, using a different thread from the calling method. On top of the parameters for the Web method, the BeginInvoke method takes another two parameters:
-
An IAsyncState object that contains context information for the callback
-
An AsyncCallback delegate that enables the callback method to be invoked on completion of the Web method
The BeginInvoke method returns an IAsyncResult object. This object has an IAsyncDelegate property. The property contains the delegate object that was invoked by the original Web service call. When EndInvoke is used, the AsyncResult object is passed as a parameter to it, and EndInvoke returns the expected values from the Web service.
You can create a callback by attaching an AsyncCallback delegate to your method. This variable is then passed to the BeginWebMethod method as an extra parameter.
Amending Our Example to Use Callbacks
We can change our example so it uses callbacks. First we delete all but the first button on the form and the corresponding event handlers that we added to the end of the previous example.
Next we amend the code for the first button’s event handler as follows:
private void Button1_Click(object sender, System.EventArgs e) { Button1.Enabled = false; AsyncCallback callBack = new AsyncCallback(MyCallBack); USW.BeginGetWeatherReport(TextBox1.Text, callBack, USW); Label2.Text = "Web Service called..."; } We also add the following method to the code for the callback:
public void MyCallBack(IAsyncResult AsyncResult) { string ReturnValue; ReturnValue = USW.EndGetWeatherReport(AsyncResult); Label2.Text += "<br>" + "Weather Report = " + ReturnValue; Button1.Enabled = true; } For all intents and purposes, our client works in the same way as it did when we used polling. The difference is that the MyCallBack method now retrieves the result instead of the second button’s event handler retrieving it.
The drawback is that unlike with the multiple methods example, if several calls are made, the method has no way of knowing which method made the request. We’ve avoided this by passing the proxy class instance as the third parameter to the service.
Other issues crop up with callbacks that relate to threading (mainly that callbacks can end up executing different threads that then run concurrently with other parts of your application, which might not be desirable). However, we won’t delve into these issues because we simply want to show a simple example that uses callbacks.
EAN: 2147483647
Pages: 172