4.7. Protecting Services
| | ||
| | ||
| | ||
4.7. Protecting Services
Many server services will be considered in this book. Their security depends not only on proper configuration of the services themselves but also on the access permissions you assign to them. Hackers often attack certain services looking for bugs that can be used to penetrate the system and, as you already know, there are bugs in any complex software, no matter how secure its developers may claim it is.
While writing this book, I was too busy to make timely updates to my site, which is hosted by a major hosting company. Hackers did not fail to take advantage of this circumstance and carried out a few successful attacks on the site. In a 2-day period, the site's home page was changed twice, and then the miscreants took over the forum. I was forced to remove the forum to a safe place to restore my administrator rights, editing the MySQL database directly.
The hackers carried out the forum break-in by exploiting bugs in the forum's phpBB engine. This is one of the most popular forum engines, and because it is free many site owners use it. Most hackers try to discover bugs in the most popular software, and sometimes they succeed. Only timely updates of the software can help you maintain the upper hand against attackers .
Examine how the attack on my site was carried out, using an abstract site, www.sitename.com , as an example. Opening a forum topic causes a reference similar to the following to be displayed in the address bar:
-
http://www.sitename.com/forum/viewtopic.php?p=5583
Appending a Linux command to this address in the following format will make the server execute the command:
-
&highlight=%2527.$poster=%60 command Linux %60.%2527
In particular, the following command can be used to view the contents of the server's /etc directory:
-
&highlight=%2527.$poster=%60 1s%09/etc%09-1a %60.%2527
And the following command will delete the site's home page:
-
&highlight=%2527.$poster=%60 rm%09index.php %60.%2527
As you can see, a single buggy forum program line can put the entire server in danger.
But the danger can be minimized by limiting the access permissions of the Web server. This can be done by creating a virtual environment for the Web server to execute in, thereby placing other sections of the server out of the hackers' reach. This will also make the /etc directory inaccessible, and the most that malefactors can do is destroy the site and disrupt the operation of the Web service; everything else will be working uninterrupted. It is much easier to restore one service than the complete server.
After this incident, I spent a whole day surfing the Internet in search for vulnerable forums. It seems like there are many lazy administrators who do not stay current with updates, because I found plenty of vulnerable forums. I believe that these administrators will go through some hard times soon, if they have not already. Sooner or later any vulnerable forum will be discovered by hackers and its owners can only pray that the hacker is just curious and not out to do damage. So I will never tire of reminding people of the need to update all application software, services, and the operating system itself. You will make your administrative life easier by fixing bugs before hackers can find and exploit them.
During my search for vulnerable forums, I also checked for accessible /etc directories to see whether administrators were more security-minded than site owners. You may find it hard to believe, but the /etc directory was accessible on about 90% of the servers I checked. Is this due to administrators being incompetent or lazy? I do not think it makes any difference. Only major servers were protected, with small hosting companies saving by not paying for good administrators.
4.7.1. Protection Principles
Consider the principles to follow in protecting services. You start by creating a root directory for the service. This is done by the chroot command, which creates a pseudo-root file system within the existing file system.
A program working in a chroot environment cannot access any file objects outside of this environment. Take a look at Fig. 4.1, which shows part of a Linux file system. The root directory (/) is at the top of the file system. It contains the /bin, /usr, /var, and /home subdirectories. The /home folder contains user directories. Create a new directory ( name it chroot, for example) in this folder to serve as the root for the service you want to isolate. It has its own /bin, /usr, and other necessary directories. The service has to work with these directories, with everything above /home/chroot being inaccessible to it.
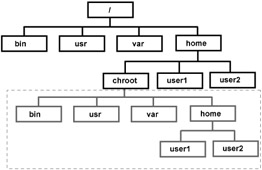
Figure 4.1: A block diagram of a chroot file system
The directories that the service can access are enclosed in the dotted line box in Fig. 4.1. The service will work in this environment, considering it the actual file system of the server.
If a hacker penetrates the system through a protected service and decides, for example, to view the /etc directory, he or she will see the contents of the /home/chroot/etc directory but not those of the system's /etc directory. To prevent the hacker from becoming suspicious, all files that the system /etc directory should usually have can also be placed in the /home/chroot/etc directory, but containing incorrect information. Requesting to view, for example, the /etc/passwd file through the vulnerable service, the hacker will be shown the /home/chroot/etc/passwd file, because to the protected service it is the system file.
But there is no need for the /home/chroot/etc/passwd file to contain the true information; any fake data can be placed into it. This will not affect the system's operation, because the operating system will use passwords from the /etc/passwd file and the protected service does not need system passwords.
4.7.2. Setting Up a Jail
Linux's built-in chroot command for creating virtual environments is too complex and difficult to use. This is why administrators prefer using the Jail program. You can download it from the www.jmcresearch.com/projects/jail/ site. Place it in your directory and unpack it with the following command:
tar xzvf jail.tar.gz
This will create a new directory, named jail, containing the program's source code in the current directory. Yes, the source code, because the program is distributed under the GNU general public license.
Now open the jail/src directory ( cs jail/src ) and edit the makefile file in any text editor (Midnight Commander, for example). Skip the parameters at the beginning of the file until you see the following parameters:
ARCH=__LINUX__ #ARCH=__FREEBSD__ #ARCH=__IRIX__ #ARCH=__SOLARIS__ DEBUG = 0 INSTALL_DIR = /tmp/jail PERL = /usr/bin/perl ROOTUSER = root ROOTGROUP = root
In the first entry, the operating system is specified; it is Linux by default. The next three entries, for the FreeBSD, Irix, and Solaris operating systems, are commented out. Leave them that way. What you have to change is the installation directory, specified in the INSTAL_DIR parameter. The latest version (when this book was written) uses the /tmp/jail directory by default. I am puzzled about why this directory is used to install the program: This is a temporary directory accessible to everyone. Earlier versions used the /usr/local/bin directory by default, and this is where I recommend you to install the program. This is the editing that has to be done; do not change anything else in the makefile file.
To execute the ensuing commands, you will need root rights, so either log in as the administrator or grant yourself root rights by executing the su root command.
Before compiling and installing the file, make sure that preinstall.sh has execute permission. If it does not, set it using the following command:
chmod 755 preinstall.sh
Now you are ready to install the program. In the terminal, switch to the jail/src directory and execute the following commands:
make make install
If you did everything right, there should now be the files addjailsw, addjailuser, jail, and mkjailenv in the /usr/local/bin directory.
4.7.3. Working with the Jail Program
First create the /home/chroot directory to be used as the root directory for the program to be used to test the system. This is done by executing the following command:
mkdir /home/chroot
Now the environment for the service has to be prepared. This is done by executing the following command:
/usr/local/bin/mkjailenv /home/chroot
Inspect the /home/chroot directory. There should be two new directories now: dev and etc. As you know, device descriptions are stored in the dev directory. In this case, the program did not copy the entire contents of the system /dev directory, creating only three main devices: null, urandom, and zero.
The etc directory also contains only three files: group , passwd, and shadow. These are partial copies of the corresponding system files. For example, the passwd file contains only the following entries:
root:x:0:0:Flenov,Admin:/root:/bin/bash bin:x:1:1:bin:/bin:/sbin/nologin daemon:x:2:2:daemon:/sbin:/sbin/nologin nobody:x:99:99:Nobody:/:/sbin/nologin
The rest of the information in the system's passwd file, including the user robert that you created in Section 4.3 , has not been copied to the Jail passwd file. The Jail shadow file contains the same information as the corresponding system's file. Make sure that its access permissions are no greater than 600 ( rw------- ).
The /home/chroot/etc/shadow file presents one security problem: It contains the actual encrypted root's password as in the /etc/shadow file. You should either delete or change this password; otherwise , if hackers get a hold of it, they will be able to penetrate the server through another door that not protected by a virtual environment.
Next, execute the following command:
/usr/local/bin/addjailsw /home/chroot
While this command is executing, it displays information about what files and directories are being copied to the /home/chroot directory. For example, such programs as cat, cp, ls, and rm are copied to the /home/chroot/bin directory, and the service will use these files and not those in the /bin directory.
The program copies those files and directories that it considers necessary, but the service that will work in the virtual environment may not necessarily need all of them. You should delete all unnecessary files, but only after ascertaining that everything works properly.
Now that the necessary programs have been copied and the virtual environment is ready, you can install the service:
/usr/local/bin/addjailsw /home/chroot -P httpd
The preceding command installs the httpd program (the Apache server) and all libraries it needs into the new environment. The Jail program will determine itself, which components to install.
Now you can add a new user to the virtual environment. This is done by executing the following command:
/usr/local/bin/addjailuser chroot home sh name
Here, chroot is the virtual root directory; in the example, this should be /home/chroot. The home parameter is the user's home directory with respect to the virtual directory. The sh argument is the shell (command interpreter), and name is the name of the user whom you want to add. The user must already exist in the main operating system environment.
The following command adds a specific user (robert) to the virtual directory:
/usr/local/bin/addjailuser /home/chroot \ /home/robert /bin/bash robert
The command did not fit into one line, so I carried it to another line with the help of the \ character. (The \ character tells the command interpreter that the command continues in the next line.)
If you did everything right, the program will display the message "Done" to show that the user have been successfully added; otherwise, it will issue an error message.
To run the httpd server (the Apache server in Linux), there has to be the apache user in the virtual environment. There is such a user in the real system. Check what its parameters are and create the same user in the virtual environment:
/usr/local/bin/addjailuser /home/chroot \ /var/www /bin/false apache
You can enter the virtual environment by executing the following command:
chroot /home/chroot
You must keep in mind, however, that most commands do not work here. For example, Midnight Commander was not installed into this environment; consequently, you will not be able to run it.
To ascertain that you are in the virtual environment, execute this command:
ls -al /etc
You will see only a few files, which is just a small part of the contents of the real /etc directory. If you examine the /etc/passwd file, you will see that it contains only the virtual environment users. Should this file be compromised by hackers, they will only obtain these data. The /home/chroot directory will be the only area of the system accessible to the perpetrators; the rest of the file system and system services will be out of their reach.
The Apache server is launched by running the /user/sbin/httpd command from the virtual environment.