| The process of using parameter fields in reports includes two distinct steps: 1. | Creation of the parameter field.
| 2. | Implementation of the parameter field into the report.
|
The remainder of this chapter uses the example mentioned earlier, the World Sales Report, to create and implement parameter fields into a report. The World Sales Report is one of the many sample reports that are provided by the Crystal Reports installation. Reviewing Parameter Field Properties Before you learn how to create and implement parameter fields, it is useful to understand a few common input options and properties associated with creating parameter fields. Each of the following input properties is presented within the Create/Edit Parameter Field dialog, shown in Figure 5.2: Name A logical name for the parameter field. Value Type A list of available field types that correspond to how you want to use the parameter field within the report, including String (the default option), Boolean, Currency, Date, Date Time, Number, and Time. List of Values Type New to XI, you now have the option of sourcing a list of values for the involved parameter from either a static list that does not change over time, or from a dynamic list that is updated regularly or is live. The dynamic list of values can also be cascading and include multiple levels of selection with increasing granularity and filtering as you move through the levels (for instance, selecting a Country leads to a filtered list of states/provinces for end-user selection at the next level and so on). Static List of ValuesValue Field A drop-down box available when Static is selected as the List of Values type that enables you to specify the list of available parameter values based on a database field. After a desired database field is selected here, you can add the values to the involved parameter through the Action drop-down list and by selecting the Append All Database Values option. Static List of ValuesDescription Field A drop-down box available when Static is selected as the List of Values type that enables you to specify default parameter descriptions based on a database field. This is an optional field that is typically used to facilitate an end user's understanding of the parameter selection. Static List of ValuesAction drop-down box A list of options that enable the insertion of values from database fields, the clearing of all values, or the import and export of the existing list of values into text files. Static List of ValuesValue Table Field A table column that is available when Static is selected as the List of Values type that enables you to manually specify an entry for a value in the list of available parameter values. Static List of ValuesDescription Table Field A table column that is available when Static is selected as the List of Values type that enables you to manually specify an entry for a description in the list of available parameter descriptions. Dynamic List of ValuesPrompt Group Text An optional title that is displayed to end users when they are prompted for the list of dynamic and potentially cascading report parameters. This is typically only used when cascading parameters are used, as it redundant otherwise. Dynamic List of ValuesChoose a Data Source A user selection enabling either creation of a new set of dynamic parameters or use of an existing list of values. The existing option will only be provided if existing lists of values are present in the report or you are attached to a BusinessObjects Enterprise repository that has them. Dynamic List of ValuesValue Table Field A table column that is available when Dynamic is selected as the List of Values type that enables you to specify the list of available parameter values based on a database field. Dynamic List of ValuesDescription Table Field A table column that is available when Dynamic is selected as the List of Values type that enables you to specify the list of available parameter descriptions based on a database field. Dynamic List of ValuesParameter Table Field A table column that is available when Dynamic is selected as the List of Values type that enables you to create a parameter in the underlying report that is automatically used in the creation of the involved cascading parameter. Prompting Text A statement or question presented to the business user within the report prompt dialog for the parameter field. Prompt with Description Only A Boolean option that allows the report designer to prompt end users with only a parameter value description (if set to True) or both the parameter value and description (if set to False). Sort Order Enables specification of the sort order and the sort field that the parameter values are sorted on. Default Value An option that allows the report designer to set a default value for the static list of values. Allow Custom Values An option that enables the business user to enter a custom parameter (if set to True). If set to False, end users are only able to select predetermined parameter values. Allow Multiple Values Enables the business user to enter more than a single value for the parameter field. Allow Discrete Values Enables the business user to enter only a single value for the parameter field. Allow Range Values Enables the business user to specify a range, using start and end values, for the parameter field. Length Limit The minimum and maximum length limits for the parameter field. Edit Mask Used to enter an Edit Mask for string data types rather than specifying a range of values. The Edit Mask can be any of a set of masking characters used to restrict the values you can enter as parameter values. (The Edit Mask also limits the values you can enter as default prompting values.) Table 5.1 provides a listing of the masking characters and instructions on how to use them.
Figure 5.2. The parameter field options and properties are presented within the Create/Edit Parameter Field dialogs. 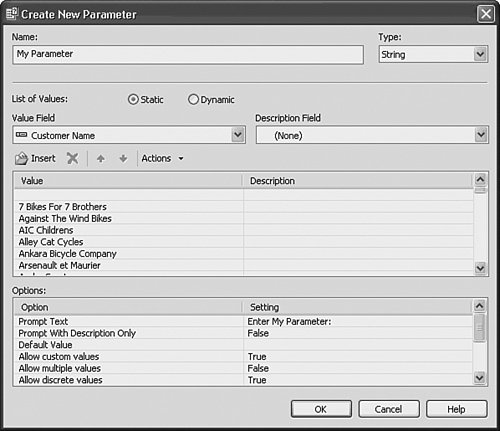
Table 5.1. Edit Mask CharactersMask Character | Mask Description |
|---|
A | Requires entry of an alphanumeric character for its place in the parameter value. | a | Enables an alphanumeric character but does not require the entry of a character for its place in the parameter value. | 0 | Requires a digit (0 to 9) for its place in the parameter value. | 9 | Enables a digit or a space but does not require such an entry for its place in the parameter value. | # | Enables a digit, space, or plus/minus sign, but does not require such an entry for its place in the parameter value. | L | Requires a letter (A to Z) for its place in the parameter value. | ? | Enables a letter but does not require such an entry for its place in the parameter value. | & | Requires a character or space for its place in the parameter value. | C | Enables any character or space but does not require such an entry for its place in the parameter value. | . , : ; - / (separator characters) | Inserting separator characters into an Edit Mask is akin to hard-coding the formatting for the parameter field. When the field is placed on the report, the separator character appears in the field object frame, like this: L0L-0L0. This example epicts an edit mask for a Canadian Postal Code (such as M2M-2L5) with a forced display dash. | < or > | Forces subsequent characters in the parameter to be converted to lowercase (<) or uppercase (>). | \ | Forces the subsequent character to be displayed as a literal. | Password | Enables the setting of the Edit Mask to "Password," so that subsequent conditional formulas can specify that certain sections of the report become visible only when certain user passwords are entered. |
Now that you have been exposed to the primary parameter field properties, you will use these items while creating parameters for a World Sales Report, as referenced earlier in the chapter. Creating Parameter Fields The first step in using parameters within a report is to create the actual parameter field and define the primary properties associated with it. In the following exercises, you will use the Field Explorer dialog to create three new parameter fields for the World Sales Report: A manual text entry field to use as the report's title A database field that prompts the business user to select one or more countries and use this selection to filter the data returned for the report A Top N parameter field that specifies how many countries are displayed in the edited World Sales report.
To begin your exercise, open the World Sales sample report within the Crystal Reports designer. You can quickly access all the sample reports from the Sample Reports link on the Crystal Reports start page. This sample report should be installed in the following directory, unless you have chosen an alternative location for the sample reports during the Crystal Reports XI installation process: C:\Program Files\Business Objects\Crystal Reports 11\Samples\en\Reports\General Business After you have opened this sample report, you can begin the steps necessary to create the parameter field objects in the following way: 1. | Remove the existing report title text object. After you have opened the World Sales Report, navigate to the Design tab view, highlight and delete the text object currently used as the report's title that reads World Sales Report, located in the Report Header A section. You will use your parameter field, created below, to populate the report title.
| 2. | Open the Field Explorer dialog by either clicking the appropriate toolbar button or using the View menu.
| | | 3. | Open the Create Parameter Field dialog. To do this, right-click on Parameter Fields within the Field Explorer and either select New from the pop-up menu or click on the New button at the top of the Field Explorer.
Tip In addition to using the right-click menu to create a new parameter field, you can use the Field Explorer's toolbar commands to create, edit, rename, and delete parameter fields. The operations available on this toolbar depend on what you have selected in the Field Explorer dialog. Also new to XI is the ability to sort the parameter's display order to end users through the Parameter Order dialog displayed in Figure 5.3. This option is accessed from the right-click menu on the Parameter sections of the Field Explorer. Figure 5.3. Use the Parameter Order dialog to control the order that parameters are presented to the end user. 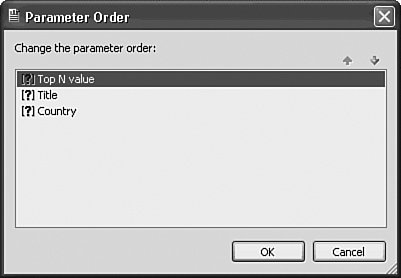
| 4. | You first create a manual text-entry parameter field to enable the business user to define a title to display on the report. Within the Create Parameter Field, enter Title in the Name property, ensure String is the selected Value Type, and provide a meaningful prompting text so that the business user understands how the entered value is used, such as, Enter a title to be used for this report.
| 5. | Ensure that both the Allow Discrete Values and the Allow Custom Values properties under the Options area are set to True and click OK to return to the Field Explorer.
| | | 6. | You should now see the Title parameter field listed under Parameter Fields in the Field Explorer. Insert this Title field onto the report in the Report Heading using either the right-click menu option or by dragging and dropping the field onto the report. The results are shown in Figure 5.4.
Figure 5.4. The Field Explorer is used to access, edit, and create parameter fields. 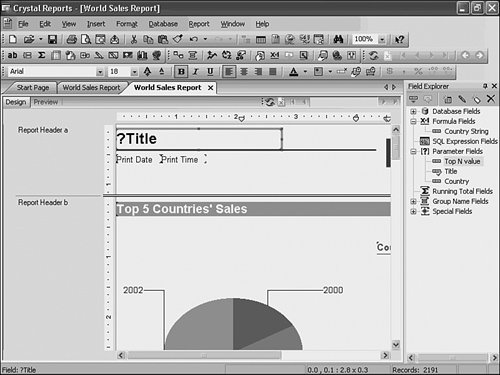
| 7. | You now create two more parameter fields to use later in the chapter when discussing how to use parameter fields in coordination with record and Top N selections. Once you learn this technique, you can enable your end users to select filters on the involved report data according to their selected parameter values.
| 8. | Open the Create Parameter Field dialog. To do this, highlight the Parameter Fields item and click the New toolbar button inside the Field Explorer dialog.
| | | 9. | Define the key properties for the first parameter object. Within the Create Parameter Field dialog, enter Top N Value in the Name property, select Number as the Parameter Type, and provide a meaningful prompting text so the business user understands how the entered value will be used, such as, Please select the top N selling countries to display on this report.
| 10. | Ensure that both the Allow Custom Values and Allow Discrete Value(s) properties under the Options area are set to True. The Allow Multiple Values property should be set to False.
| 11. | Create another parameter called Countries. Within the Create Parameter Field dialog, enter Countries in the Name property and provide a meaningful prompting text so that the business user understands how the entered value will be used, such as, Please select one or more countries for this report.
| | | 12. | Ensure that both the Allow Multiple Values and Allow Discrete Value(s) properties under the Options area are set to True, as shown in Figure 5.5.
Figure 5.5. Use the Create/Edit Parameter Field dialog to create and edit parameter fields. 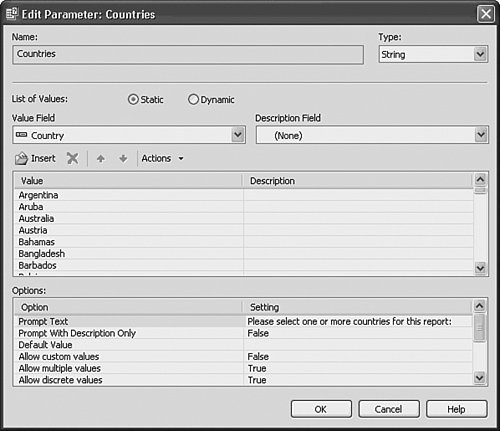
|
Setting Default Values for Parameter Fields You now want to define the Countries parameter field to include all database values within the Country field of the Customer table. This can be accomplished by mapping the parameter field to this database field and quickly importing these values. This enables the business user of the report to select one or more country values from the available list. When setting default parameter values for a static parameter, a list of default values can be read from the database or entered manually to provide the business user with a list of available values from which to choose. With static parameters, the Crystal Reports application enables you to define the default values list when you are designing reports, and no direct database connection exists to populate the prompting parameter field list when the business users run the report. New to XI, Crystal Reports now enables the creation of dynamic parameters that access an underlying database in real-time when a business user is running the report. These will be covered later in this chapter. For now, populate the static Country parameter by following these steps: | | 1. | Access the Create/Edit Parameter dialog if you have closed it by highlighting the Countries parameter and clicking on the Edit toolbar button. In the Value drop-down list, select the Country field from the Customer table and then select the Append All Database Values action from the Actions drop-down list. All countries listed in that table will be added as parameter options for this report parameter, as shown in Figure 5.6.
Figure 5.6. The Edit Parameters dialog enables you to define the default selection values for parameter fields. 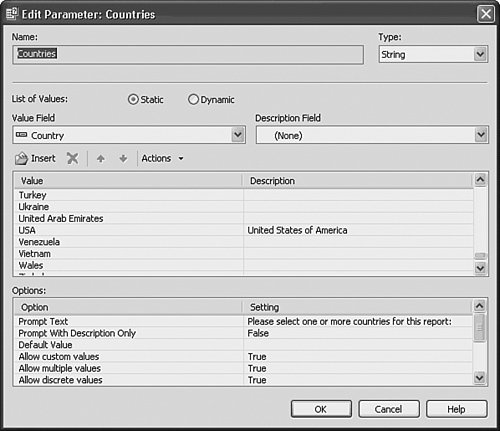
Continuing the process started above, now add descriptions to the default values that you have added to the parameter field.
| 2. | Locate and highlight the USA value in the Default Values list. Click in the Define Description field located just beside the Values field displaying USA.
| 3. | Add United States of America as the description for USA and click OK to close the Edit Parameter dialog. If you want, repeat this step for any additional default values.
| 4. | Click OK to return to the Field Explorer. You should now see the Countries and Top N Values parameter fields listed under Parameter Fields in the Field Explorer. These parameters are now part of your Crystal Report but will not become functional filters until you attach them to record selection criteria, as described in the next section.
|
Tip There are a few considerations to keep in mind when working with parameter fields, such as Any parameter field prompting text more than one line in length will automatically word wrap. The creation of a pick list enables the business user to select parameter field values from drop-down boxes instead of needing to enter them manually. A parameter field does not have to be placed in a report to be used in a record or group selection formula. You can create the parameter field and then enter it in your formula as you would any other field.
Implementing Parameter Fields You have now completed the first task necessary to use parameter fields within a reportcreating the actual parameter field objects. This section, and the exercises included here, discuss how to apply these parameter fields and make use of them to provide the business user of the report with a more dynamic and interactive reporting experience. First, add the parameter fields created earlier, called Title, Countries, and Top N Value to be displayed on the report. This example demonstrates how different parameter fields can be used to add useful commentary or descriptive information to a report. Continue working with the same report, the World Sales Report and follow these steps: | | 1. | Add and position the Title, Countries, and Top N Value parameter objects onto the report. Open the Field Explorer dialog and expand the Parameter Fields list. Click on the Title parameter field, drag it onto the report, and drop it into the upper-left corner of the Report Header A section, shown in Figure 5.7 in a size 20 Arial font. Place the Countries and Top N Value parameter in the same section with size 10 Arial font.
Figure 5.7. Drag and drop the parameter fields into the left side of the Report Header A section. 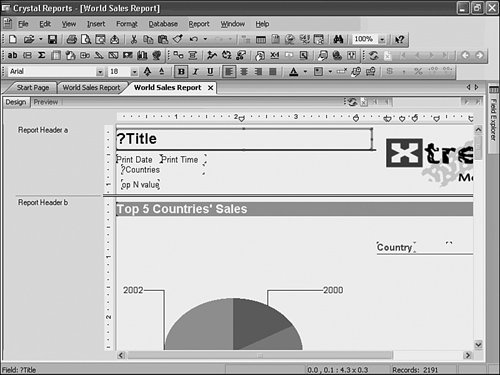
| | | 2. | Preview the report. To view how this parameter is now used within the generation of the report, run the report by clicking on the Refresh toolbar button (represented by the two blue arrows indicating a counter-clockwise rotation). As shown in Figure 5.8, the report now prompts the business user to enter a value that will be used as the report's title.
Figure 5.8. Parameter fields offer a means to add additional interactivity for the business users within the report. 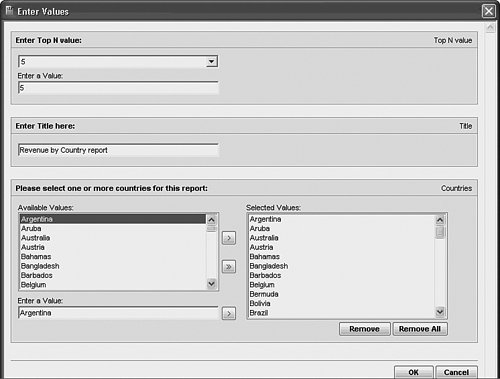
|
Note If you have already run the report at least once and then select to refresh the report, you will also see the Refresh Report Data dialog that asks you to select from the following two options: To enter or select new values for any existing parameter fields, you need to select the second optionPrompt for New Parameter Values.
|