Working with Groups
| Grouping data in a report facilitates business user analysis and enables meaningful summarizations. Examples of common and useful groupings in reports include:
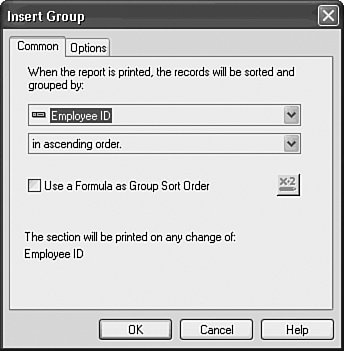
Crystal Reports provides easy-to-use grouping functionality that enables multiple types of powerful and flexible data grouping. Inserting GroupsTaking either the sample report from this or the previous chapter, you can realize the flexibility and power of grouping in a few short steps. Assume that senior sales management in a hypothetical company is interested in viewing customer order information by Employee/Sales representative, in addition to the existing grouping by Country. The following steps will guide you through an example of how grouping can help this company accomplish this task:
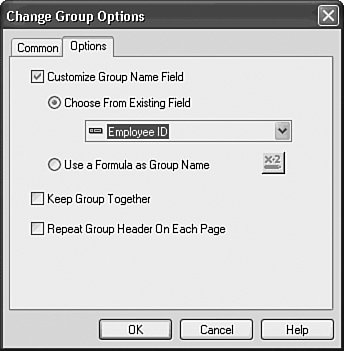
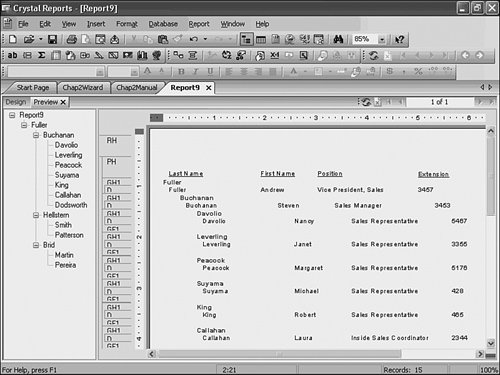
The results of this new grouping are shown in Figure 2.9. Note that the Employee ID grouping is automatically selected to be the lowest-level grouping. This is the standard and expected behavior when inserting new groups, but based on the sales management's hypothetical request, you will need to edit the grouping order so that Employee ID becomes the highest level and you can view an Employee's sales across countries. You will do that in the next section. Figure 2.9. Here is a sample report that has been grouped by Country and Employee ID.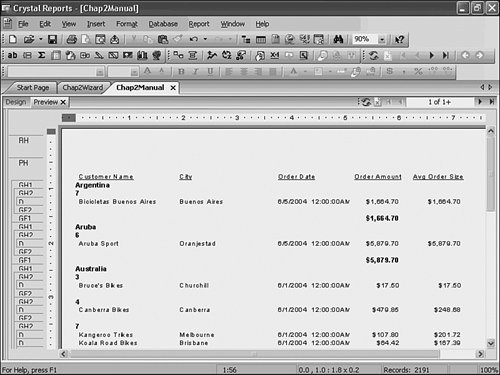 Note The specified order selection of the Insert Group dialog is particularly interesting because of the great flexibility it provides. With this option, you can dynamically create both groups and a custom order of appearance on the report. A related geographic example would be the creation of a Continent grouping based on the country field in the database with the groupings and order of appearance specified in the Insert Group dialog. Notice that when you select specified order and name the group, two more tabs appear in the Change Group Options dialog (see Figure 2.10). These tabs enable you to specify or create dynamic groupings and also to select a method of handling the other elements that do not fit into your dynamically created groups. Figure 2.10. The Change Group Options dialog displaying the Specified Order tab. Another custom ordering option new to XI is the ability to conditionally sort a group based on a formula. This option is enabled through the Group Dialog box and the Use Formula As Sort Order check box. A formula can then be entered by clicking on the x+2 box. A last note on the Change Group Options dialog is that options around group naming are available for customization. These options are accessed through the Options tab and facilitate the process of making your reports most presentable. For example, in another situation you might want to group on a country code instead of a country name for report processing efficiency (that is, numeric fields are sorted faster than string fields), but you still want to present the actual Country Name in the report. You could perform this customization through the Options tab in the Change Group Options dialog as shown in Figure 2.11. Figure 2.11. The Options tab of the Change Group Options dialog enables you to set some custom Grouping options, such as the displayed Group name. Reordering GroupsAs you can certainly imagine, it is quite common to want to group data by different fields within a single report. It is also quite common to receive multiple reporting requests for different views of data by various levels of grouping. Some examples might be
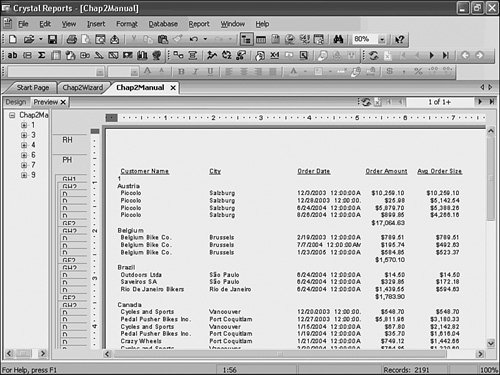
During report design, one of these different grouping orders could be created initially as you did in the last section with the groups Country and Employee ID. If other grouping orders were required, these could be quickly realized through either the Crystal Reports Design window or the Group Expert. Working in the left-most report section area of the Design tab of Crystal Reports (not the Preview tab), the different groups (sections) can be dragged and dropped before or after each other, quickly rearranging the grouping order. To complete the sales management's reporting request from the last section (to group by Employee ID at the highest level and Country below that), follow these steps:
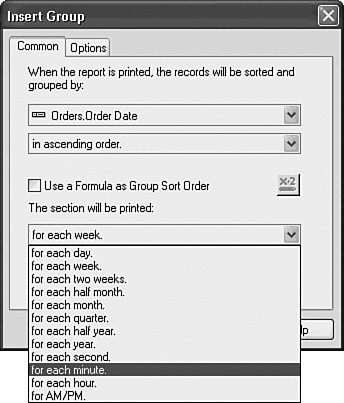
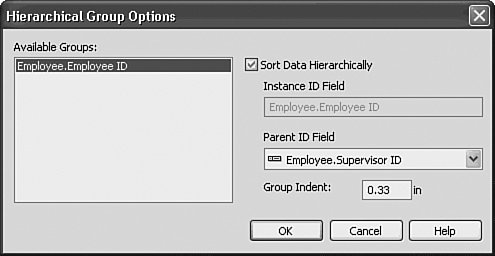
An alternative and powerful method for reordering groups is provided with the Group Expert. It is accessed from the Report menu, and the different groups can be reordered through the up and down buttons within the Grouping dialog. This quick reordering can present your data in completely different ways, serving multiple analysis requirements with very little report development effort. The next section explores the power of the Group Expert. Using the Group ExpertCrystal Reports provides an easy method to add multiple groups simultaneously and a central location for accessing all your current groupsthe Group Expert dialog. Accessed from the Report menu, the Group Expert dialog, shown in Figure 2.13, enables you to add multiple groups at one time and quickly reorder any specified groups. Figure 2.13. The Group Expert dialog accessed from the Report menu enables macro-level report group reordering and option setting. This dialog enables the selection of multiple groups in one location and provides access to the same functionality as the Change Group Options dialog through the Options button. The groups can also be easily reordered from within this dialog through use of the up and down arrow buttons, located on the upper right of the dialog area. Grouping on Date/Time FieldsOne type of grouping that is common across most organizations is date-and-time related grouping. Analysts from all industries want to see how numbers (for example, sales revenue, units shipped, units produced, employees hired, and so on) change over various periods of time. To facilitate this type of analysis, Crystal Reports provides some built-in flexibility around date-and-time grouping. When you are creating a group that is based on a Date or Time field, an extra drop-down box appears in the Insert Group dialog (see Figure 2.14). This extra Print by Section box enables the user to group the detail records in the report automatically by any number of time-related criteria. Examples include By Day, By Hour, By Quarter, or even By Second. These automatic grouping options enable quick time-oriented analysis. Figure 2.14. The Insert Group dialog with the Date/Time grouping drop-down box expanded. Hierarchical GroupingAnother type of special grouping that is available in Crystal Reports is hierarchical grouping. This special type of grouping enables your report data to be dynamically grouped on a hierarchy kept within a single table of your database. To enable hierarchical grouping, a group of the base-level data should be created through the standard Group Creation dialogs described previously. The Hierarchical Group option dialog can then be selected from the Report menu. To walk through a quick example, follow these steps:
|

EAN: 2147483647
Pages: 365
- ERP System Acquisition: A Process Model and Results From an Austrian Survey
- The Second Wave ERP Market: An Australian Viewpoint
- Healthcare Information: From Administrative to Practice Databases
- A Hybrid Clustering Technique to Improve Patient Data Quality
- Development of Interactive Web Sites to Enhance Police/Community Relations