| Like transitions and titles (see the previous two chapters), iMovie effects are accessed from their own Effects pane (Figure 13.1). Clicking an effect's name displays the effect in the preview window; clicking the Preview button shows a rough version of the effect in the Monitor. Figure 13.1. The Effects pane is a similar layout to the Transitions and Titles panes. 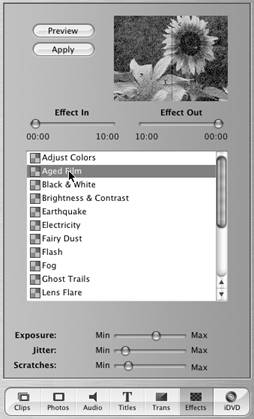 Some effects, such as Black & White, don't contain any additional controls; others, such as Adjust Colors, involve several sliders that determine the effect's end result. All of them, however, let you apply or remove the effect gradually. To control how an effect begins and ends: Select an effect's name in the list. Move the Effect In and Effect Out sliders to control the time it takes for the effect to start and end (Figure 13.2). You can, of course, leave them set at 00:00 to apply the effect throughout the entire clip, but changing these values lets you ease into and out of the effect. (For example, suppose you want someone's flashback to appear in black and white, then blend back into color as the flashback merges into the present day.) The Effect In point and Effect Out point times are shown at the bottom of the preview window as you make adjustments. Figure 13.2. Setting Effect In to 01:00 causes the effect to gradually apply, instead of starting at the beginning of the clip. In this case, the Mirror effect pushes the mirror image into the scene from the left. If we kept the Effect In slider set to 00:00, the first frame would look like the 01:00 frame, above. 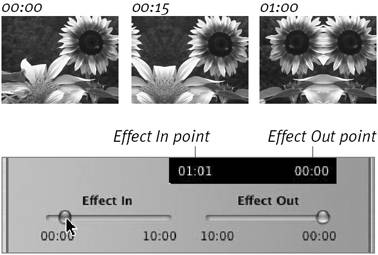
To adjust an effect's settings: Select an effect's name in the list. If it features additional controls, they appear below the list (Figure 13.3). Figure 13.3. Effect-specific controls appear below the list of effects. Changing them updates the preview window dynamically.  Move the sliders to adjust the effect's settings. The preview shows your changes immediately, so feel free to experiment.
To adjust an effect's settings in the preview window: If an effect includes controls in the preview window (such as Fairy Dust or Lens Flare), click within the window to specify a focus point (Figure 13.4). There's no obvious indication that such controls exist for any given effect, though, so you need to click the window to see if a control is available. Figure 13.4. Some effects feature controls within the preview window. For example, clicking in the preview window with Fairy Dust sets the sparkles' arc. 
 Tips Tips
To reset the sliders to their original positions, click another effect, then switch back to the one you're adjusting. The defaults return when you do, saving you the trouble of trying to approximate the controls' original positions. This doesn't apply to the Effect In and Effect Out sliders, however. They stay put when you click other effects in the list. Third-party iMovie plug-in developers have gone wild with effects. In addition to adding "painterly" looks, you can create picture-within-picture effects (as seen on TV newscasts), and even perform some rudimentary greenscreen matting effects (for when you want to make your cat look like she's rampaging through downtown Tokyo!). See Appendix B for a list of plug-in vendors.
|