| Like so many things in iMovie, adding a transition to your movie is as easy as dragging and dropping an icon. The trickery (and I use the term loosely) is in configuring how it appears in the movie. Don't worry about nailing it the first time, though: you can always change a transition's settings, even after you've added it to your movie. To add a transition: Drag the transition to the intersection of two clips in the Clip Viewer or Timeline Viewer. (Transitions can be added to the beginning and end of the movie as well.) A transition icon appears, containing a red line moving from left to right (Figure 11.6). Figure 11.6. Transitions need to render before they can play back smoothly in the Monitor (top). The transition icon is similar in the Clip Viewer (bottom). 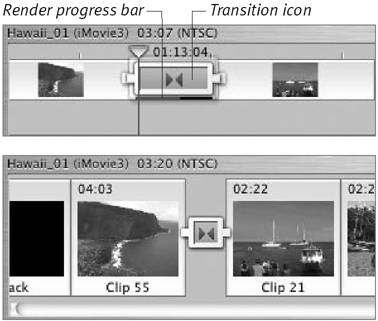 That line indicates iMovie's progress of rendering the transitions. To build a transition, iMovie recreates the affected frames of the clip with the transition applied. For example, if we add a Fade In transition that's one second (30 frames) in duration, iMovie redraws each frame with a different brightness setting (Figure 11.7). This ensures that in the final movie, the transition appears at its best resolution and plays smoothly. Figure 11.7. An iMovie transition recreates your footage with the transition's effect applied. Here are three frames from a Fade In transition.   Tips Tips
Leave enough padding in your clips to accommodate transitions. Otherwise, iMovie displays an error that one or both of the clips is too short (Figure 11.8). Figure 11.8. iMovie needs a certain amount of source material to work with. It will tell you how much footage is needed, based on your Speed slider setting. 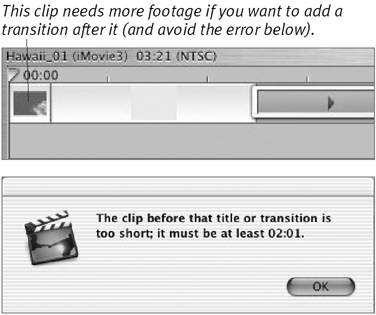 To cancel a transition while it's rendering, choose Undo from the Edit menu or press Command-period (.). Go ahead and continue working while a transition is rendering, or even add other transitions, which are rendered concurrently. You can also play your movie before the rendering finishes, though the unrendered clips will appear jumpy and rough until they're fully rendered.
To modify existing transitions: Select the transition in the Clip Viewer or Timeline Viewer. Adjust the transition's settings in the Transitions pane. Click the Update button to re-render the transition (Figure 11.9). Figure 11.9. If you change a transition's settings, click the Update button to re-render it in the Timeline. 
Tips Since transitions become their own clips, you can edit their volume levels, including fading sound in and out. The Fade In and Fade Out transitions automatically apply audio fades, which you can edit (see Chapter 10). When you update a transition, most of the time you're adjusting the clip's duration. However, you can also change the type of transition entirely: just click your transition clip, select a new transition from the list, and click Update. In the Clip Viewer, you might think you can pick up a transition and move it to another clip because the surrounding clips move aside when you drag the icon. However, all you really get is an error warning you that your foolhardy action will delete the transition (Figure 11.10). Figure 11.10. Don't say you weren't warned about moving a transition out of place. Then again, if you click the Don't Ask Me Again checkbox, you can say you weren't warned but you won't get any sympathy from me. Well, all right, maybe a little sympathy. But just this one time, got it? Okay? Good. 
iMovie's Habit of Stealing Time As you add transitions, you may notice something odd happening: your movie is getting shorter. Is it possible to add things to a movie and still end up with less than when you started? (And if so, does it apply to eating ice cream?) Yes. (But no to the ice cream.) Here's how iMovie steals time using transitions (Figure 11.11): Figure 11.11. Some transitions, such as Cross Dissolve, need to overlap two clips in order to merge the number of frames needed for the effect. This creates a shorter overall movie.  For the sake of not straining my math abilities, let's assume we want to add a Cross Dissolve transition between two 10-second clips. The clips contain outside shots of a lake and some trees, so in order to maintain a comfortable pace, we decide to make our transition 2 seconds long. We drag the transition into place between the clips, and notice that each clip has become 8 seconds in length, not 9 seconds (to split a 2-second transition between two clips leaves 1 second for each clip: 10 1 = 9). The mystery is solved when we look at how iMovie is building the transition. It needs to start dissolving one clip into the other clip at the very beginning of the transition, so iMovie merges 2 seconds of each clip, removing 4 seconds total. The transition is still 2 seconds in duration, but required 4 seconds to perform the blends. Think of it as tightening a belt: you still have the same amount of material, but the overlap where the buckle rests allows you to encompass a smaller area.
Watching iMovie grab and modify clips is also the best motivation for locking any audio clips you've extracted (see Chapter 10). It only takes one transition to throw the rest of your movie out of sync. |
|