| When you extract audio, it becomes its own clip that you can edit independently of its original video clip. To split an audio clip: Select the audio clip. Unlike video clips, which are split at the Playhead even if they're not selected, audio clips must be selected with the Playhead in place. Choose Split Selected Audio Clip at Playhead from the Edit menu, or press Command-T (Figure 10.12). Figure 10.12. You can split an extracted audio clip without splitting the video clip to which it's attached. 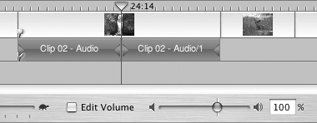
To rename an audio clip: Double-click the audio clip to display the Clip Info dialog box. Type in a new name in the Name field, then click OK. Note that as of iMovie 3.0.3, the Clip Info box doesn't work properly for audio clips: the name isn't shown in the Timeline, and the duration field doesn't work.
Changing a clip's duration Video clips use crop markers on the scrubber bar to select a range of frames. Audio clips, by contrast, feature crop markers at each end of the clip that determine at what point a clip becomes audible and when it goes silent. Simply drag the triangular crop markers to change the clip's duration (Figure 10.13). The highlighted section between the markers is what will be heard during playback. Figure 10.13. Drag an audio clip's crop markers to set which portion will be audible during playback. 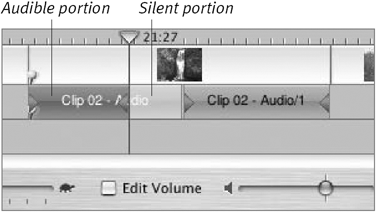 If you prefer, you can leave the rest of the clip dangling in case you need to adjust the clip's duration in the future. However, this can lead to overlapping clips that are difficult to select. If you're satisfied with the clip's length, you can crop out the unused sections. To crop an audio clip: Set a clip's crop markers to your liking. Choose Crop from the Edit menu, or press Command-K. The unused portions are removed (Figure 10.14). Figure 10.14. When you crop an audio clip, the unused portions are removed, not just kept silent. 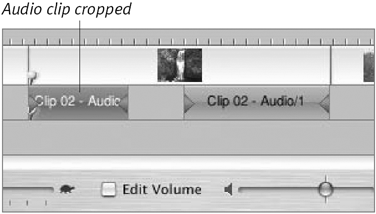
 Tips Tips
Clips can go into either audio track in the Timeline Viewer, though iMovie tends to use the second track for imported audio. Although audio clips act like video clips in most respects, you can only edit them in the Timeline Viewer; there's no audio equivalent to the Shelf. However, you can temporarily store audio clips you aren't yet using: simply drag them beyond the end of the last video track (Figure 10.15). Figure 10.15. The end of your movie is a convenient location to temporarily store unused audio clips. 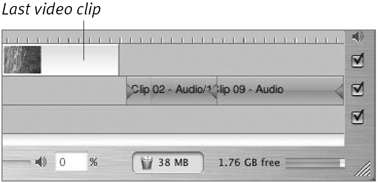 You don't have to select an audio clip before you adjust its crop markers. Grabbing a marker selects the clip for you. Audio is notoriously difficult to trim to the right length. Fine-tune your editing by using the left and right arrow keys: selecting a clip anywhere in the middle moves the entire clip when the keys are pressed, while clicking once on either crop marker makes it respond to your key presses. Unlike video clips, audio clips can overlap (though this can create audible gibberish, but that may be what you're going for). Editing audio is one area where the Timeline Viewer's Zoom control is especially useful. Zoom in to make precise changes. Experiment with overlapping clips that contain fades. This is an easy way to blend dialogue, for example (one quickie method for playing voices in a character's head), or even tighten scenes by reducing the amount of lag between speakers.
|