| If you have more control over the way your scene is lit, try to use a basic three-point lighting setup. This allows for plenty of light to illuminate the scene, while also reducing deep shadows. A three-point setup consists of a key light, a fill light, and a back light (Figure 4.4). Figure 4.4. A basic lighting setup involves three lights, though of course you can use more (or less). 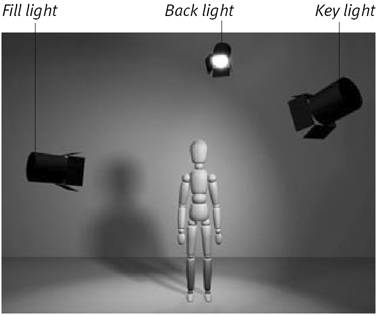 The key light is the primary light source in your scene, and usually the brightest. The fill light is softer, filling in the shadows and adding texture, and is often dimmer than the key light to avoid washing out the image and flattening it. The back light is often small, focused, and used to help separate the scene's subject from the background. As an easy example, let's say you're setting up to shoot an interview (Figure 4.5). Remember this is just a basic configuration you can position the lights any way you choose. Figure 4.5. You could use just a key light, a fill and key, or any other combination of lights. Shown here is the progression of adding lights. 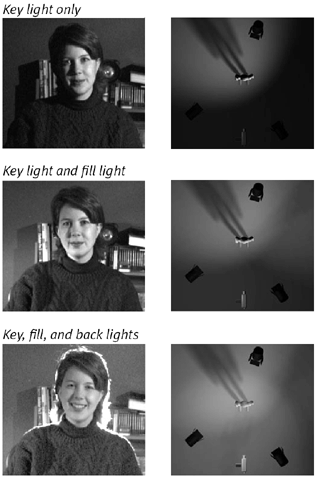 To set up three-point lighting: With the camera facing the interview subject, position the key light to the right and slightly forward of the camera. Raise the light so that it's at a 35- to 45-degree angle pointing down at the subject. Position the fill light to the left of the camera and subject, approximately halfway between the two. The fill prevents deep shadows caused by the key. Place the back light behind the subject, raised a bit higher than the key light, and aimed so that it illuminates the back of the subject's head and shoulders.
 Tips Tips
Your camcorder is programmed to automatically adjust the exposure (the amount of light coming in) by opening or closing its iris. You've probably seen this happen when you move from a bright area to a dark one, as details come into view after a second or two. To minimize this extreme change of contrast, break up your shots so that the camera can make the adjustment when you're not filming. You've seen the silhouettes. When the key light is behind your subject whether it's the sun, an especially bright white wall, or a lamp in the background the camera picks up on the light area in favor of the dark, and pretty soon the person in your video looks like a mob informant protecting his identity (Figure 4.6). Try to shoot with the light coming from behind you or from one side so the light is falling on the person or object you're filming. Figure 4.6. A strong light source behind your subjects can easily make them appear as silhouettes. 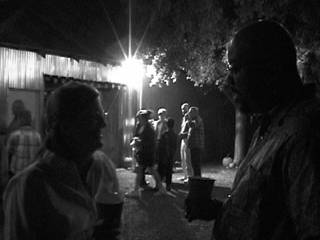 When a back light spills directly into the frame, you get the visual artifact known as lens flare. Repositioning your light usually fixes the problem. Keep in mind that you don't need to raid a professional camera store and stock up on lighting equipment. You probably have all the lights you need at home or in your office, if you're willing to move things around a bit. Just be careful to not shed too much light onto a scene, which will make it appear flat and less interesting. Three-point lighting is a good minimum starting point. On some productions, dozens of light sources may be used to properly light a scene.
|