Triggering Events
When you need your players to interact with the game world, there is a lot that is handled by the engine through the programming of various objects in the environment, as we saw with collisions with vehicles. Most other interactions not handled by an object class can be dealt with using triggers.
A trigger is essentially a location in the game world, and the engine will detect when the player enters and leaves that space (trigger events). Based on the event detected we can define what should happen when that event is triggered using event handlers or trigger callbacks. We can organize our triggering to occur when there is an interaction with a specific object.
Creating Triggers
If you recall, some of our Koob specifications require us to count the number of laps completed. What we'll do is add a trigger to the area around the start/finish line, and every time a car with a player in it passes through this area, we'll increment the lap counter for that player.
For the trigger to know what object to call onTrigger for, you need to add an additional dynamic field with the name of instance of the trigger when it is created using the Mission Editor.
Open the file C:\koob\control\server\server.cs and at the end of the onServerCreated function, add this line:
exec("./misc/tracktriggers.cs"); This will load in our definitions.
Now create the file C:\koob\control\server\misc\tracktriggers.cs and put the following code in it:
datablock TriggerData(LapTrigger) { tickPeriodMS = 100; }; function LapTrigger::onEnterTrigger(%this,%trigger,%obj) { if(%trigger.cp $= "") echo("Trigger checkpoint not set on " @ %trigger); else %obj.client.UpdateLap(%trigger,%obj); } The datablock declaration contains one property that specifies how often the engine will check to see if an object has entered the area of the trigger. In this case it is set to a 100-millisecond period, which means the trigger is checked 10 times per second.
There are three possible methods you can use for the trigger event handlers: onEnterTrigger, onLeaveTrigger, and onTickTrigger.
The onEnterTrigger and onLeaveTrigger methods have the same argument list. The first parameter, %this, is the trigger datablock's handle. The second parameter, %trigger, is the handle for the instance of the trigger object in question. The third parameter, %obj, is the handle for the instance of the object that entered or left the trigger.
In this onEnterTrigger the method is called as soon as (within a tenth of a second) the engine detects that an object has entered the trigger. The code checks the cp property of the trigger object to make sure that it has been set (not set to null or " "). If the cp property (which happens to be the checkpoint ID number) is set, then we call the client's UpdateLap method, with the trigger's handle and the colliding object's handle as arguments.
You can use onLeaveTrigger in exactly the same way, if you need to know when an object leaves a trigger.
The onTickTrigger method is similar but doesn't have the %obj property. This method is called every time the tick event occurs (10 times a second), as long as any object is present inside the trigger.
Next, we need to place the triggers in our world. We are going to put five triggers in, one at the start/finish line and one at each of the checkpoints.
Launch Koob, go into camera fly mode, and then move to a position overseeing (looking down at) the start/finish line. Go into the World Editor Creator (press F11 followed by F4), and then add a trigger by choosing Mission Objects, Mission, Trigger from the Tree view at the lower right.
Once you have your trigger placed, rotate and position it as necessary underneath the start/finish banner, and resize it to fill the width and the height of the area under the banner. Make the thickness roughly about one-tenth of the width, as shown in Figure 22.3.
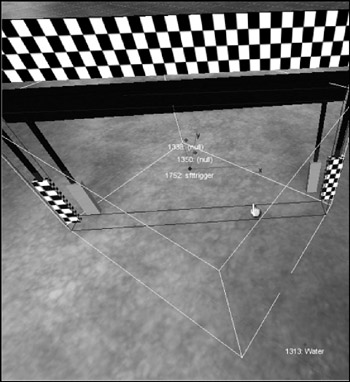
Figure 22.3: Placing a trigger.
Now switch to the World Editor (F3), locate your new object in the hierarchy at the upper right, and click it. In the Inspector frame, click the Dynamic Fields button, and then click Add. When you get the Add Dynamic Field dialog box (see Figure 22.4), enter "cp" in the name field and "0" in the value field, and click OK. Then click the Apply button to commit the changes to the object. What we've done is added a property to the object and named it "cp" with the value 0. We can access this property later from within the program code. The next checkpoint will be numbered 1, the one after that will be 2, next is 3, and finally 4, which is the fifth checkpoint. The numbering proceeds in a counterclockwise direction.
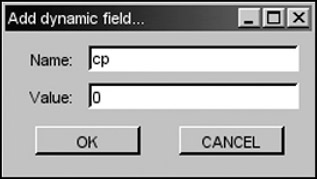
Figure 22.4: The Add Dynamic Field dialog box.
Go ahead and add those checkpoints now, using the same technique as just noted. You can copy and paste the first trigger object to create the rest if you like—just remember to change the cp property accordingly.
| Tip | Some objects behave a little oddly when added via copy and paste.After pasting an object into the world, even though it will be visually selected in the view of the world, it still needs to be selected in the Inspector hierarchy in the upper-right frame. There are times when this may not be strictly necessary, but if you move, rotate, or resize the object by directly manipulating it via the gizmo handles, the changes will not be reflected in the Inspector frame until you reselect the object in the hierarchy. |
Now we have the ability to measure progress around the track. We have to add code to use these triggers, and that will be done as part of the scoring system, which is in the next section.
Scoring
We need to keep track of our accomplishments and transmit those values to the client for display.
Laps and Checkpoints
Open the file C:\koob\control\server\server.cs and put the following code at the end of the GameConnection::CreatePlayer method:
%client.lapsCompleted = 0; %client.cpCompleted = 0; %client.ResetCPs(); %client.position = 0; %client.money = 0; %client.deaths = 0; %client.kills = 0; %client.score = 0;
These are the variables we use to track various scores. Now add the following methods to the end of the file:
function GameConnection::ResetCPs(%client) { for (%i = 0; %i < $Game::NumberOfCheckpoints; %i++) %client.cpCompleted[%i]=false; } function GameConnection::CheckProgress(%client, %cpnumber) { for (%i = 0; %i < %cpnumber; %i++) { if (%client.cpCompleted[%i]==false) return false; } %client.cpCompleted = %cpnumber; return true; } function GameConnection::UpdateLap(%client,%trigger,%obj) { if (%trigger.cp==0) { if (%client.CheckProgress($Game::NumberOfCheckpoints)) { %client.ResetCPs(); %client.cpCompleted[0] = true; %client.lapsCompleted++; %client.DoScore(); if(%client.lapsCompleted >= $Game::NumberOfLaps) EndGame(); } else { %client.cpCompleted[0] = true; %client.DoScore(); } } else if (%client.CheckProgress(%trigger.cp)) { %client.cpCompleted[%trigger.cp] = true; %client.DoScore(); } } function GameConnection::DoScore(%client) { %scoreString = %client.score @ " Lap:" @ %client.lapsCompleted @ " CP:" @ %client.cpCompleted+1 @ " $:" @ %client.money @ " D:" @ %client.deaths @ " K:" @ %client.kills; commandToClient(%client, 'UpdateScore', %scoreString); } Starting from the last, the DoScore method merely sends a string containing scores to the client using the messaging system. The client code to handle this string will be presented in Chapter 23.
Before that is the meat of these particular functions—UpdateLap. You will recall that this is the method that is called for the client from the onEnterTrigger method.
The first thing UpdateLap does is to check to see if this is the first checkpoint, because it has a special case. Because we will start and drive through the first checkpoint at the start/finish line, it can be legitimately triggered without any other trigger events having occurred. We want to check for this condition. We check this by calling CheckProgress to see how many triggers have been passed. If the answer is none (a false return value), then we are starting the race, so we mark this checkpoint as having been completed and update our score to reflect that fact.
If this isn't the first checkpoint, then we want to check if all the checkpoints up until this checkpoint have been completed for this lap. If so, then mark this one completed and update the score; otherwise just ignore it.
Now finally, if we are back at checkpoint 0 and when we check to see if all the other checkpoints have been passed the result is true, then we are finishing a lap. So we increment the lap, reset the checkpoint counters, mark this checkpoint completed, update the score, and then check to see if the race is over—if not, we continue.
The previous method, CheckProgress, is called from UpdateLap and receives the current checkpoint ID number as a parameter. It then loops through the checkpoint array for this client and verifies that all lower-numbered checkpoints have been set to true (they have been passed). If any one of them is false, then this checkpoint is out of sequence and not legitimate. The function then returns false; otherwise all is in order, and it returns true.
And then first, but not least (grins), is the method ResetCPs. This simple method just riffles through the checkpoint array setting all entries to false.
Now there are a few odds and ends to deal with: Earlier in this file, ![]() server.cs, is the StartGame function. Locate it, and add these lines after the last code in there:
server.cs, is the StartGame function. Locate it, and add these lines after the last code in there:
$Game::NumberOfLaps = 10; $Game::NumberOfCheckpoints = 5;
Of course, you should adjust these values to suit yourself. You might want to set NumberOfLaps to a lower number, like 2, for testing purposes. Speaking of testing, if you want to test this, but without having addressed the client-side code first, then you can add some echo statements and view the output in the console window (invoked by pressing the Tilde key). A good place to put such a statement would be just before the CommandToClient call in DoScore. It would look like this:
echo( "Score " @ %scoreString );
Money
Another requirement was to have randomly scattered coins in the game world.
Open C:\koob\control\server\server.cs and locate the function StartGame and add the following line to the end of the function:
PlaceCoins();
Then place the following function just after the StartGame function:
function PlaceCoins() { %W=GetWord(MissionArea.area,2); %H=GetWord(MissionArea.area,3); %west = GetWord(MissionArea.area,0); %south = GetWord(MissionArea.area,1); new SimSet (CoinGroup); for (%i = 0; %i < 4; %i++) { %x = GetRandom(%W) + %west; %y = GetRandom(%H) + %south; %searchMasks = $TypeMasks::PlayerObjectType | $TypeMasks::InteriorObjectType | $TypeMasks::TerrainObjectType | $TypeMasks::ShapeBaseObjectType; %scanTarg = ContainerRayCast(%x SPC %y SPC "500", %x SPC %y SPC "-100", %search- Masks); if(%scanTarg && !(%scanTarg.getType() & $TypeMasks::InteriorObjectType)) { %newpos = GetWord(%scanTarg,1) SPC GetWord(%scanTarg,2) SPC GetWord(%scanTarg,3) + 1; } %coin = new Item("Gold "@%i) { position = %newpos; rotation = "1 0 0 0"; scale = "5 5 5"; dataBlock = "Gold"; collideable = "0"; static = "0"; rotate = "1"; }; MissionCleanup.add(%coin); CoinGroup.add(%coin); } // repeat above for silver coin for (%i = 0; %i < 8; %i++) { %x = GetRandom(%W) + %west; %y = GetRandom(%H) + %south; %searchMasks = $TypeMasks::PlayerObjectType | $TypeMasks::InteriorObjectType | $TypeMasks::TerrainObjectType | $TypeMasks::ShapeBaseObjectType; %scanTarg = ContainerRayCast(%x SPC %y SPC "500", %x SPC %y SPC "-100", %search- Masks); if(%scanTarg && !(%scanTarg.getType() & $TypeMasks::InteriorObjectType)) { %newpos = GetWord(%scanTarg,1) SPC GetWord(%scanTarg,2) SPC GetWord(%scanTarg,3) + 1; } %coin = new Item("Silver "@%i) { position = %newpos; rotation = "1 0 0 0"; scale = "5 5 5"; dataBlock = "Silver"; collideable = "0"; static = "0"; rotate = "1"; }; MissionCleanup.add(%coin); CoinGroup.add(%coin); } // repeat above for copper coin for (%i = 0; %i < 32; %i++) { %x = GetRandom(%W) + %west; %y = GetRandom(%H) + %south; %searchMasks = $TypeMasks::PlayerObjectType | $TypeMasks::InteriorObjectType | $TypeMasks::TerrainObjectType | $TypeMasks::ShapeBaseObjectType; %scanTarg = ContainerRayCast(%x SPC %y SPC "500", %x SPC %y SPC "-100", %search- Masks); if(%scanTarg && !(%scanTarg.getType() & $TypeMasks::InteriorObjectType)) { %newpos = GetWord(%scanTarg,1) SPC GetWord(%scanTarg,2) SPC GetWord(%scanTarg,3) + 1; } %coin = new Item("Copper "@%i) { position = %newpos; rotation = "1 0 0 0"; scale = "5 5 5"; dataBlock = "Copper"; collideable = "0"; static = "0"; rotate = "1"; }; MissionCleanup.add(%coin); CoinGroup.add(%coin); } } The first thing this function does is to obtain the particulars of the MissionArea. For this game, you should use the Mission Area Editor (press F11 followed by F5) to expand the MissionArea to fill the entire available terrain tile.
The %H and %W values are the height and width of the MissionArea box. The variables %west and %south combined make the coordinates of the southwest corner. We uses these values to constrain our random number selection.
Then we set up a search mask. All objects in the Torque Engine have a mask value that helps to identify the object type. We can combine these masks using a bitwise-or operation, in order to identify a selection of different types of interest.
Then we use our random coordinates to do a search from 500 world units altitude downward until we encounter terrain, using the ContainerRayCast function.
When the ray cast finds terrain, we add 1 world unit to the height and then use that plus the random coordinates to build a position at which to spawn a coin. Then we spawn the coin using the appropriate datablock, which can be found in your new copy of ![]() item.cs.
item.cs.
Next, we add the coin to the MissionCleanup group so that Torque will automatically remove the coins when the game ends. We also add it to the CoinGroup in case we want to access it later.
After putting that code in, copy C:\3DGPAi1\RESOURCES\CH22\ITEM.CS over to C:\koob\control\server\misc. You will find the datablocks for the coins (where the coin values are assigned) in there.
Note that when we added the coins in the preceding code, the static parameter was set to 0. This means that the game will not create a new coin at the place where the coin was picked up, if it is picked up. The weapons of the ammo do this, but we don't want our coins to do it. It's a game play design decision.
In addition to the datablocks for the coins in ![]() item.cs, you will also find this code:
item.cs, you will also find this code:
if (%user.client) { messageClient(%user.client, 'MsgItemPickup', '\c0You picked up %1', %this.pickup- Name); %user.client.money += %this.value; %user.client.DoScore(); } The last two statements in there allow the player to accumulate the money values, and then the server notifies the client of the new score. Note that it is similar in that small way to the checkpoint scoring.
Again, until the client code is in place, you can insert echo statements there to verify that things are working properly.
Deaths
We want to track the number of times we die to further satisfy requirements, so open C:\koob\control\server\server.cs, locate the method GameConnection::onDeath, and add these lines at the end:
%this.deaths++; %this.DoScore();
By now these lines should be familiar. We can expand the player death by adding some sound effects and animation. Add the following to the end of C:\koob\control\server\ players\player.cs:
function Player::playDeathAnimation(%this,%deathIdx) { %this.setActionThread("Die1"); } datablock AudioProfile(DeathCrySound) { fileName = "~/data/sound/orc_death.wav"; description = AudioClose3d; preload = true; }; function Player::playDeathCry( %this ) { %client = %this.client; serverPlay3D(DeathCrySound,%this.getTransform()); } The first function, playDeathAnimation, will play the animation sequence we named Die1 in our model. After that is another audio profile, pretty straightforward, followed by the function playDeathCry, which will play that profile's sound effect. These are invoked by two lines that you should place in the OnDisabled function farther back up in the ![]() player.cs file. Add these two lines to OnDisabled just before the call to SetImageTrigger:
player.cs file. Add these two lines to OnDisabled just before the call to SetImageTrigger:
%obj.playDeathCry(); %obj.playDeathAnimation(-1);
One more thing—copy the audio wave file C:\3DGPAi1\RESOURCES\CH22\ORC_ ![]() DEATH.WAV to C:\koob\control\data\sound in order to make the sound work.
DEATH.WAV to C:\koob\control\data\sound in order to make the sound work.
Kills
The victim, who notifies the shooter's client when he dies, actually does the kill tracking. So we go back to GameConnection::onDeath and add this:
%sourceClient = %sourceObject ? %sourceObject.client : 0; if (%obj.getState() $= "Dead") { if (isObject(%sourceClient)) { %sourceClient.incScore(1); if (isObject(%client)) %client.onDeath(%sourceObject, %sourceClient, %damageType, %location); } } This bit of code figures out who shot the player and notifies the shooter's client object of this fact.
Now it is important to remember that all this takes place on the server, and when we refer to the client in this context, we are actually talking about the client's connection object and not about the remote client itself.
Okay, so now let's move on to the client side and finish filling the requirements!
EAN: 2147483647
Pages: 197