Developing with the Logging and Instrumentation Application Block
| The previous section covered the design of the Logging and Instrumentation Application Block and how it can be extended. Admittedly, there's a lot of code that accompanies that section, but that code is solely for the purpose of adding new features to the block. The major design goal for the blockand for Enterprise Library in generalis to make it very simple to create enterprise-level applications. That is the reason why the Logger and tracer façades exist. If you just plan on using the ExtraInformationProviders, distribution strategies, Distributors, Formatters, and Sinks that ship with this block, you will need to write very little code. And the good news is that the components that ship with the block cover the majority of the situations that you may ever encounter. The intent of the extensions shown in the previous section is simply to show that there are options available if none of the components fit your particular needs. Whether you use the out-of-the-box assets or develop extensions for the Logging and Instrumentation Application Block, it is important to understand that writing code to leverage these assets is very straightforward. The bulk of the work that needs to be done is configuring them, not coding against them. Configuring the Logging and Instrumentation Application BlockThere are two parts to the Logging and Instrumentation Application Block: the client side and the distributor side. The client side is responsible for creating the log or trace messages, filtering them as needed, and sending the messages to a distributor via a specific distribution strategy. The distributor receives the log/trace messages and determines how to format and route each message based on its Category. In an asynchronous model, the client and distributor can actually exist on separate physical machines. As such, there are actually two separate configuration sections that get created for the Logging and Instrumentation Application Block: one for the client side and one for the distributor side. Let's start with how to create the client side configuration. Client SettingsThe client settings themselves can be broken down further into two major areas: configuring filters and configuring the distribution strategies. Configuring FiltersLogEntry messages get filtered based on their Category and Priority (the Filtering section earlier in this chapter discussed how this works). These filters get configured on the Client Settings node.
There is one more kind of filter that can be configured on the Client Settings node: the enabling of logging or tracing for all messages. Disabling one of these essentially has the effect of "filtering" all messages for that type of log (i.e., a log message or a trace). The LoggingEnabled and tracingEnabled properties can be used to enable or disable Logging or Tracing respectively. Figure 6.18 highlights the different ways to set filtering criteria in the Logging and Instrumentation Application Block. Figure 6.18. Configuring Filters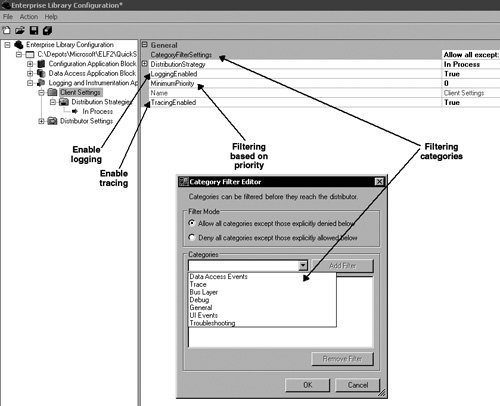 Configuring the Distribution StrategyThe other decision that needs to be made for the client side of logging is whether the log messages should be distributed synchronously or asynchronously. The default is synchronous processing, which uses the InProcLogDistributionStrategy. If the default is chosen, then the client and distributor must remain on the same machine because the distribution of log messages is completed in-process. Enterprise Library ships with the MsmqLogDistributionStrategy as a means for accomplishing asynchronous log distribution. To configure an application to use the MsmqLogDistributionStrategy, the MsmqDistributionStrategyNode first needs to be added as a valid distribution strategy. To add this node, right-click on the Distribution Strategies node in the Enterprise Library Configuration Tool and select New > MSMQ. Then configure the new MsmqDistributionStrategyNode with the location for the queue to which the distribution strategy will write and the Distributor will read. The default is .\Private$\myQueue. Two distribution strategies will now exist under the Distribution Strategies node. The block isn't configured to use the new MsmqLogDistributionStrategy until this distribution strategy is configured as the current one in the Property pane for the Client Settings. Figure 6.19 shows the three steps that are needed to configure the Logging and Instrumentation Application Block to distribute logs asynchronously. Figure 6.19. Configuring Asynchronous Log Distribution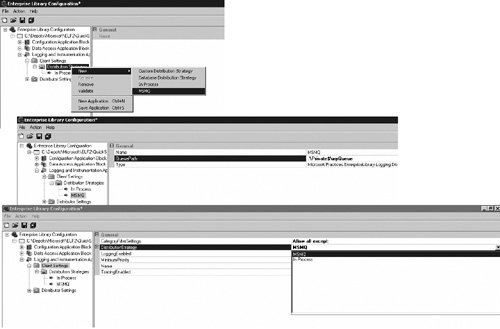 If you've compiled and deployed the Database Distribution Strategy code that accompanies this chapter, you can use that to distribute log messages asynchronously too. The prerequisite to using it is that the Data Access Application Block has already been configured to point to the database where the LogEntries will be stored. The process for configuring the Database Distribution Strategy is outlined earlier in this chapter in the Custom Distribution Strategy section. Distributor SettingsThat is all that is needed to configure the client settings. The Distributor is responsible for formatting and routing the messages that it receives to the Sinks that have been configured to accept them. This equates to the following configuration settings.
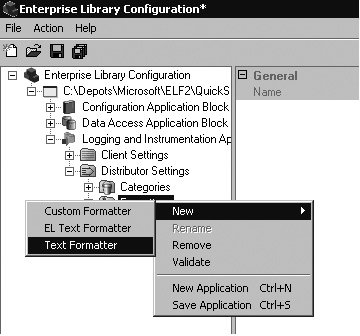
Configuring the DistributorIf the In-Process distribution strategy (the default setting) was left to distribute the log messages to the endpoints, then no configuration needs to be completed for the Distributor. However, if an asynchronous log distribution strategy was selected, the Distributor Service must be configured to match the distribution strategy. That is, if the MsmqLogDistributionStrategy was selected as the distribution strategy in the client settings, then the MSMQ Distributor Service must be configured to receive the LogEntries from the location where the client stored them. If the DatabaseDistributionStrategy was selected, then the Database Distributor Service must be configured to do the same. To configure the Distributor to use the MSMQ Distributor Service, right-click the Distributor Settings node and select New > MSMQ Distributor Service. This adds the MSMQ Distributor Service node to the rest of the nodes under the Distributor Settings hierarchy. Figure 6.20 illustrates how to do this. Figure 6.20. Selecting the MSMQ Distributor Service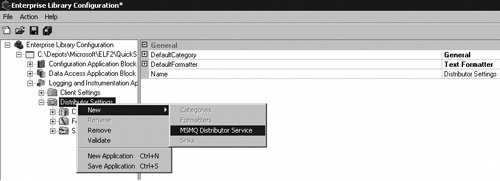 The MsmqPath property, which denotes the location where the MSMQ Distributor Service looks for the log entries, must match the QueuePath property that was configured for the MsmqLogDistributionStrategy. Otherwise, the MSMQ Distributor Service will not find any messages in the queue. Figure 6.21 illustrates how the two settings must match. Figure 6.21. Configuring Asynchronous Distributor Settings to Match Client Distribution Strategy Settings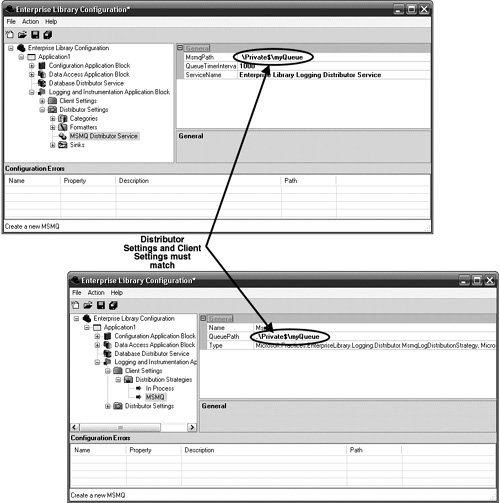 By default, the MSMQ Distributor Service is configured to poll for new messages every 1,000 milliseconds (one second); however, this setting can be changed by setting a different value for the QueueTimeInterval property. If the client settings were configured to use the Database Distribution Strategy included with this chapter, then the Database Distributor Service must also be configured to match the settings of the Database Distribution Strategy. The specifics about configuring the Database Distributor Service are outlined in the Custom Distribution Strategy section earlier in this chapter. Configuring FormattersBy default, the Logging and Instrumentation Application Block is configured with a single TextFormatter whose template will format a LogEntry as: Timestamp: {timestamp} Message: {message} Category: {category} Priority: {priority} EventId: {eventid} Severity: {severity} Title:{title} Machine: {machine} Application Domain: {appDomain} Process Id: {processId} Process Name: {processName} Win32 Thread Id: {win32ThreadId} Thread Name: {threadName} Extended Properties: {dictionary({key} - {value} )}If this template suits the needs for all the LogEntries for your application, you don't need to do any further configuration for Formatters. How ever, if you need to modify this template or add new templates or Formatters, then read on. Figure 6.15 showed the Template Editor in the discussion about the design of the TextFormatter. Modifying a template involves editing the text that exists with the Template Editor's text box. It is this text that is saved in the configuration file with the rest of the Distributor Settings configuration. For your convenience, the Template Editor also provides a drop-down box with a list of available tokens. This is intended to make it easy to add tokens to a template. If you need more than one template because it is necessary to have some LogEntries formatted differently than others, then you need to add a new TextFormatter (or another class that implements that ILogFormatter interface and supports templates) to the configuration settings. To add a new Formatter, and therefore a new template, right-click on the Formatters node and select New > Text Formatter. Figure 6.22 shows how to accomplish this. Figure 6.22. Adding a New TextFormatter Configuring SinksSinks represent the place where the LogEntries will finally reside. Each Sink needs its own unique set of configuration data to determine where the LogEntry will reside. The FlatFileSink, for example, requires a filename, the EmailSink requires the name of an SMTP server, and the DatabaseSink requires the name of a DatabaseInstance. Table 6.8 details how to configure each of the Sinks that ship with Enterprise Library.
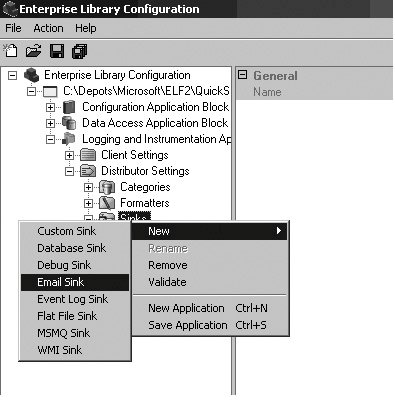
To add a Logging Sink to the configuration information for an application, follow these steps.
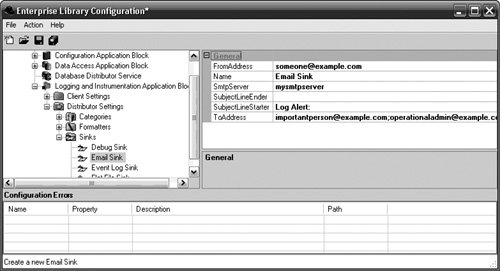
The following example shows how to add and configure an EmailSink.
Optionally, the SubjectLineStarter and SubjectLineEnder properties can be configured so that the text on the subject lines can be customized. The SubjectLineStarter property has been configured to Log Alert: so that every e-mail that gets sent from this Sink will start with a subject line of Log Alert:. Configuring Categories and DestinationsLast but certainly not least are the details for configuring Categories. The configuration for Categories determines how all LogEntries will be formatted and to which Sinks they will be routed. Each Category has a name. For most of the constructs in Enterprise Library, the Name property isn't too important; it is usually just meant to signify a unique way to identify a node in configuration. Category names, however, are more important. It is this name that gets matched to the LogEntry's Category; thus, it ultimately decides which Destinations a LogEntry will be routed to. If no match is made between a LogEntry's Category and one of the configured Category names, the LogEntry will be assigned to the default Category. Changing the name of a Category that is used in an application can easily cause LogEntries to be assigned to the default Category simply because the value for their Category property no longer matches an existing one. To add a Category to an application's configuration information, right-click the Categories node and select New > Category. Add the name for the Category that matches the name of one of the Categories that will be used to log messages. In Figure 6.25, the name of the Category is Bus Layer. Any LogEntries written as Logger.Write("log message", "Bus Layer") will be routed to the Destinations configured for this Category. Figure 6.25. Adding a New Category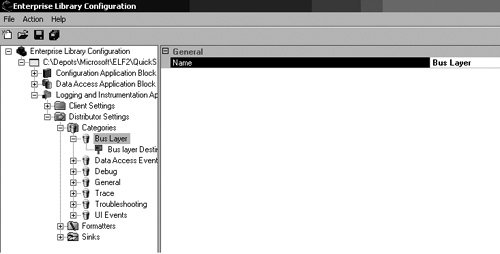 In addition to a name, every Category can be configured with zero or more Destinations. Of course, configuring a Category with no Destinations is not usually very beneficial because the LogEntries won't go anywhere. Therefore, it is a good idea to add at least one Destination. As mentioned before, a Destination is a pairing of a Formatter and a Sink. Consequently, before a Destination can be configured for a Category, you must have already configured the Formatter and Sink that will be used for that Destination. All that is left after that point is to add the Destination node by right-clicking on the Category node and selecting New > Destination and then selecting a Formatter and Sink. Figure 6.26 shows how to configure a Destination with a Formatter and Sink. Figure 6.26. Configuring the Formatter and Sink for a Destination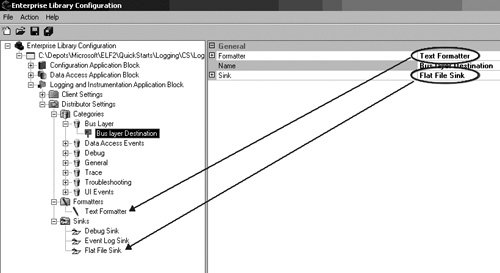 DefaultsIt is possible to configure a Destination without pointing to a Formatter; only the Sink is a required field. It is also possible for a LogEntry to be published with a Category name that doesn't match one of the Categories defined in configuration for that application. The question, then, is what should the Logging and Instrumentation Application Block do when one of these scenarios is encountered? The answer is that it uses the default values for these constructs. The root node for the Distributor Settings allows default values to be specified to let the Logging and Instrumentation Application Block continue functioning when it encounters a Destination without a Formatter or a LogEntry that does not match one of the predefined Categories. The last task that remains to be completed for configuring the Logging and Instrumentation Application Block is to set the default Formatter and Category by selecting the Distributor Settings node and setting the properties accordingly. Each property will provide a drop-down box from which one of the available Formatters and Categories can be selected. Figure 6.27 illustrates this. Figure 6.27. Setting the Default Formatter and Category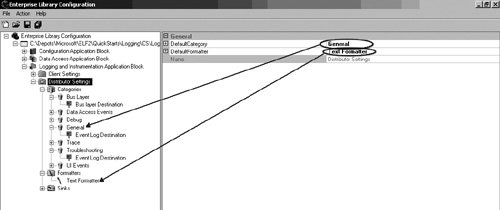 Using the Logging and Instrumentation Application Block's APIA detailed analysis of the logging and tracing features were covered at the beginning of this chapter. This section is meant as a review of this block's API to make logging and tracing messages very straightforward. For more detailed information about how it works beneath the covers, please refer back to the section "Design of the Logging and Instrumentation Application Block" earlier in this chapter. LoggingWhen it comes to developing an application that uses the Logging and Instrumentation Application Block, configuring the application is actually the most complex part. The primary design goal for this block was to make it very simple to develop against it. Therefore, two service façades exist to serve this need. The first is the Logger class. Its principal method for use is its static Write method. For most situations, the overloads for the Write method will provide all the functionality that is needed to log a message. Table 6.9 shows the different signatures for the Write method.
The method that you will probably use the most is the second one, Write(object,string). It is easy to use in that it only takes two parameters (usually just two strings) and robust enough to ensure that the message will get logged to the proper Sink because it includes the name of the Category. The point to remember is that Logger.Write may be the only method that you will have to use to accomplish all the logging needs for an application. Should you need to add more application-specific information to a LogEntry, you can extend the log message in many ways. The most straightforward technique is to add items to the LogEntry's ExtendedProperties dictionary. For more advanced techniques (namely subclassing the LogEntry class), see the subsection Custom LogEntry in the section "Design of the Logging and Instrumentation Application Block" earlier in this chapter. One way to add items to the ExtendedProperties dictionary is illustrated by the last four overloads listed in Table 6.9. These samples show adding items to an object that implement IDictionary (e.g., Hashtable) and then setting the LogEntry's ExtendedProperties dictionary equal to it. Another way is to use the Logger's static SetContextItem method. This method was covered in detail in the section "Design of the Logging and Instrumentation Application Block" of this chapter; however, here's a quick recap. Every LogEntry that is written on the same thread after the SetContextItem method call will contain the additional data that is passed to it. This data is added to every LogEntry's ExtendedProperties dictionary. To flush the data from any future LogEntries for that thread, the FlushContextItems method must be called. Listing 6.28 adds the AppVersion identifier for two LogEntries. Listing 6.28. Adding Contextual Information with SetContext
Using the tracer ObjectTracing entails correlating multiple messages that occur in a particular activity in an application. From a technical perspective, tracing involves logging an initial LogEntry, a final LogEntry, and adding an ActivityId to every LogEntry that occurs between the two. This activity ID allows all of these LogEntries to be grouped as one "activity." Adding tracing to an application is even more straightforward than logging. The constructor for the tracer object creates and sends the initial LogEntry and, if an ActivityId has not already been created, creates a new Guid that represents it. The tracer's Dispose method creates and sends the final LogEntry. The ActivityId is pushed onto an internal stack and every LogEntry that occurs between the constructor and the Dispose method has the ActivityId added as an item to its ExtendedProperties. The bottom line is that the only methods that you need to be concerned about are the constructor and Dispose method. Table 6.10 lists the public constructors for the tracer object.
That's all that you need to know to add tracing to an application. If you're using Visual Basic, you won't be able to leverage the using statement, so you'll need to explicitly call the Dispose method when you're done tracing.[6]
The tracer object also exposes four public static properties to help you determine what the current activity identifier is, what the root (outermost) activity identifier is, what the current Tracer's Category is, and what the root Tracer's Category is. These property names, aptly enough, are CurrentActivityId, RootActivityId, CurrentCategory, and RootCategory respectively. |
EAN: 2147483647
Pages: 103