| Saving a table as a page is the simplest Save As DAP operation. For example, do the following to save the Suppliers table as a Suppliers.htm page: In the Tables page of Northwind.mdb's Database window, right-click the Suppliers table and choose Save As to open the Save As dialog. Change Copy of Suppliers to Suppliers, and select Data Access Page (see Figure 25.1). Click OK to open the New Data Access Page dialog. Figure 25.1. Name the page for the table, and choose Data Access Page in the Save As dialog.  Accept Suppliers.htm as the file name, and click OK to create the file in the current folder. After a second or two, the Suppliers page opens in Page view with a caption, data-entry, standard page navigation section (see Figure 25.2). Figure 25.2. Page view of a table saved as a page is a reasonably close rendition of datasheet view, considering the limitations of HTML. The Suppliers datasheet uses default formatting, which displays a plain-vanilla page.  Opening HTML elements;table cell values> a page in IE 6+ or Page view generates an ADO Recordset object of the updateable snapshot type over the entire table. Specially formatted text boxes (HTML <TEXTAREA> elements) contain cell values of the table. Following are the default display and editing characteristics of a table saved as a page:
The datasheet layout determines the column widths of the page. If the table has a lookup field, the column width of the field is expanded, but the foreign key value not the lookup field value appears in the column. Clicking a field caption sorts the underlying Recordset in ascending order of the field values. For example, clicking Company Name sorts the records in alphabetic order. To restore the original sequence, click the Supplier ID column. The default record navigation control displays 10 records at a time. Recordset navigation progresses by 10-record groups and uses the First, Previous, Next, and Last buttons. Record-selector buttons are bitmap images stored in the Office Web Components (OWC) Data Source control (MSODSC). When you select a record by clicking the record-selector button, the black arrow changes to white and the background changes to a darker shade of gray. The Tab key navigates from left to right by column and the top to bottom by row. Fields with locked values such as Jet AutoNumber fields aren't tab stops. When you reach the last column of the last visible row, the focus changes to the navigation control buttons. Pressing Tab when the focus is on the last navigation control moves to the first editable column of the first row. The  and and  keys don't navigate rows in the current columns. You can assign key names as the value of the AccessKey property of a text box to enable navigation by Alt+Key down but not up the rows of the specified column. The later "Streamlining Data Entry" section describes how to set AccessKey values for columns. keys don't navigate rows in the current columns. You can assign key names as the value of the AccessKey property of a text box to enable navigation by Alt+Key down but not up the rows of the specified column. The later "Streamlining Data Entry" section describes how to set AccessKey values for columns. The Tab key positions the insertion point after the last character of an editable cell. You must manually select the entire field (press Shift+Home or Shift+) if you want the text that you type to replace rather than extend the existing value. Jet Hyperlink fields display the text but not the link; thus, Jet hyperlinks aren't operable. This is the opposite of the behavior of Hyperlink fields that you add to DAP from the Field List. Field- and table-level validation rules for Jet tables and CHECK CONSTRAINTs for SQL Server tables work as expected, and referential integrity rules are enforced. For example, attempting to delete a Supplier record that has dependent records in the Products table displays the messages shown in Figure 25.3. Figure 25.3. Users receive a warning message before deleting a record. If deleting the record violates referential integrity rules, a single message from Jet or two messages from SQL server explain the reason for denying the deletion operation.  The Input Mask property of fields is ignored. You must write VBScript event-handling code to implement after-entry input masks, such as the >LLLLL mask for the CustomerID field of the Customers table. For this example, the event handler must apply the ucase function to the entry, test for the correct number of characters, and use the asc function to verify that only letters are present.
Tip  | For a VBScript workaround for lack of Input Mask capability in pages, see the "ACC2002: Data Access Page Ignores Underlying Table's Input Mask" Knowledge Base article at http://support.microsoft.com/support/kb/articles/Q299/0/09.ASP. |
Web pages aren't as effective as Access datasheets for bulk data-entry operations because keyboard shortcuts for editing operations such as copying field values from the preceding row aren't available in IE. Enhancing the Page's Appearance A few simple design changes can dress up the table-based page and improve the usefulness of the display. The following sections offer suggestions for making table-based pages resemble the style of pages that you create in Page Design view or that the Layout Wizard creates for you. Adding Heading Elements with the Script Editor  Unlike pages that you create from scratch, pages saved from datasheets don't have empty <H1> and <H2> elements for adding a heading and explanatory text to the table. Adding elements to table-based pages requires adding HTML code with the Script Editor. Unlike pages that you create from scratch, pages saved from datasheets don't have empty <H1> and <H2> elements for adding a heading and explanatory text to the table. Adding elements to table-based pages requires adding HTML code with the Script Editor.
 To review use of the Microsoft Script Editor, see "The Microsoft Script Editor," p. 1012. To review use of the Microsoft Script Editor, see "The Microsoft Script Editor," p. 1012.
To add <H1> and, optionally, <H2> elements, do the following:  With the Suppliers page open, change to Page Design view and click the Microsoft Script Editor button to open the source window for your page. With the Suppliers page open, change to Page Design view and click the Microsoft Script Editor button to open the source window for your page.
By default, the Script Editor adds HTML tag names in lower case, which conforms to XHTML standards; RPT2DAP.xsl generates upper-case tag names. To change the tag name case, choose Tools, Options, to open the Options dialog. Expand the Text Editor and HTML nodes, and select Format. Select Uppercase in the Generated HTML list. If you want to make your changes more evident, mark the Tag Start: Before and Tag End: After check boxes (see Figure 25.4). Click OK to close the Options dialog. Figure 25.4. The Script Editor defaults to lowercase tags. You change to uppercase tags in the Option Dialog's HTML Format page. You also can specify line breaks in the code before and after tag pairs. 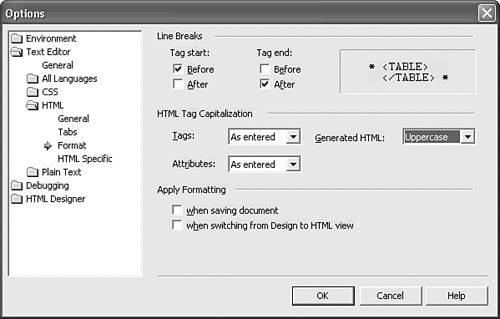 Tip You can reduce toolbar clutter by choosing View, Toolbars, and toggling the Design, Formatting, and Text Editor toolbars off. Only the Standard toolbar is useful for the HTML editing examples in this chapter. After the <TITLE> tag, change Suppliers to Suppliers Table Data Entry. Press Ctrl+F to open the Find dialog, type body, and press Alt+F twice to locate the <BODY> tag that follows the </HEAD> tag. Move to the end of the line, and press Enter to create a new line. Type <h2, which opens the HTML statement-completion window and selects the H2 item. Double-click H2 and type > to create an <H2></H2> tag pair. Type the title that you added in step 4 between the tag pair as the heading for the form. As you add the HTML content, Page Design view displays the changes. Optionally, add a <P></P> tag element;adding to table-based pages> element;adding to table-based pages> pair with explanatory text after the heading. To center the lines, type a <CENTER> tag before the <H2> element, and type </CENTER> after the </P> element. Remove the extra </CENTER> and <CENTER> tags that the statement completion feature adds (see Figure 25.5), and close the Script Editor. Figure 25.5. The HTML code between the <CENTER> and </CENTER> tags adds an 18-point heading and a text paragraph to the page. 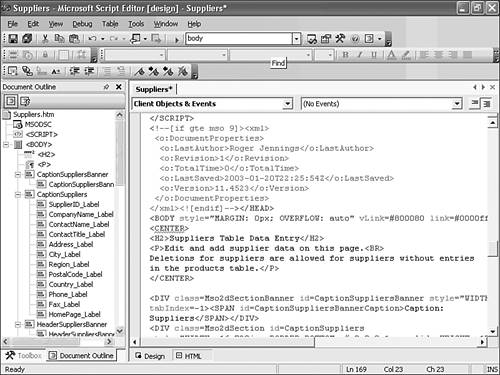 Tip Close the Script Editor before making further changes in Page Design view. If you leave the Script Editor open it's difficult and sometimes impossible to alter control positions or sizes.  Return to Access, select all captions, and click the Bold button. Press Ctrl+S to save your changes. Return to Access, select all captions, and click the Bold button. Press Ctrl+S to save your changes.
 Change element;adding to table-based pages> element;adding to table-based pages> to Page view to check your work so far (see Figure 25.6). Change element;adding to table-based pages> element;adding to table-based pages> to Page view to check your work so far (see Figure 25.6).
Figure 25.6. The added HTML code of Figure 25.5 provides the heading and text shown here. After you add the elements, you can edit their text in Page Design view. 
Note If you've specified a default theme, the styles of the theme determine the color, font, and size attributes of the elements that you add. Otherwise, the attributes default to the standard style for DAP.
Modifying Fixed Page Layout and Design Elements A few additional design changes make the page more attractive and make the appearance conform to the DAP that you created from scratch in Chapter 24, "Designing and Deploying Data Access Pages." The sections of DAP that you save from Access objects have fixed positions and dimensions, so you must change section property values to alter the overall design of the page. To make the form-based design of saved datasheets resemble the standard format of the other pages you've created, using the Suppliers.htm page as an example, do the following: Return to Page Design view, and double-click the Caption: Suppliers section heading to open its properties window. Change the BackgroundColor property value to steelblue and the Height to 25px.  Select all the captions, open the Fore/Font Color picker, and click the white square. Select all the captions, open the Fore/Font Color picker, and click the white square. With all captions selected, drag the captions down one grid dot. Change the Supplier ID caption to ID and decrease its width to fit the text. Decrease the width of the Supplier ID text box to match the width of the ID caption, and select and drag the remaining text boxes to the left. Dragging the text boxes also drags the labels. The Home Page hyperlink field isn't functional in the Suppliers page, because the page link isn't present. Delete the field and its caption. The width of the active area of the page is set by the fixed Width property of the record navigation section. Double-click the NavigationSuppliers section, and set the Width property value to 13.75in. To add a small margin around the page elements, open the Script Editor and change the <BODY style="MARGIN: 0px attribute to 17px. Press Ctrl+S to save the edits, close the Script Editor, and change to Page view to review your work (see Figure 25.7). Figure 25.7. Adding a background color to the caption, reducing the width of the Supplier ID column, and adding a margin improves the appearance of the page. 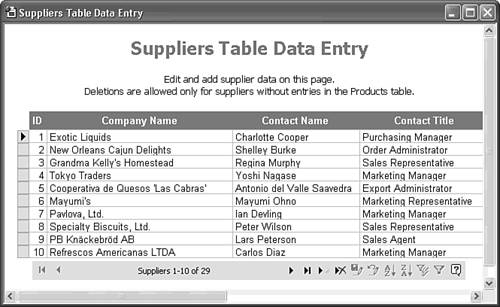
Streamlining Data Entry The width of the sections exceeds the visible page widths on ordinary monitors, so editing values in more than one row of columns that aren't visible is a painfully slow process. Tabbing through columns and then rows causes the display to flash, which leads to data-entry operator fatigue. To navigate by rows of a particular column, you add AccessKey property values to each updateable field. Access key column navigation is limited to the number of rows displayed by the Header section. The 10-row default creates a page that resembles a form more than a Web page. Forms usually have about a 4:3 width-to-height aspect ratio to avoid scrolling the form, but users are accustomed to scrolling Web pages vertically. Displaying more rows of the table in a group aids navigation, especially when combined with column access keys. To add and test AccessKey values for the columns of the sample Suppliers.htm page and increase the number of rows on the page, do this: In Page Design view, double-click the Company Name text box to open the Text Box: CompanyName window. Click the Other tab and type 1 as the AccessKey value. Alternatively, type a letter that's easier to reach with a thumb or finger on the Alt key. Select each text box in sequence, and specify a different AccessKey value. This example uses 1, 2, 3, ... 0 for the 10 active fields of the Suppliers table. (SupplierID is an AutoNumber or identity field, so it isn't active.) Right-click the page and choose Group Level Properties to open the Group Level: Suppliers window, and set the DataPageSize property value to a larger number. Select All if you want to scroll the entire Recordset. Press Ctrl+S to save your changes, and then open the page in Web Page Preview. Click the Company Name header to sort the page by company. Press Alt+5 (or the letter that you chose) to move the insertion point to the end of the City name in the first row (see Figure 25.8). Pressing the same key combination repeatedly scrolls the City column. When you reach the last row of a list that's less deep than IE's window, the insertion point returns to the first row of the City column. Otherwise the insertion point returns to the first row of the page. Figure 25.8. You can sort the page by clicking a column heading or selecting a column and clicking the A-Z or Z-A buttons. This view is sorted by city. Pressing Alt+AccessKey navigates horizontally to the designated column and then vertically through the rows. 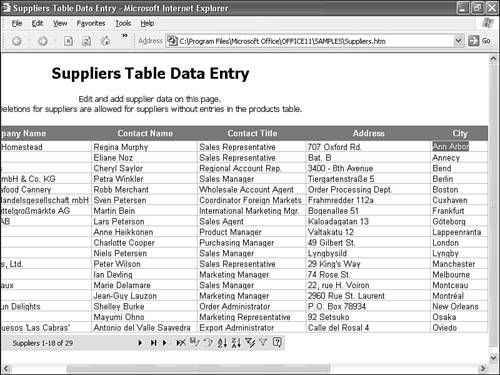
Unfortunately, you can't freeze fields to make the Supplier ID and Company Name field visible while you edit other fields. It's a good practice to delete buttons in the PageNameNavigation section that aren't necessary for data entry. For example, the Help button opens the "About Data Access Pages" help topic; installing the Office Web Components (OWC) 11 runtime on client PCs adds this help file. The help file contains more information than most data-entry operators need. Depending on your application, you might want to remove the filter buttons. To remove a button, in Page Design view, select the button and press Delete. Removing unneeded buttons also improves page performance. To make the data entry page available to users, see "Delivering Pages on an Intranet or the Internet," p. 1057.
 | If you encounter problems opening the page from a networked computer other than the one on which you're designing the page, see the "Data Source Problems" topic of the "Troubleshooting" section near the end of the chapter. |
|