| The Page Wizard is the quickest route to creating DAP from multiple related tables. The Page Wizard lets you specify individual table fields for multiple record groupings. In this case, you group products by their category. To generate a page to display related records from the Categories, Products, and Suppliers tables, do the following:  With the Pages shortcut selected in the Database window for Northwind.mdb, double-click the "Create Data Access Page by Using Wizard" shortcut to open the first Page Wizard dialog. With the Pages shortcut selected in the Database window for Northwind.mdb, double-click the "Create Data Access Page by Using Wizard" shortcut to open the first Page Wizard dialog.
In the Tables/Queries list, select Table: Categories, and then double-click CategoryName in the Available Fields list to add the field to the Selected Fields list. Repeat step 2, adding the ProductID, ProductName, and UnitPrice fields of the Products table, and the CompanyName field of the Suppliers table to the Selected Fields list (see Figure 24.11). Figure 24.11. Add the CategoryName, ProductID, ProductName, UnitPrice, and CompanyName fields from the Categories, Products, and Suppliers tables in the first Page Wizard dialog. 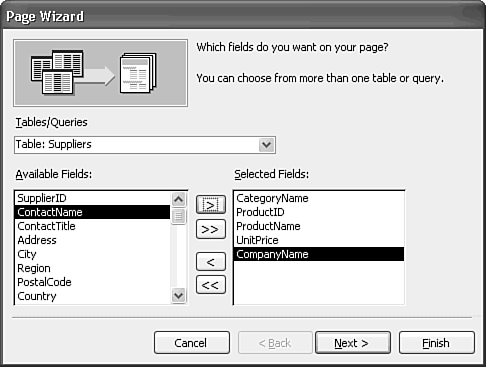 Click Next to open the second Wizard dialog for grouping levels. Grouping levels in DAP are similar to those for Access reports. Select the CategoryName field on which to group Products records (see Figure 24.12), and click Next to open the third Wizard dialog. Figure 24.12. The Page Wizard's grouping dialog is identical to the Report Wizard's second dialog. This report uses the CategoryName field to group product records. 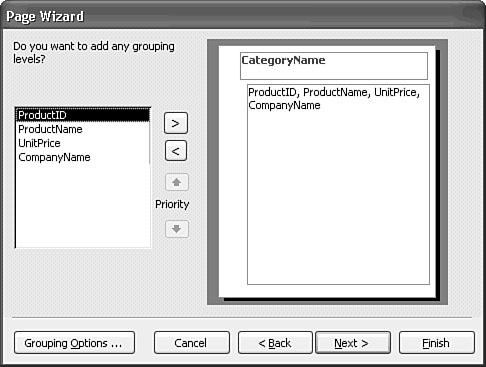 Open the first sort order drop-down list and select ProductName for an alphabetic sort on the names of products within the selected category (see Figure 24.13). Click Next to open the final Wizard dialog. Figure 24.13. The third Page Wizard dialog duplicates the Report Wizard's sorting dialog. 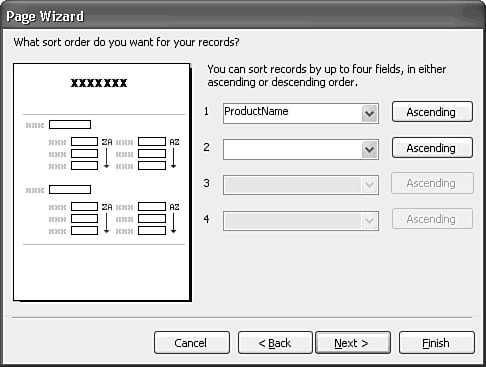 Type an appropriate title, such as Products and Suppliers by Category, in the text box. Accept the default Modify the Page's Design option, and mark the check box titled Do You Want to Apply a Theme to Your Page? (see Figure 24.14). Figure 24.14. The last Page Wizard offers the option to apply a standard theme to your page. 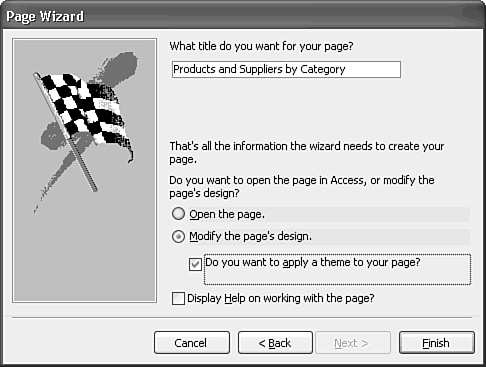 Tip If you marked Microsoft Office, Office Tools, Themes as Not Available when installing Office 2003, clear the Do You Want to Apply a Theme to Your Page? check box. You receive a non-fatal error message if the Wizard can't find themes on your fixed disk or load them from the CD-ROM. Click Finish to initiate creation of the page. After a few seconds of disk activity, the Theme dialog appears with the default Straight Edge item selected. Choose Profile (see Figure 24.15) or another theme that you like better. Figure 24.15. Profile is one of many themes that Office 2003 installs by default. The Background Image check box is cleared to remove the patterned background. 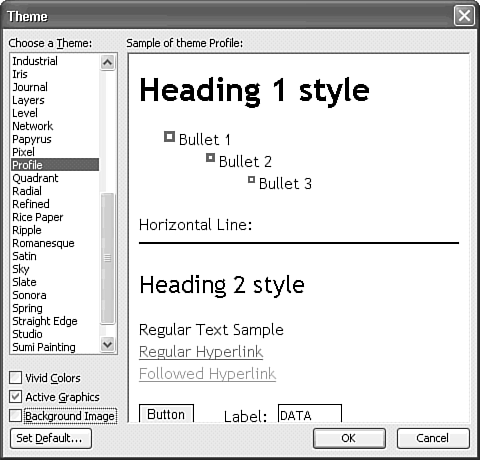 Note Profile without a background is one of the more conservative themes in the list; most themes in the Choose a Theme list are additional themes that load on first use. You can make Profile the theme for successive pages by clicking Set Default and clicking Yes to close the Set Default Themes message box. Themes are a set of CSS with predefined fonts and background graphics. Marking the Active Graphics check box enables bullet images to change when clicked. Marking the Vivid Colors check box changes the heading and button colors from black to red. Clearing the Background Image check box removes the background bit map. Click OK to close the Theme dialog and display your new page in Design view. Replace Click Here and Type Title Text line with the title that you chose in step 6 (see Figure 24.16). Figure 24.16. You must add the page title manually to complete the initial design. The space between the title and the first header holds an empty text block. 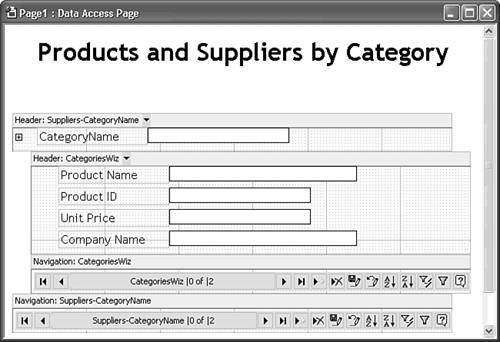   Click the Page View button to execute the page's source code and emulate its appearance in IE 5.5. Click the Expand button to display the first record of the Beverages category (see Figure 24.17). Click the Page View button to execute the page's source code and emulate its appearance in IE 5.5. Click the Expand button to display the first record of the Beverages category (see Figure 24.17).
Figure 24.17. The plain-vanilla, columnar pages that the Wizard creates won't win any graphic design awards. The CategoriesWiz and Suppliers CategoryName <SPAN> elements in the navigation controls could use a bit of improvement also.  Save the page with an appropriate name, such as ProductsAndSuppliersByCategory.htm, in your working or ...\Office\Samples folder. Note If you receive "A link to this Data Access Page could not be created because the database cannot be exclusively locked" error, close any other DAP open in IE or Notepad, and then save the page. Acknowledge the warning message about the use of absolute paths for page files (see Figure 24.18). Figure 24.18. This warning message appears when you save a page with a connection to a Jet .mdb file in your working folder. 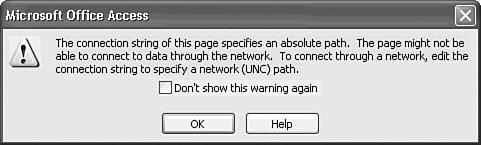
Making DAP Updatable By default, DAP aren't updatable. To make the innermost section updatable, you must specify the table that supplies the section's data as the UniqueTable property value. Change to Design view, right-click inside the CategoriesWiz section, and choose Section Properties to open the Section: HeaderCategoriesWiz properties dialog. Click the Data tab and select Products from the UniqueTables list (see Figure 24.19). Figure 24.19. Making fields in the Products table updatable requires specifying Products as the value of the UniqueTable property. 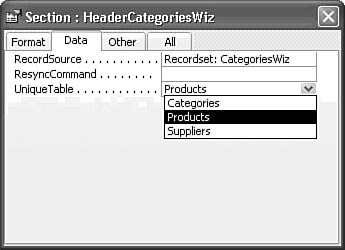 Tip Be judicious when enabling updates with DAP. Anyone with a copy of the page that has the UniqueTables property value set can wreak havoc on a back-end Jet database. The default connection string uses your Admin account or the account you created in the Admins group for a secure database. Secure your Jet back-end or use SQL Server tables with integrated Windows authentication for any page you want to make updatable by authorized users.
Exploring CSS Files in the Page's Subfolder When you save DAP that have themes applied, Access creates a subfolder named PageName_files ProductsAndSuppliersByCategory_files, for this example that stores the theme style sheets (.css files), the graphics files (.gif or .jpg files), and a list of the files (filelist.xml) for the page (see Figure 24.20). Double-clicking filelist.xml displays its text in IE 5.5 (see Figure 24.21). Figure 24.20. The PageName_files subfolder stores the XML file list, CSS files, and .gif images for the page theme that you select. If you select (No Theme) in the Theme dialog's Choose a Theme list, Access doesn't create the subfolder. 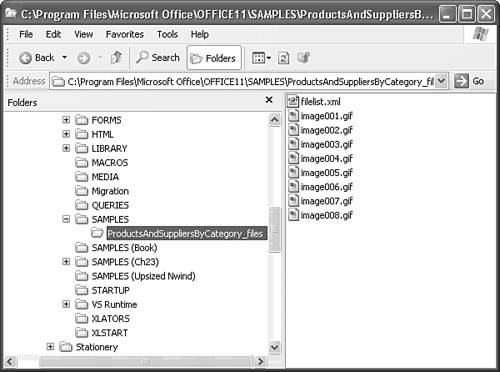 Figure 24.21. The filelist.xml file is a well-formed XML document that lists the sequentially numbered files for the selected page theme. 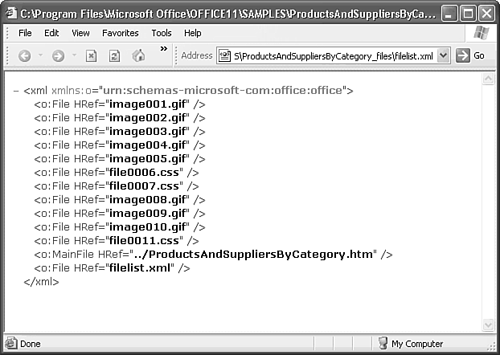  For the definition of a well-formed XML document and other XML-related terms, see "Gaining an XML Vocabulary," p. 944. For the definition of a well-formed XML document and other XML-related terms, see "Gaining an XML Vocabulary," p. 944.
Note The link from the MainFile to filelist.xml is relative. If you relocate PageName.htm, you must also relocate the PageName_files subfolder and its contents to the folder containing PageName.htm. Double-click .css files to open them in the Microsoft Development Environment (another name for the Script Editor) or FrontPage 2003; .gif files usually open in Microsoft Photo Editor. Installing other Microsoft and third-party software, however, often changes file associations.
 | See the "DAP Lose Their Style" topic in the "Troubleshooting" section near the end of the chapter for the symptoms of lost filelist.xml and .css files. |
 | The ProductsAndSuppliersByCategory.htm page and its subfolder are located in the \Seua11\Chaptr24 folder of the accompanying CD-ROM. The data source for this chapter's Jet examples is C:\Program Files\Seua11\Chaptr24\Data24.mdb. If you've installed the files from the CD-ROM in a different location, you must open the .htm files in Notepad and change the Data Source property value to the correct path (refer to Figure 24.6). |
Tip To prevent the default theme that you chose from applying to all DAP that you create, open a page that uses the default theme in Page Design view. Then choose Format, Theme, select (No Theme) in the Choose a Theme list, and click the Set Default button. Click Yes to confirm your action, and close the page without saving the changes to preserve the page's theme. If you want to remove the theme from your page and use the designer's default formatting, save the changes.
|