Modifying the Properties of a Form or Control After Testing
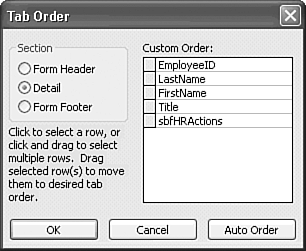
| The entries you added and edited gave you an opportunity to test your form. Testing a form to ensure that it accomplishes the objectives you have in mind usually takes much longer than creating the form and the query that underlies it. During the testing process, you might notice that the order of the fields isn't what you want or that records in the subform aren't displayed in an appropriate sequence. The following two sections deal with modifying the properties of the form and subform control. Changing the Order of Fields for Data EntryThe order in which the editing cursor moves from one field to the next is determined by the Tab Order property value of each control. The Form Wizard established the tab order of the controls when you first created the form. The default Tab Order property of each field is assigned, beginning with the value 0, in the sequence in which you add the fields. Because the Form Wizard created a single-column form, the order of the controls in HRActions is left to right, top to bottom. The tab order originally assigned doesn't change when you relocate a control. To change the sequence of entries for example, to match the pattern of entries on a paper form follow these steps:
Note Using the Auto Order button to change the tab order of fields on a form also changes the left-to-right order of the table fields in Datasheet view to correspond to the Auto Order field sequence. Datasheet and other views of the frmHRActions form has been disabled, which you can prove by opening the View button's menu. Removing Fields from the Tab OrderAccess lets you set the value of the Tab Stop property to No to prevent controls from receiving the focus in the tab order. To remove a control from the tab order, select the control, open the Properties window, select Other, and change the value of the Tab Stop property to No. You can't edit the EmployeeID field, so set the Tab Stop property to No for this control. Note Setting the Tab Stop property's value to No doesn't disable a given control, but it removes the control from the tab sequence. As a result, the control can't be selected by pressing the Tab key, but can still be selected by clicking it with the mouse. |
EAN: 2147483647
Pages: 417
